What is platformio?
![]()
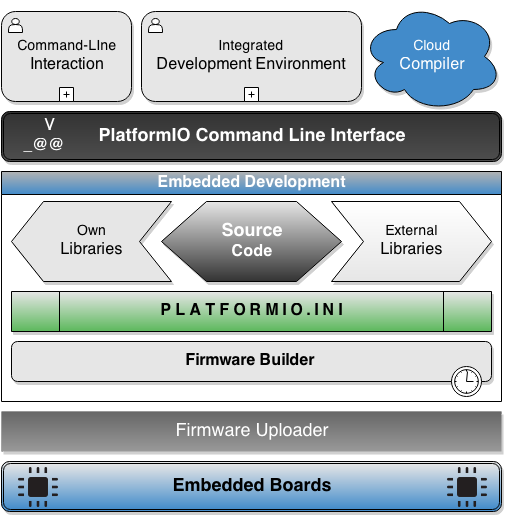
Platformio is cross platform code builder and library manager with tons of platforms and boards already available. It takes care of toolchains, debuggers, frameworks that work on most popular platforms like Windows, Mac and Linux. It supports more than 200 development boards along with more than 15 development platforms and 10 frameworks. So most of popular boards are covered.
In Layman’s terms
Platformio is a development environment, like Arduino, but for tons of frameworks and boards.
How does it work?
- We define a Project Configuration File
platformio.ini. We can choose board(s), frameworks and so on. - Based on this list of boards, PlatformIO downloads required toolchains and installs them automatically. Users develop code and PlatformIO makes sure that it is compiled, prepared and uploaded to all the boards of interest.
The docs
Here you can find the docs.
Installation
To download and install platformio, it is best to follow it’s own guide. Since it’s based on Python, we can use pip (Pip Installs Python or PIP Installs Packages):
➜ pip install -U platformioInstallation guide
You can find it here
Atom users
Platformio has an Atom GUI. Check it out here!
Platformio structure
The PlatformIO based Project has the next structure:
platformio.ini(Project Configuration File)srcdirectory where you should place source code (.h, .c, .cpp, .S, *.ino, etc.)libdirectory can be used for the project specific (private) librariesboardsdirectory for custom specific boards
PROJECT
- platformio.ini
|-- src
|   main.cpp
|   main.h
|   ...
|-- lib
|   Input
|   |-- input.cpp
|   |-- input.h
|   Output
|   |-- output.cpp
|   |-- output.h
|   ...
|-- boards
|   board_definition.json
platformio.ini
The platformio.ini file is a configuration file where we define the way we want our project to be compiled, linked and to communicate with our board:
General
- platform: the development platform name. For example:
atmelavr. - framework: the framework, for example:
arduino. - board: if the board is a generic board, such as an Arduino UNO, NodeMCU, etc., some of the configs can be definde here.
Build options
Here we can define many specific options, such as board speed (i.e. external clock: 20MHz).
Upload with different programers
https://docs.platformio.org/en/latest/platforms/atmelavr.html#upload-using-programmer
More advanced configurations here.
Fuses
We can set the fuses with an extra script:
extra_scripts = extra_script.pyextra_script.py:
Import('env')
env.Replace(FUSESCMD="avrdude $UPLOADERFLAGS -e -Ulfuse:w:0x5E:m")
Check the fuses
Check the fuses in a GUI (only MAC users) with AVR Fuses tool
Or in a more advanced configuration with the fuses section of the board’s json.
Libraries
Include libraries from different sources with the Library Manager of platformio. You can use the library search command to find them.
Beware of the version!
Each library is done for an specific framework and cannot be compiled for your board. Finding a library in github does not mean that it’s compatible with everything, and platformio provides with a great dependency manager built-in.
In order to include a non-private-library in your project (remember those go in the lib folder) you can include it in the platformio.ini file with one of these options:
lib_deps =
  13 ; version ID from the platformio
  PubSubClient ; library name
  ArduinoJson@~5.6,!=5.4 ; library name with specific version
  https://github.com/gioblu/PJON.git#v2.0 ; library from github with specific version
  me-no-dev/ESPAsyncTCP
  IRremoteESP8266=https://github.com/markszabo/IRremoteESP8266/archive/master.zip
Example
; PlatformIO Project Configuration File

[env:myenv]
platform = atmelavr
framework = arduino
upload_protocol = usbtiny
board = attiny44 ; or the filename of the json describing the board
extra_scripts = extra_script.py

; Build options
build_flags =
    -DF_CPU=20000000L

; Serial Monitor options
monitor_speed = 115200

; Libraries
lib_deps =
  13
Documentation of platformio.ini
You can find it here
Folder structure
src
In this folder we put the main code of our board. In our code, we can include as many libraries as we need, from either the public libraries from our framework, which platformio will manage automatically, or private libraries from the lib folder.
lib
Folder hosting private project libraries.
boards
Folder hosting specific board configurations in json format. As an example:
{
  "build": {
    "core": "arduino",
    "extra_flags": "-DARDUINO_AVR_ATTINYX4 -DF_CPU=20000000L",
    "f_cpu": "20000000L",
    "mcu": "attiny84",
    "variant": "tiny14"
  },
  "frameworks": [
    "arduino"
  ],
  "fuses":
  {
    "low": "0x5E",
    "unlock": "0x3F"
  },
  "name": "Generic ATTiny84",
  "upload": {
    "extra_flags": "-e",
    "maximum_ram_size": 512,
    "maximum_size": 8192,
    "protocol": "usbtiny"
  },
  "url": "http://www.atmel.com/devices/ATTINY84.aspx",
  "vendor": "Generic ATTiny"
}
In this file, we can define compiler flags and programming flags, similarly to the ones from the makefile:
PROJECT=led_button
SOURCES=$(PROJECT).c
MMCU=attiny44
F_CPU = 20000000

CFLAGS=-mmcu=$(MMCU) -Wall -Os -DF_CPU=$(F_CPU)
CLI
The most common way to use platformio is through it’s core. In here, we will detail some of the most useful and common commands.
Initialise the project
Simply go to an existing folder and type in:
pio init --board XYZThe list of available boards can be listed by:
pio boards atmelavrSince we have many, we can grep:
pio boards atmelavr | grep uno
uno                   ATMEGA328P     16MHz     31.50KB 2KB    Arduino Uno
elektor_uno_r4        ATMEGA328PB    16MHz     31.50KB 2KB    Elektor Uno R4
the_things_uno        ATMEGA32U4     16MHz     28KB    2.50KB The Things Uno
Then, we can use the the platformio.ini file to finish tweaking some details as shown above.
PIO?
Platformio, for short, can be called from the terminal via pio. platformio works as well.
Compile
Once you have something in the src directory, type in:
pio runThis will compile your project and put it in the hidden .pioenvs directory.
.pioenvs folder
Do not delete this folder, as the necessary files for your project reside there!
Flash
If you want to flash your board, just type:
pio run -t uploadSerial monitor
To open the serial interface:
pio device monitor -b 115200And that’s it!
Libraries
The most interesting feature of platformio can be it’s library manager. We can look for libraries with the command:
pio lib search radiohead
...
TinyHead
========
#ID: 6014
Arduino library for ATtiny85 communicating with 433Mhz transmitter, RadioHead based.

Keywords: radiohead, tinyhead, 433mhz
Compatible frameworks: Arduino
Compatible platforms: Atmel AVR
Authors: Thijs van Ulden

---
...