MIT APP INVENTOR

This is a collection/instructions on how to make phone (android) Interface applications with MitAppInventor webapp . You will need an arduino or similar board with serial-bluetooth-wifi capabilities
Now-a-days the world is in the search of comfort, making IoT devices is the best solution to ease the lifestyle. Like we can control home appliances, door-locks, machines using smartphones or webserver. Here, we are also doing the same using an Android app designed by MIT App Inventor.
MIT App Inventor is an open-source web application for Android. Originally it was created by Google, but now it is maintained by the Massachusetts Institute of Technology (MIT). By using MIT app inventor a beginner can also create software applications for Android easily. MIT app inventor uses graphical interface, in which users can drag-and-drop visual objects to create an application that can run on Android devices.
After designing app on MIT app inventor, you can download it on your Android phone using the QR code, or you can download its APK on your PC and later install it on your smartphone.
APP Inventor + Wifi ESP8266/ESP32

- click here to download full code
- click here to download the example precompiled android apk
- click here to download mit app inventor uncompiled example app
Components required
- NodeMCU
- Laptop
- Digital output (integrated led gpio13 barduino in this example)
- Jumper Wires(maybe)
Programming Code Explanation
click here to download full code
The complete code for the project of controlling home appliances using MIT designed Android app is given at the end. Below we are explaining the function of the code, so that you can understand how the code is actually working.
Include the libraries for ESP8166 wifi module, and enter the wifi name and password.
#include <WiFi.h>
 #include <WiFiClient.h>
 #include <WebServer.h>
 #include <ESPmDNS.h>
 const char* ssid = "put your wifi name here";//"Enter Your WiFi Name "
 const char* password = "put your wifi password here";//"Enter Your WiFi Password"
 // Create an instance of the server
 // specify the port to listen on as an argument
 WiFiServer server(80);
In void setup function, the function will try to connect to the wifi. This process executes in the loop, means it will run until it connects to wifi. So, be careful before entering your wifi name and password.
void setup() {
  Serial.begin(115200);
  delay(10);

  // prepare GPIO2
  pinMode(13, OUTPUT);
  digitalWrite(13, 0);

  // Connect to WiFi network
  Serial.println();
  Serial.println();
  Serial.print("Connecting to ");
  Serial.println(ssid);

  WiFi.begin(ssid, password);

  while (WiFi.status() != WL_CONNECTED) {
    delay(500);
    Serial.print(".");
  }
  Serial.println("");
  Serial.println("WiFi connected");

  // Start the server
  server.begin();
  Serial.println("Server started");

  // Print the IP address
  Serial.println(WiFi.localIP());
}
In void loop, it will check for client availability and perform the actions according to inputs.
void loop() {
  // Check if a client has connected
  WiFiClient client = server.available();
  if (!client) {
    return;
  }

  // Wait until the client sends some data
  Serial.println("new client");
  while(!client.available()){
    delay(1);
  }
//Response to the client request to avoid error 1101
client.println("HTTP/1.1 200 OK");
client.println("Content-Type: text/html");
client.println("");
client.println("<!DOCTYPE HTML>");
client.println("<html>");
client.println("</html>");


  // Read the first line of the request
  String req = client.readStringUntil('\r');
  Serial.println(req);
  client.flush();

  // Match the request
  int val;
  if (req.indexOf("/gpio/0") != -1)
    val = 0;
  else if (req.indexOf("/gpio/1") != -1)
    val = 1;
  else {
    Serial.println("invalid request");
    client.stop();
    return;
  }

  // Set GPIO2 according to the request
  digitalWrite(13, val);

  client.flush();

  // Prepare the response
  String s = "HTTP/1.1 200 OK\r\nContent-Type: text/html\r\n\r\n<!DOCTYPE HTML>\r\n<html>\r\nGPIO is now ";
  s += (val)?"high":"low";
  s += "</html>\n";

  // Send the response to the client
  client.print(s);
  delay(1);
  Serial.println("Client disonnected");

  // The client will actually be disconnected
  // when the function returns and 'client' object is detroyed
}
Now to check whether your web server is working or not, navigate to your browser and use the following URLs to ON or OFF your light. for that you will need to be conected to the same wifi network as your ESP
http://192.168.1.40/gpio/1
http://192.168.1.40:/gpio/0
Where 192.168.1.40 is NodeMCU’s IP address. You can find your NodeMCU’s IP address in the serial monitor. When you run the code in Arduino IDE, it will print your device’s IP address on the serial monitor. Therefore, it will be confirmed that the webserver is working or not.
Create an Android APP using MIT App Inventor
Now we will create an android app using MIT app Inventor to control light using the following steps:
First of all go to the MIT app inventor’s website: http://ai2.appinventor.mit.edu/
Then click on ‘Create apps’ on the top right corner.

Now in the next screen click on ‘Projects’ and then ‘Start new project’.

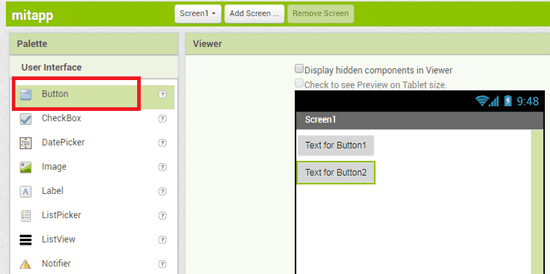
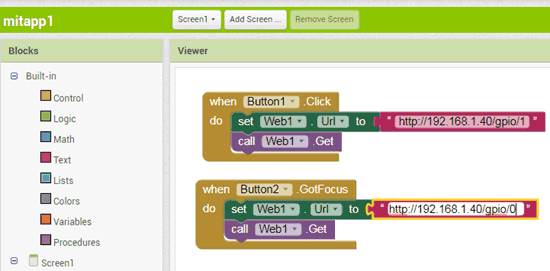
Now click on ‘Button’ and drag and drop two buttons on the main screen. You can enter the name of your choice on the buttons from the options on the right side.
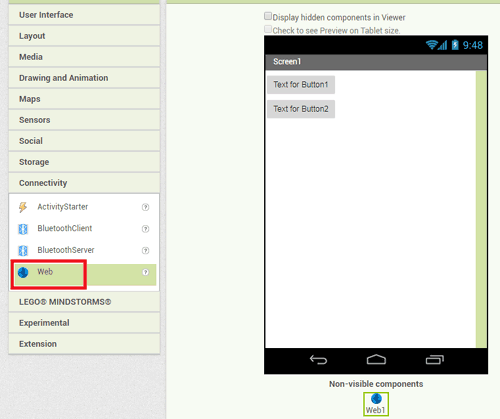
After this click on the ‘connectivity’ and drag and drop the web component on the main screen.
Now click on the ‘Blocks’ to add blocks in your app.
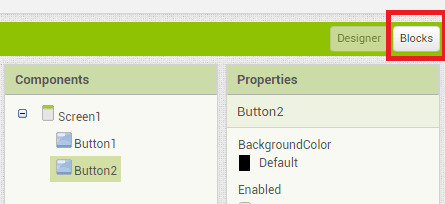
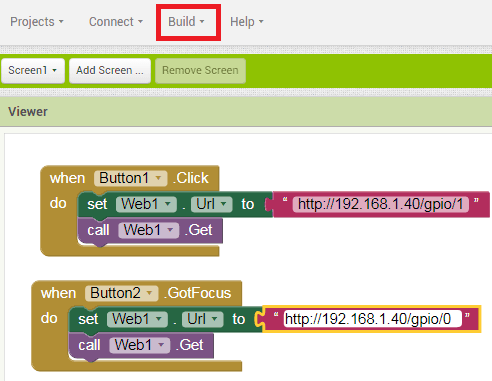
Now in blocks menu click on the button1 and then click on the marked red option.
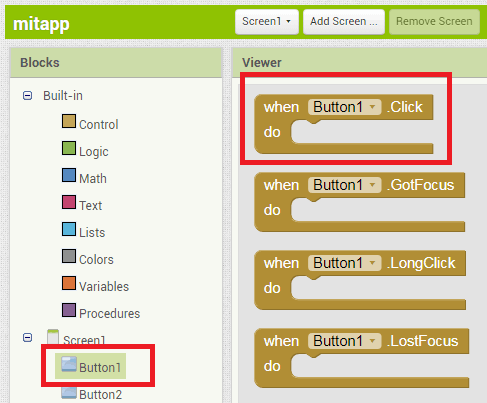
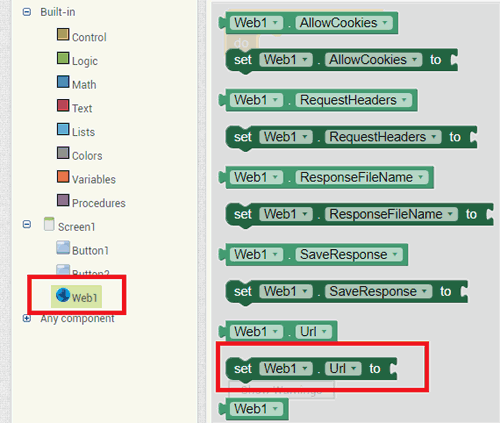
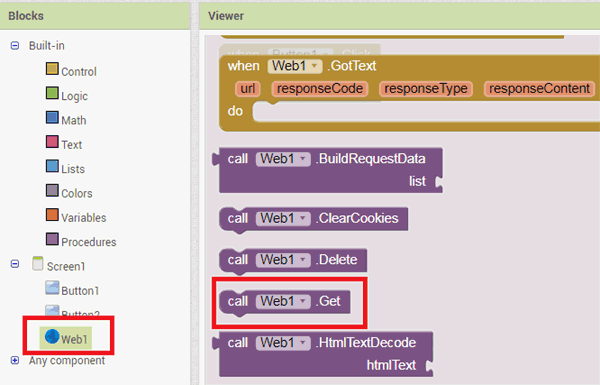
After this click on web1. Scroll down and choose the red marked block.
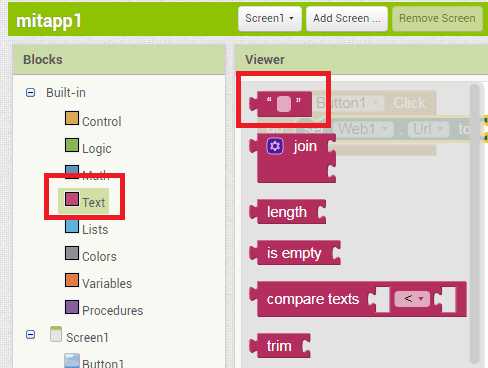
Now click on the text menu and choose the first option. Enter your URL in the text menu.
After this click on the web1 again and then choose the marked red option.
Follow the same procedure for the ‘Button2’
Now the app is ready to download, simply click on ‘Build’ to get he apk file . Also, there are two options to download the app apk, by the QR code and directly on PC, then later install it on the Android.
Now your app is ready, and you can control the light using the on-off buttons presented on the app.
APP Inventor + Bluetooth HC08 +Arduino compatible board + Sensor


Arduino Code
#include <SoftwareSerial.h>
SoftwareSerial BT1(4,2);      // RX, TX recorder que se cruzan

void setup()
   { Serial.begin(9600);
     Serial.println("Enter AT commands:");
     BT1.begin(9600);
     pinMode(A0, INPUT);
    pinMode(9, OUTPUT);

   }

void loop()
   {  int mois = analogRead(A0);
    if (BT1.available())
          Serial.write(BT1.read());


      if (Serial.available())
         { char c = Serial.read() ;
           Serial.print(c);
           BT1.write(c);

         }
         BT1.print(mois);
         delay(1000);
   }
ESP8266 Controlled with Android App (MIT App Inventor)
Firebase ESP32
