Week 1
Assignement
- Work through a git tutorial.
- Build a personal site in the class archive describing you and your final project.
Learning outcomes
- Explore and use website development tools.
- Formulate a final project proposal.
- Identify version control protocols.
Student should have
- Made a website and described how you did it.
- Introduced yourself.
- Described and made a sketch of your final project.
- Documented steps for uploading files to archive.
- Pushed to the class archive.
Git Introduction
Git is a version control system (VCS) for tracking changes in computer files and coordinating work on those files among multiple people. It is primarily used for software development,but it can be used to keep track of changes in any files. As a distributed revision control system it is aimed at speed, data integrity,and support for distributed, non-linear workflows.
Fab Academy Archive Structure
Each lab will have its own repository. Students will push their documentation to this shared repository.
All the repositories are then merged into a single tree available at:
http://archive.fabacademy.org/archives/2017
- /master/ The main index repository, schedule, classes, videos,etc
- /doc/ Tutorials and projects
- /labname_repo/ Individual Lab repositories
For example, the Fab Lab Barcelona repository is:
http://git.fabacademy.org/fabacademy2017/fablabbcn
and is published as:
http://archive.fabacademy.org/archives/2017/fablabbcn
This is updated every time one pushes to the repositories.
Each student has his/her own folder in the repository: http://archive.fabacademy.org/archives/2017/fablabbcn/students/student_number_id
Please, check your student id before setup the repository. Your student id is the same you got when you did Fab Academy application.
Git Tutorial
REGISTER
- Login/create account to: fablabs.io
- Go to http://git.fabacademy.org/ and login with your fablabs.io credentials. Once you have your username of fablabs.io (and you logged in once to git.fabacademy.org) send it to your instructor so he can add you to the group of your fablab.
- Add a ssh-key to your account.
GENERATE A SSH Key
GIT Authentication
Git is a distributed version control system, which means you can work locally but you can also share or "push" your changes to other servers. Before you can push your changes to a GitLab server you need a secure communication channel for sharing information. GitLab uses Public-key or asymmetric cryptography which encrypts a communication channel by locking it with your "private key".
So first, you need to generate a SSH Key.
An SSH key allows you to establish a secure connection between your computer and GitLab. Before generating an SSH key in your shell, check if your system already has one by running the following command ( Terminal in Mac/Linux or Console in Windows ):
cat ~/.ssh/id_rsa.pub
If you see a long string starting with ssh-rsa, you can skip the ssh-keygen step.
Note: It is a best practice to use a password for an SSH key, but it is not required and you can skip creating a password by pressing enter. Note that the password you choose here can't be altered or retrieved.
To generate a new SSH key, use the following command:
ssh-keygen -t rsa -C "$your_email"
This command will prompt you for a location and filename to store the key pair and for a password. When prompted for the location and filename, just press enter to use the default. If you use a different name, the key will not be used automatically.
Use the command below to show your public key:
cat ~/.ssh/id_rsa.pub
Please copy the complete key starting with ssh-rsa and ending with your username and host. To copy your public key to the clipboard, use the code below. Depending on your OS you'll need to use a different command:
Windows: clip < ~/.ssh/id_rsa.pub
Mac: pbcopy < ~/.ssh/id_rsa.pub
GNU/Linux (requires xclip): xclip -sel clip < ~/.ssh/id_rsa.pub
Setting up your SSH Keys on Gitlab
Once you generated your SSH Key, you then add your public key to your profile, following this screencast can help.
INSTALL GIT
- Download and install: git
If it offers you to install git-bash, choose yes. For all the other choices you can leave the default option.
CLONE ARCHIVE
- Open a Terminal (Linux/Windows) or the GitBash (Windows).
-
Navigate to the folder where you want to store the folder with the Archive. For example:
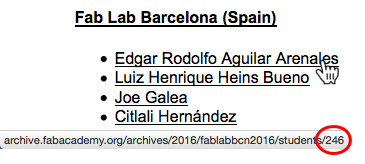
cd ~/Desktop/3. Clone the archive.git clone git@git.fabacademy.org:fabacademy2017/fablabbcn.git4. Input your name (change John Doe to your name).git config --global user.name "John Doe"5. Input your email (change johndoe@example.com to your email).git config --global user.email johndoe@example.com6. Now you should have a folder "fablabbcn" which contains all the websites of students in Barcelona. 7. Hovering over the link with your name on the students-page should reveal your number.

This is the number of your folder under fablabbcn/students/ where you should put the index.htm of your website.
UPDATE ARCHIVE
Check the file-size of your folder! You should commit 1-2MB per week. Not more! Run the following command (Terminal or GitBash) in your folder to see folder and file-sizes:
du -sk * | sort -n
Each time you want to update your website, you should go through the following commands:
```
cd ~/Desktop/fablabbcn
git pull
<change files>
git status
git add .
git commit -m "<commit message>"
git push
```
change files means that at this point you copy/replace the files in your folder.
commit message write a meaningful commit message. For example: "uploading final project idea".
If something goes wrong, restart from the beginning (git pull).
If you end up in Vim-Editor, quit without saving by typing: :q!
Your website might not update in your Browser until you clear the cache. If you still get error messages, study git or write an Email to your instructor.