CAP-MIDI
An English translation and cleaned-up setup guide for CAP MIDI, a Raspberry Pi Pico board that turns capacitive touch into a small keyboard or instrument controller.
What CAP MIDI Is
CAP MIDI is a development board that uses the Raspberry Pi Pico's capacitive-touch capability. The board can be used as a touch keyboard, a simple instrument, or another interactive input device that reacts to touch instead of mechanical switches.
Raspberry Pi Pico
The Raspberry Pi Pico is a very small microcontroller. It includes GPIO pins that let it communicate with other electronic parts, which makes it useful for small embedded projects like touch instruments and experimental interfaces.
Embedded Programming
The Pico supports several programming languages. This CAP MIDI documentation uses Python because it is approachable for beginners and easy to work with during testing. The original notes also mention that C is more efficient and can be used on the Pico as well.
Capacitive Touch
Capacitive touch is the same sensing approach commonly used in laptop trackpads, tablets, and phone screens. Instead of pressing a physical button, the user changes the electrical field on a conductive pad, and the controller reads that change as input.
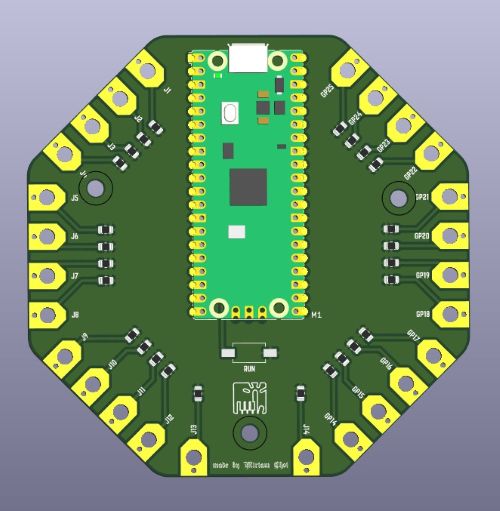
Board Documentation
Front board view
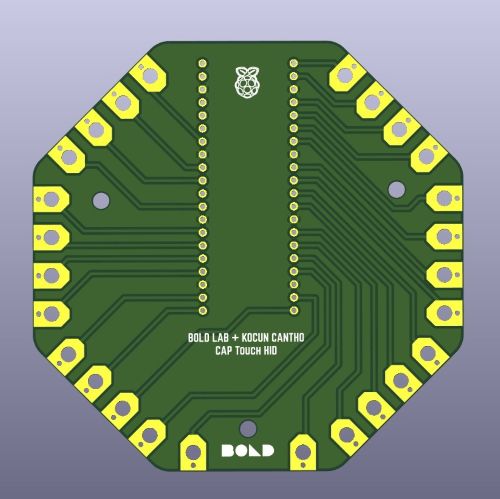
Back board and touch area
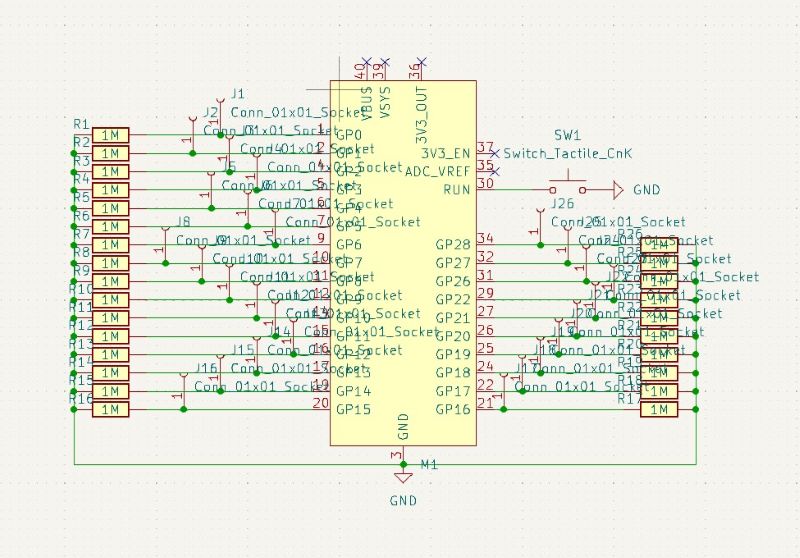
Schematic overview
Before We Begin
Before using CAP MIDI, prepare the board, firmware, and editor. The original Notion documentation focuses on getting the Raspberry Pi Pico ready with CircuitPython and then working directly on the board through Thonny.
- Download the Raspberry Pi Pico
.uf2firmware file from the CircuitPython website. - Install Thonny or another editor that can write files directly to the board.
- Prepare the Adafruit CircuitPython libraries you need and copy them into the
libfolder on theCIRCUITPYdrive. - Use a stable USB connection and handle the connector carefully to avoid damaging the board.
Recovery note: If uploads fail or the board stops responding, disconnect it, hold the BOOTSEL button, reconnect the USB cable, and then release the button. This returns the Pico to its initial boot mode so you can reflash the firmware.
Handling note: The original documentation warns that the USB connector area can be damaged if the cable is pulled carelessly. Hold the connector body when plugging or unplugging the CAP MIDI board.
Bill of Materials (BOM)
Main physical parts used for the CAP MIDI build shown on this page.
| Item # | Ref. | Item | Description | Package | Link |
|---|---|---|---|---|---|
| 1 | U1 | Raspberry Pi Pico | Microcontroller used as the core of the CAP MIDI board. | Module | Raspberry Pi |
| 2 | PCB | CAP MIDI PCB | Custom board with capacitive touch pads and routing for the Pico. | Custom PCB | Board doc |
| 3 | TP1-TPn | Capacitive touch pads | Conductive touch areas used as the playing surface and input triggers. | PCB pads | Pad view |
| 4 | CASE-1 | Case body | 3D-printed enclosure body for protecting the board. | STL / print | STL |
| 5 | CASE-2 | Case lid | Matching top piece for the CAP MIDI enclosure. | STL / print | STL |
Installation and Programming
CircuitPython is used here because it makes microcontroller programming easier to learn and easier to update. The translated instructions below condense the original Notion steps into a cleaner workflow.
1. Install CircuitPython on the Pico
- Download the Raspberry Pi Pico
.uf2firmware file from the CircuitPython website. - Connect the Pico while holding the
BOOTSELbutton if it does not already appear as a storage device. - Copy the downloaded
.uf2file onto the Pico drive. - Wait for the board to restart and appear as the
CIRCUITPYdrive.
2. Work with Thonny
- Connect the board to your computer.
- Open Thonny and install or select CircuitPython support for the board.
- After the Pico restarts, connect to the CircuitPython device from Thonny.
- Copy the required Adafruit libraries into the
libfolder on theCIRCUITPYdrive. - Open or create your Python file in Thonny and save it directly onto the board.
The original notes mention that Arduino IDE can also be used, but Thonny is the main workflow documented for CAP MIDI.
Using CAP MIDI
Once the board is flashed and the required libraries are copied over, CAP MIDI can be used as a touch-based controller. The documented workflow is to connect it by USB, open a compatible synth or MIDI target, and test the touch pads as note triggers or input buttons.
- Connect the CAP MIDI board to your computer over USB.
- Make sure the
CIRCUITPYdrive and your code file are present. - Open a web synth such as Dot Piano to test interaction.
- Touch each conductive area and confirm the board responds consistently.
- Adjust your code thresholds or pad mapping if a touch is too sensitive or not sensitive enough.
HID keyboard starter
This example demonstrates a basic HID keyboard setup using CircuitPython. Make sure to copy the required Adafruit HID libraries into the board's lib folder first.
In this code, each touch pad on the CAP MIDI board is mapped to a specific keyboard key. When a pad is touched, the corresponding key is sent to the connected computer. if you are running on thonny you can also debug if your resistor is soldered well also.
import time
import board
import touchio
import usb_hid
import digitalio

from adafruit_hid.keyboard import Keyboard
from adafruit_hid.keycode import Keycode

kpd = Keyboard(usb_hid.devices)

# Setup LED toggling
led = digitalio.DigitalInOut(board.LED)
led.direction = digitalio.Direction.OUTPUT

# Define the touch pins
touch_pins = [board.GP0, board.GP1, board.GP2, board.GP3, board.GP4, board.GP5, board.GP6, board.GP7, board.GP8, board.GP9, board.GP10, board.GP11, board.GP12, board.GP13, board.GP14, board.GP15, board.GP16, board.GP17, board.GP18, board.GP19, board.GP20, board.GP21, board.GP22, board.GP26, board.GP27, board.GP28]

# Initialize touch sensors
touch_sensors = []
for pin in touch_pins:
    try:
        touch_sensors.append(touchio.TouchIn(pin))
    except ValueError:
        print(f"No pulldown resistor found on pin {pin}, skipping...")

# Keymap configuration
KEYMAP = (
    ("A", [Keycode.A]), #gp00
    ("B", [Keycode.B]), #gp01
    ("C", [Keycode.C]), #gp02
    ("D", [Keycode.D]), #gp03
    ("E", [Keycode.E]), #gp04
    ("F", [Keycode.F]), #gp05
    ("G", [Keycode.G]), #gp06
    ("H", [Keycode.H]), #gp07
    ("I", [Keycode.I]), #gp08
    ("J", [Keycode.J]), #gp09
    ("K", [Keycode.K]), #gp10
    ("L", [Keycode.L]), #gp11
    ("M", [Keycode.M]), #gp12
    ("N", [Keycode.N]), #gp13
    ("O", [Keycode.O]), #gp14
    ("P", [Keycode.P]), #gp15
    ("Q", [Keycode.Q]), #gp16
    ("R", [Keycode.R]), #gp17
    ("S", [Keycode.S]), #gp18
    ("T", [Keycode.T]), #gp19
    ("U", [Keycode.U]), #gp20
    ("V", [Keycode.V]), #gp21
    ("W", [Keycode.W]), #gp22
    ("X", [Keycode.X]), #gp26
    ("Y", [Keycode.Y]), #gp27
    ("Z", [Keycode.Z]) #gp28
)

print("\nWelcome to keypad")
print("keymap:")
for key_name, _ in KEYMAP:
    print("\t", key_name)

# Initialize variables to track key state
key_states = [False] * len(touch_pins)

# Main loop
while True:
    # Check each touch sensor
    for i, sensor in enumerate(touch_sensors):
        # If the capacitive touch is activated
        if sensor.value:
            # If the key was not already pressed
            if not key_states[i]:
                print(KEYMAP[i][0])  # Print the key name
                # Send HID keyboard commands corresponding to the key
                for keycode in KEYMAP[i][1]:
                    kpd.press(keycode)
                    led.value = True

                key_states[i] = True  # Update key state
        else:
            # If the key was previously pressed, release it
            if key_states[i]:
                # Release all keys associated with this key
                for keycode in KEYMAP[i][1]:
                    kpd.release(keycode)
                    led.value = False

                key_states[i] = False  # Update key state
    time.sleep(0.1)  # Add a small delay to debounce