Electronics Design
Group assignment requirements
The group assignment for this week is the following: - Use the test equipment in your lab to observe the operation of a microcontroller circuit board (as a minimum, you should demonstrate the use of a multimeter and oscilloscope) - Document your work on the group work page and reflect what you learned on your individual page
## Multimeter

Describe/list the available features and key settings of a Multimeter.
Continuity test
The continuity test is a test performed to confirm if an electrical circuit is open or closed. The multimeter is able to determine that by measuring the resistance in the circuit. We conducted a continuity test on a PCB to confirm that all the tracks are connected correctly.
[add your observations about the process]
Voltage level
measure the voltage level at various points of the microcontroller board, a lot of the boards will have a 5v pin and a 3v pin.
We measured the voltage level at various points of the microcontroller board, we found the following values:
[MEASURED VALUE] at the [pin]
[MEASURED VALUE] at the [pin]
Power up any analog sensor and measure the output voltage.
We also measured the voltage of the [SENSOR NAME] analog sensor. [write a brief description about the sensor and how it works and what it measures]
Using the multimeter, we were able to see how the voltage value was changing with the change of the [WHATEVER THE SENSOR MEASURES]. The voltage measured was in a range of [MAX]v and [MIN]v.
Oscilloscope
Describe/list the available features and key settings of an Oscilloscope.
Voltage level - sensor
Power up any analog sensor and measure the output voltage
We also used the oscilloscope to measure the voltage of the [SENSOR NAME] analog sensor.
Using the oscilloscope, we were able to see how the voltage value was changing with the change of the [WHATEVER THE SENSOR MEASURES].
[compare between using the multimeter vs the oscilloscope for the sensor measuring. Which one was faster, worked better, which one did you prefer?]
Voltage level blink test
Program your board to blink an LED on and off, connect the Oscilloscope to the led pin and observe the signal
We programmed the microcontroller board to blink on and off and observed the signal going to the LED.
INCLUDE THE BLINK CODE
Using the Oscilloscope we were able to see the voltage level pulsing on and off. We are also able to adjust the view to be able to see the signal closely.
[A video of the voltage changing in the oscilloscope]
Voltage level PWM test
Program your board to fade an LED on and off, connect the Oscilloscope to the led pin and observe the signal
Pulse Width Modulation (PWM), works by adjusting the width of digital pulses used to control output devices which simulates analog signals, allowing us to be able to control the level of led brightness for example instead of simply toggling it on and off.
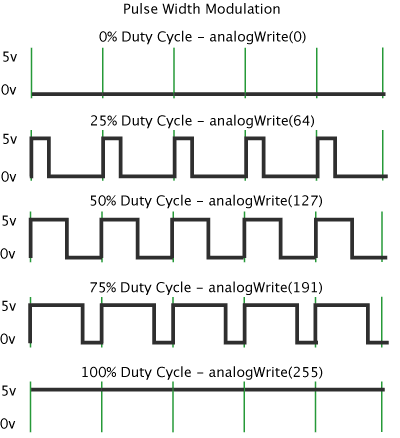
We programmed our LED to fade on and off using PWM and observed its behavior using the Oscilloscope.
INCLUDE THE FADE CODE
Using the Oscilloscope we were able to see the voltage modulation and what the PWM signal looked like and how the led corresponds to that signal. We are also able to adjust the view to be able to see the signal closely.
[A video of the voltage changing in the oscilloscope]