Introduction
This week was about combining the separate parts of DESKO into one complete system. Before this stage, I had already tested the main parts separately, but the final project needed everything to work together inside one object.
The main focus was the physical and electronic integration of the clock: display, buttons, NeoPixels, buzzer, wiring, power, enclosure, and code.
Made a plan for system integration
DESKO is built around the ESP32-C3. It controls the e-paper display, NeoPixels, buzzer, buttons, alarm, countdown, stopwatch, and the local web interface.
The system is divided into these parts:
| Part | Role |
|---|---|
| ESP32-C3 | Main controller |
| E-paper display | Clock and menu display |
| NeoPixels | Ambient light, wake-up light, countdown feedback |
| Buttons | Local control |
| Buzzer | Alarm and countdown sound |
| Enclosure | Holds all components together |
The goal was to make the device work as one object, not as separate test circuits.
System diagram
              Buttons
                 |
                 v
Phone/Computer -> ESP32-C3 -> E-paper display
   Web UI          |
                  |---- NeoPixels
                  |
                  |---- Buzzer
                  |
                  |---- Power input
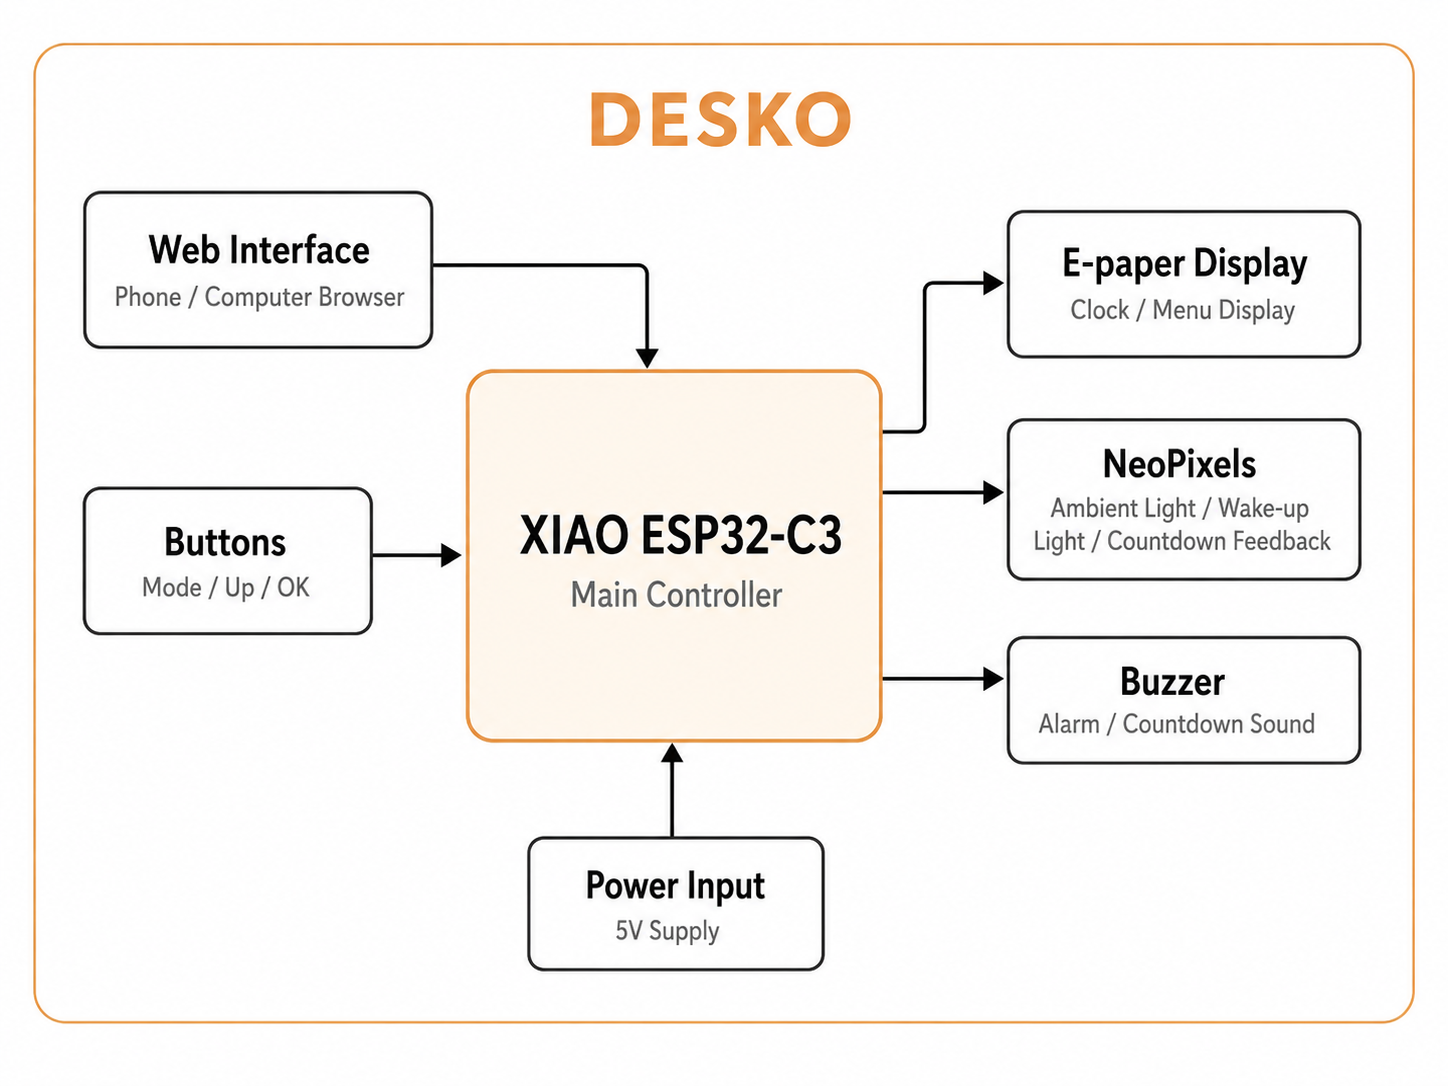
(Also a system diagram created by ChatGPT.)
The buttons and the web interface both control the same functions. This means DESKO can be used directly from the device or from a browser.
Documented the plan with CAD and sketches
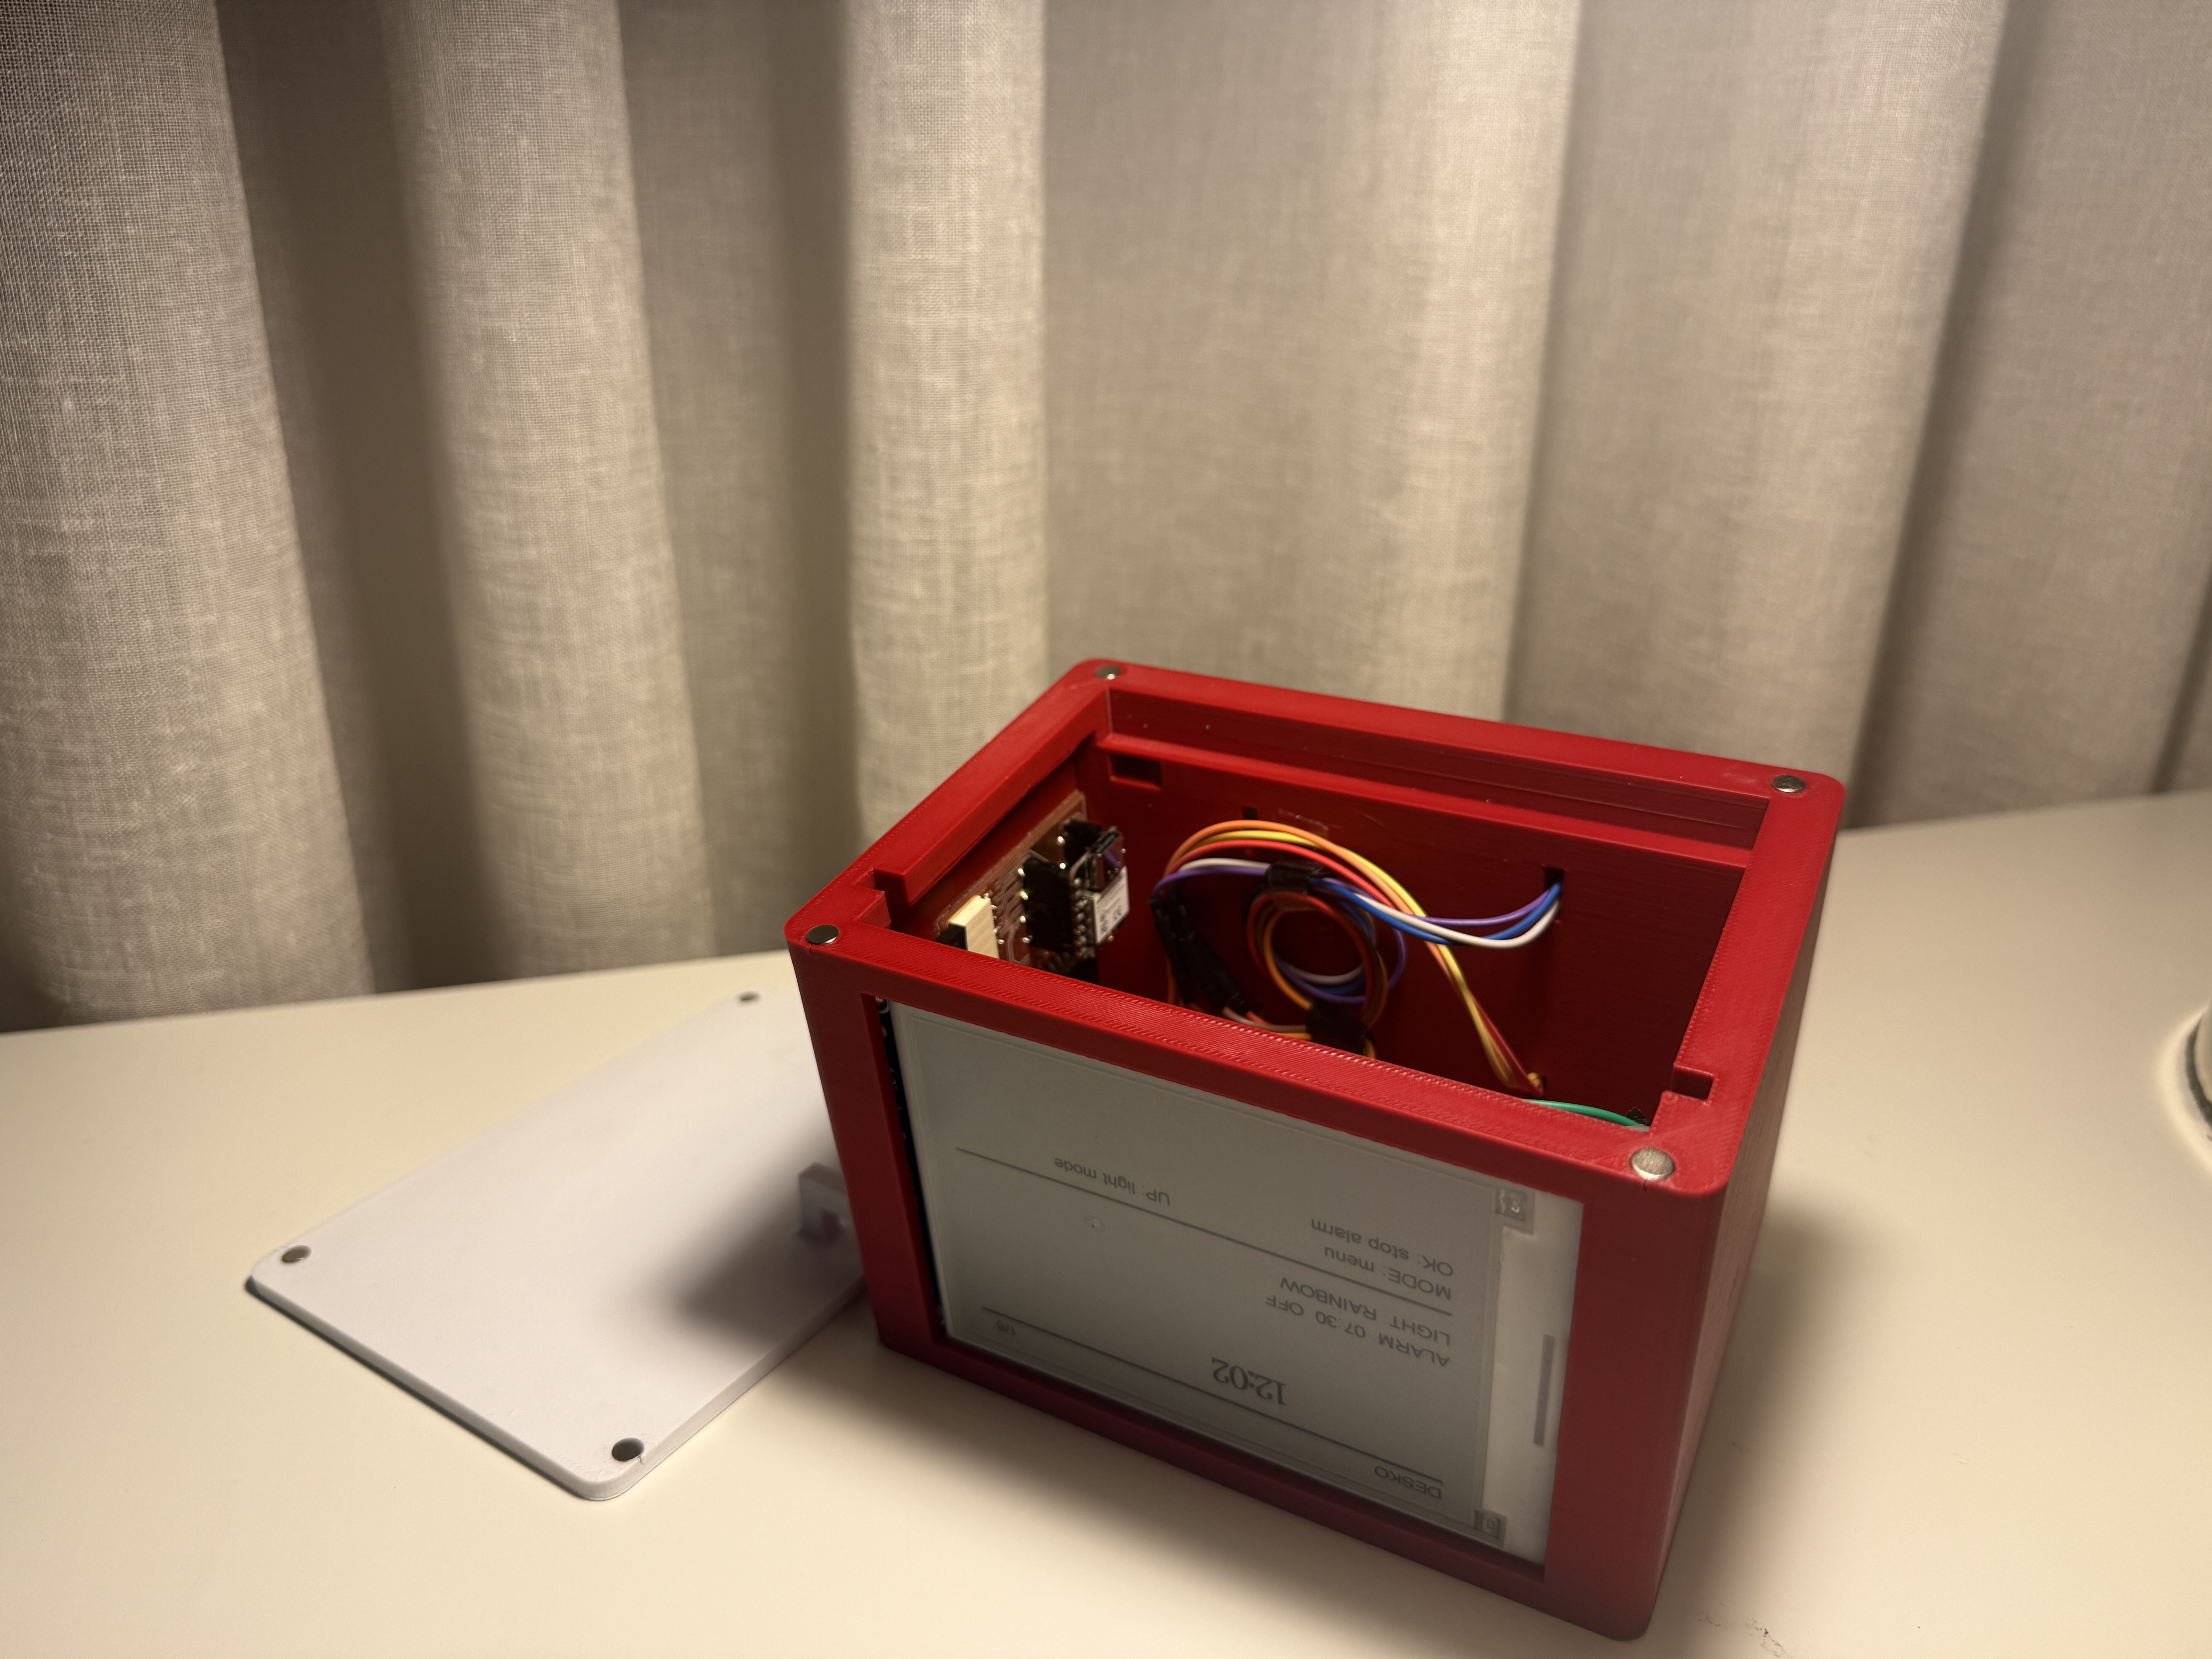
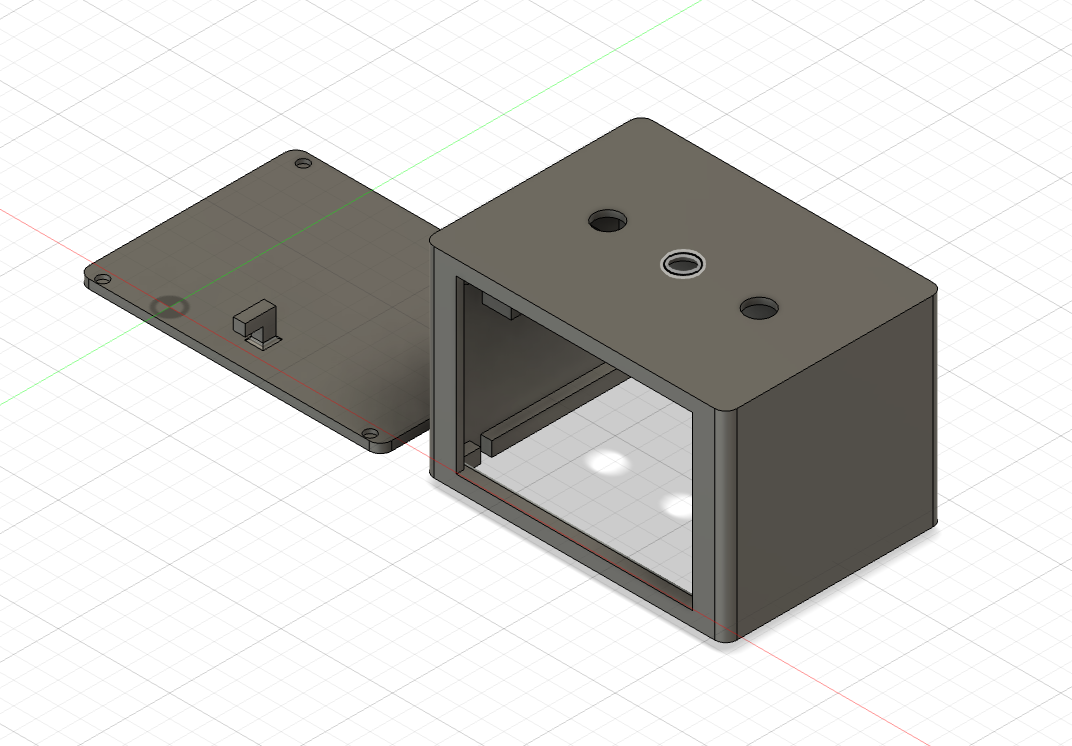
For the enclosure, I planned the layout around the biggest component, which is the e-paper display. The display is placed on the front so it is easy to read. The buttons are placed on the top so they can be pressed easily. A magnetic bottom lid is present with a hood-like sturcture to also support the display.
Implemented methods of packaging
Packaging was important because the final project should not look like a loose circuit. Each component needed a fixed place inside the enclosure.
| Component | Packaging method |
|---|---|
| E-paper display | Mounted behind the front opening |
| Buttons | Fixed through top holes |
| NeoPixels | Placed inside the enclosure for light diffusion |
| ESP32-C3 | Mounted inside with access to wiring |
| Buzzer | Placed inside but not fully covered |
| Wires | Routed along the inside walls |
| Power cable | Routed from the back |
The aim was to keep the inside clean enough to assemble and repair if needed.
Electronics integration
The electronic parts were connected to the ESP32-C3.
| Component | Connection type |
|---|---|
| Mode button | Digital input |
| Up button | Digital input |
| OK button | Digital input |
| Buzzer | Digital output |
| NeoPixels | One data pin |
| E-paper display | UART |
| Power | 5V and common ground |
A common ground is used between the ESP32-C3, LEDs, buzzer, and display as Esp hd only one ground.
Code integration
The final code was organized so all systems run together. The loop checks the web interface, updates the software clock, reads the physical buttons, handles the alarm and countdown, updates the lights, and refreshes the display only when needed.
void loop() {
  server.handleClient();

  updateSoftwareClock();

  if (btnMode.pressed()) handleModeButton();
  if (btnUp.pressed())   handleUpButton();
  if (btnOk.pressed())   handleOkButton();

  handleMinuteDisplayUpdate();
  handleAlarm();
  handleCountdown();
  handleStopwatchDisplay();
  applyAmbientLighting();

  if (displayDirty) updateDisplay();
}
Designed the final project to look like a finished product
I wanted DESKO to look like a desk object, not only an electronics prototype.
The goal is that the user sees a finished clock from the outside, while the electronics stay hidden inside.
Documented system integration
The main integration work was combining the physical packaging, wiring, and code into one system.
What worked:
- the ESP32-C3 runs the main program
- the e-paper display shows the menu screens
- buttons control the clock interface
- NeoPixels show ambient modes and countdown progress
- buzzer gives alarm and timer feedback
- the web interface controls key functions
- the system runs inside one code structure
Problems and fixes
| Problem | Fix |
|---|---|
| Too many separate test codes | Combined functions into one main program |
| E-paper refresh was slow | Used displayDirty to update only when needed |
| LED modes could conflict with alarm/countdown | Alarm and countdown override ambient light |
| Internal wiring could get messy | Planned dedicated spaces for each component |
| Interface needed to be clearer | Improved menu labels and layout |