1. Principles and practices
This weeks class was an introduction to theory, history of digital fabrication and interesting developments, the class structure, schedule. I worked on defining my final project idea and started to getting used to the documentation process.
W1.1 : Final Project Description
W1.2 : Final Project sketch
W1.3 : Install Git and setup a webpage.
W1.4 : Project Planning.
W1.5 : Extended Research.
W1.1 : Final Project description : Cargo Power Supply and Control
In the context of the ongoing ROMI project, I will be prototyping a Modular power supply and control unit for a remote image capture device.
ROMI is an EU H2020 program that develops robotic tools for Micro Farms. The robotics include a ground based rover ‘UGV’ a drone ‘UAV’ a suspended ‘cablebot’. These tools are designed as an adaptable platform to help farmers monitor and track the growth of complex ecosystems such as polyculture organic farms and those implementing agroecology and agroforestry. The in-field monitoring systems are accompanied by the development of an indoor ‘phenotyping scanner’ that is used for plant development science. At the end of the ROMI project we will integrate the phenotyping scanner into the ‘UGV’ as a new field as a tool for the rover.
H2020 ROMI Research Documentation Page
Following the modular philosophy of the project, an image capture device is being developed that is capable of being easily attached and detached to each of the tools described above. Yet as each of the tools runs a different power range there is a need to develop a power supply that can both regulate the power of each device and support the function of the image capture device.
Design Brief Cargo Power Supply:
The Modular Power supply developed through the Fab Academy 2020 will regulate and supply power to an image capture device (such as a Rasberry pi-cam) attached to a gimbal. The unit will be use BMS to communicate via bluetooth and send data via an app to a web app integrated into the ROMI web tools. It will be modular in that it can be attached to any other the robotic tools described above, more specifically it should also be able to be strapped to any commercial UAV (drone), and allow for the operation of the gimbal and image capture device independently of the robots own power systems. This will allow users to operate the image capture device as an inter-changable tool between ALL of the robotics developed by ROMI AND any other tool developed by collaborating farmers.
Images of the ROMI tools
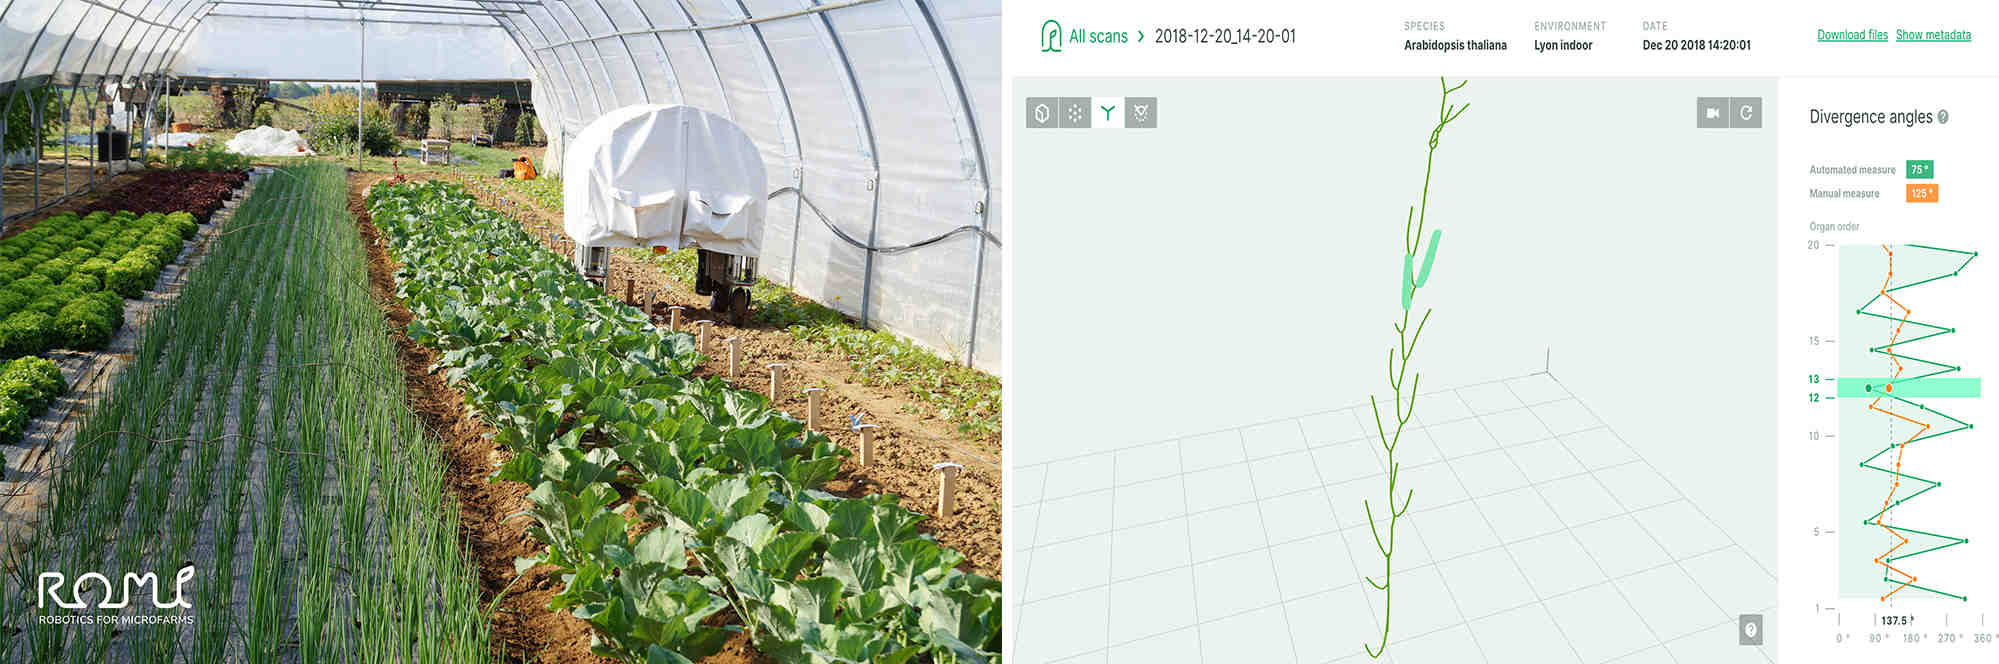
Showing the UGV at the Chatalein farm on the left and a snapshot of the plant development segmentation program developed by SONY CSL.

Showing the Cablebot at the Valldaura research gardens farm on the left and a snapshot of some computation results of an NDVI analysis done by Noumena.
ROMI Video from Vimeo
ROMI from video produced by Noumena on Vimeo.
ROMI Platform tool list
- Rover V2
- Nero Drone v2
- Phenotyping scanner
- Cablebot
“Image of the tool sets coming here soon”
Specification of the Cargo Power Supply:
The list of power demands by the robotics platform are split into the following specifications:
| Power Supply Specs | UGV | Phenotyping Specs | UAV | Cable Specs |
|---|---|---|---|---|
| 3.3 v | x | |||
| 5.0 v | x | |||
| 12.0 v | x | |||
| 24.0 v | x |
- Pi should inform gimbal.
- Pi should store high quality information.
- Pi ‘could’ send low-rez imagery.
- Embedding information Pi GPIO
- Wifi Links -
- FBV (First person View)
- 3D printed adaptation of the Edu Chamoro Board.
- Brushless motor
- High speed Controllers?
- Alex Mos
- Storm 32 (closed Firmware)
- External supply 11.1 or 12v (for interchange)
- Power board should support 24 to 3.3
- Output are fixed for Edu Gimbal
- 2 axis
- Input of Emu
- Keep track of a point.
- Input for Stabilizing and for tracking
Project Precedents:
Together with an open source philosophy of sharing and iterating I include here a list of the projects that have and will inspire the next work. I fully intend to re-use the work done here, yet also intend to add to it and share again. Here are some initial presidents to take account of :
GIMBAL :
P1 : Gimbal by Timothy Winz 2020
P2 : Gimbal by Aldo Sollazzo 2014
P3 : Pi Mini Gimbal 2016
P4 : Norbert Arnold 2020
CONTROL BOARDS :
P5 : Satscha kit Nero
P5 : ESP32 Wroom
POWER SUPPLY BOARDS :
P5 : ESP32 Wroom
CODE :
As a fab lab instructor Eduard Chamorro will be an influential contributor to the project. His gimbal and control unit will suit the purposes of being attachable to each ROMI tool as they are, yet will still need a cargo power supply if fitted to a commercial drone. This board developed and updated recently for Ki-CAD with the specs necessary to develop the Cargo Power Supply.
W1.2 : Sketch of the final project
To sketch the design I used adobe sketchpad on an android tablet. I’ve tried to adhear to a product design rendered sketch type.
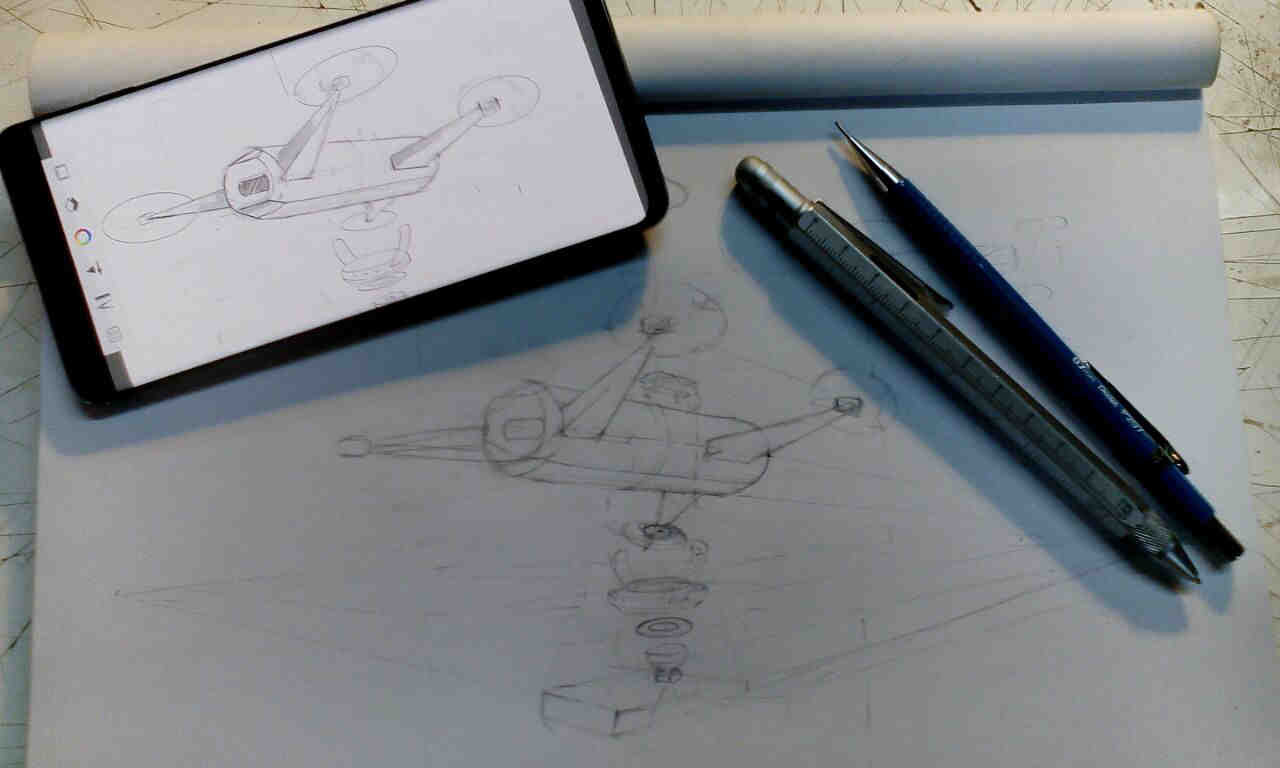 Hand Sketch vs Digital sketch with pencil and stylus.
Autodesk Sketchpad was used on an Android Samsung S10 to photo scan the initial hand sketch, I was then able to develop it digitally using layers and masks using the Sketchpad app. As I got used to manipulating the tools, jumping between brushes, zooming and using layers the drawing experience become a great pleasure. It is nice to be able to quickly undo.
One problem i found was that the image did not export in a high resolution, and i could not successfully export the file to another device running the same software. There is also no cloud service for this app.
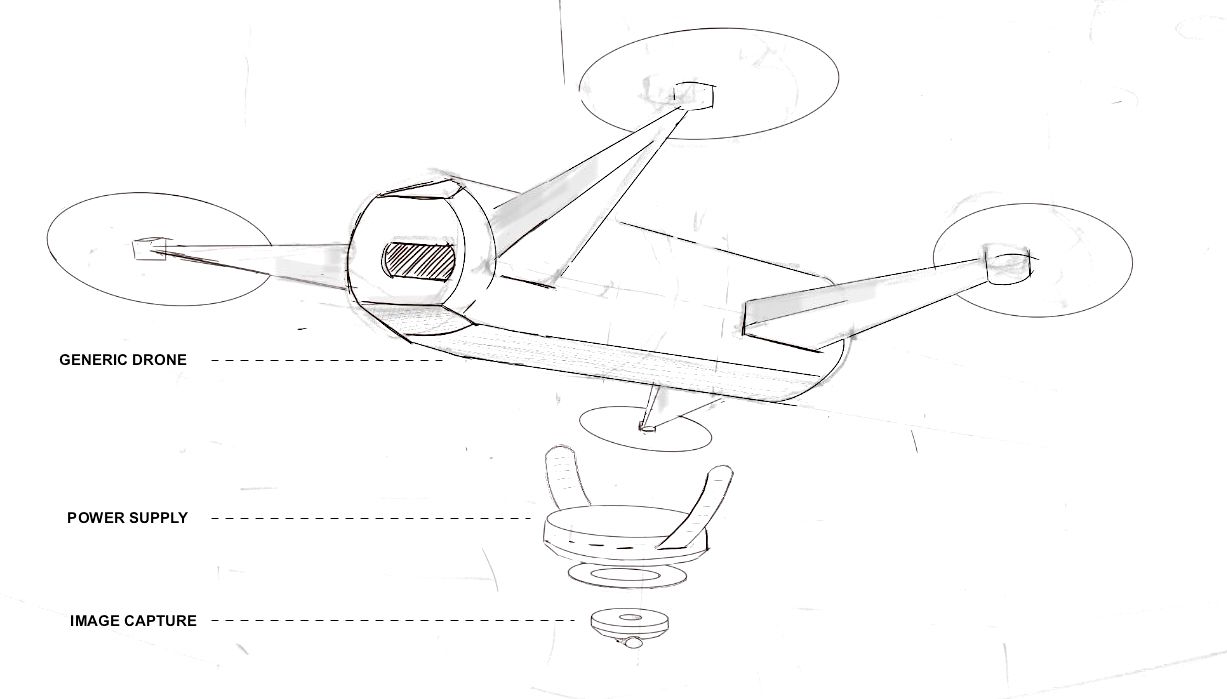 Showing a drone with the attached cargo of the modular power supply and removable imaging capture device.
The project will develop only the Modular power supply shown in this drawing, it must be able to fit to any drone with the lift capable to carry a light cargo. Example drones are the Bebop series, the Phantom and Maverick types.
My Framework and Setup
I am running a Macbook Pro, OSX 10.11.6 (15G31) with an Ubuntu virtual drive and a native Windows 8 partition. I am using mkdocs with atom. I have a Samsung S10 Android Smartphone and a HiFive Mini (7.5 Inch Tablet) Running Android. I am using Linux builds on an UDOO board and Rasberry Pi also.
W1.2 : Install Git and setup a webpage.
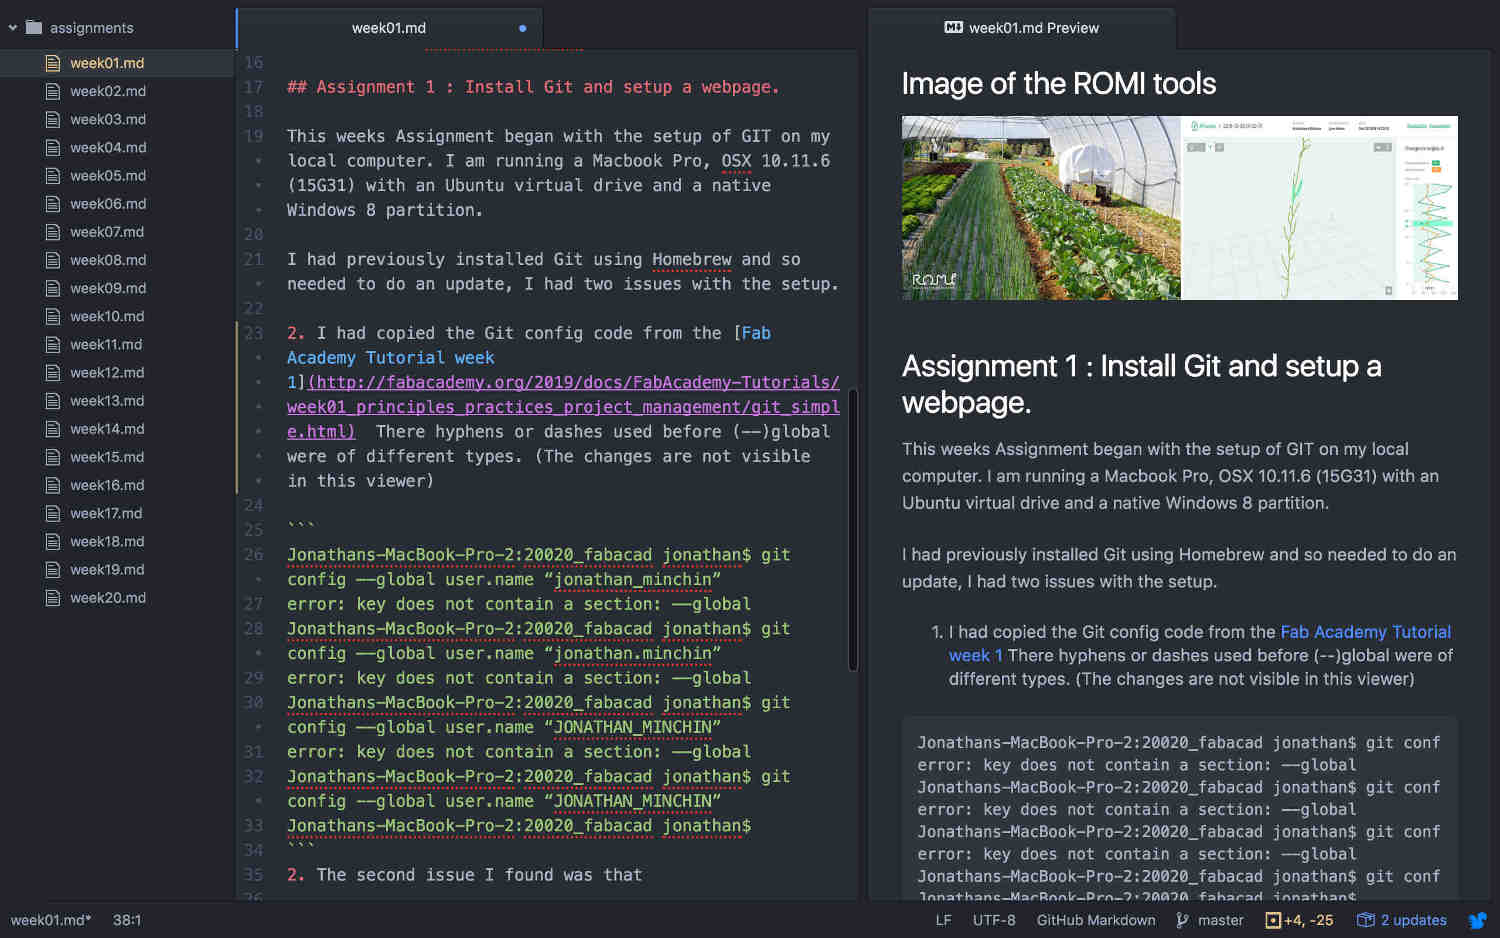
This weeks Assignment began with the setup of GIT on my local computer. I am running a Macbook Pro, OSX 10.11.6 (15G31) with an Ubuntu virtual drive and a native Windows 8 partition. I had previously installed Git using Homebrew and so needed to do an update, I had two issues with the setup :
1 I had copied the Git config code from the Fab Academy Tutorial week 1 There hyphens or dashes used before (–)global were of different types. (The changes are not visible in this viewer) i resolved this by typing the command again rather than using copy paste from the website.
Jonathans-MacBook-Pro-2:20020_fabacad jonathan$ git config –-global user.name “jonathan_minchin”
error: key does not contain a section: –-global
Jonathans-MacBook-Pro-2:20020_fabacad jonathan$ git config –-global user.name “jonathan.minchin”
error: key does not contain a section: –-global
Jonathans-MacBook-Pro-2:20020_fabacad jonathan$ git config –-global user.name “JONATHAN_MINCHIN”
error: key does not contain a section: –-global
Jonathans-MacBook-Pro-2:20020_fabacad jonathan$ git config --global user.name “JONATHAN_MINCHIN”
Jonathans-MacBook-Pro-2:20020_fabacad jonathan$
2 The second issue I found was that i had a build error when installing the theme ‘material’ for mkdocs. I believe this is because i’m using an older OSX operating system.
Aborted with 1 Configuration Errors!
Jonathans-MacBook-Pro-2:jonathan jonathan$ ls
README.md       docs            mkdocs.yml      requirements.txt
Jonathans-MacBook-Pro-2:jonathan jonathan$ mkdocs build
ERROR   -  Config value: 'theme'. Error: Unrecognised theme name: 'material'. The available installed themes are: mkdocs, readthedocs
3 I realized that i needed a complete upgrade of my operating system. To make things easier to install from the next time I created a batch install list.
TERMINAL TIP : Use Homebrew to search for and unistal outdated programs
brew list
brew outdated
brew cleanup
TERMINAL TIP : Use Homebrew to install batch list of software
Brew install search
To setup the webpage i first needed to clone the student repo to add a template from the Academy gitlab server. This was done with the following command
git clone git@git.fabacademy.org:fabacademy2017/yourlabname/2025.git
From there I was able to open the template files using Atom and begin to edit my work into the pages. Although I could now preview my webpage using a web browser and MKdocs I would also able to do so through atoms on Preview toggle tool. This contains a feature to show git previews also and I found it very useful to be able view the page whilst coding in the same window.
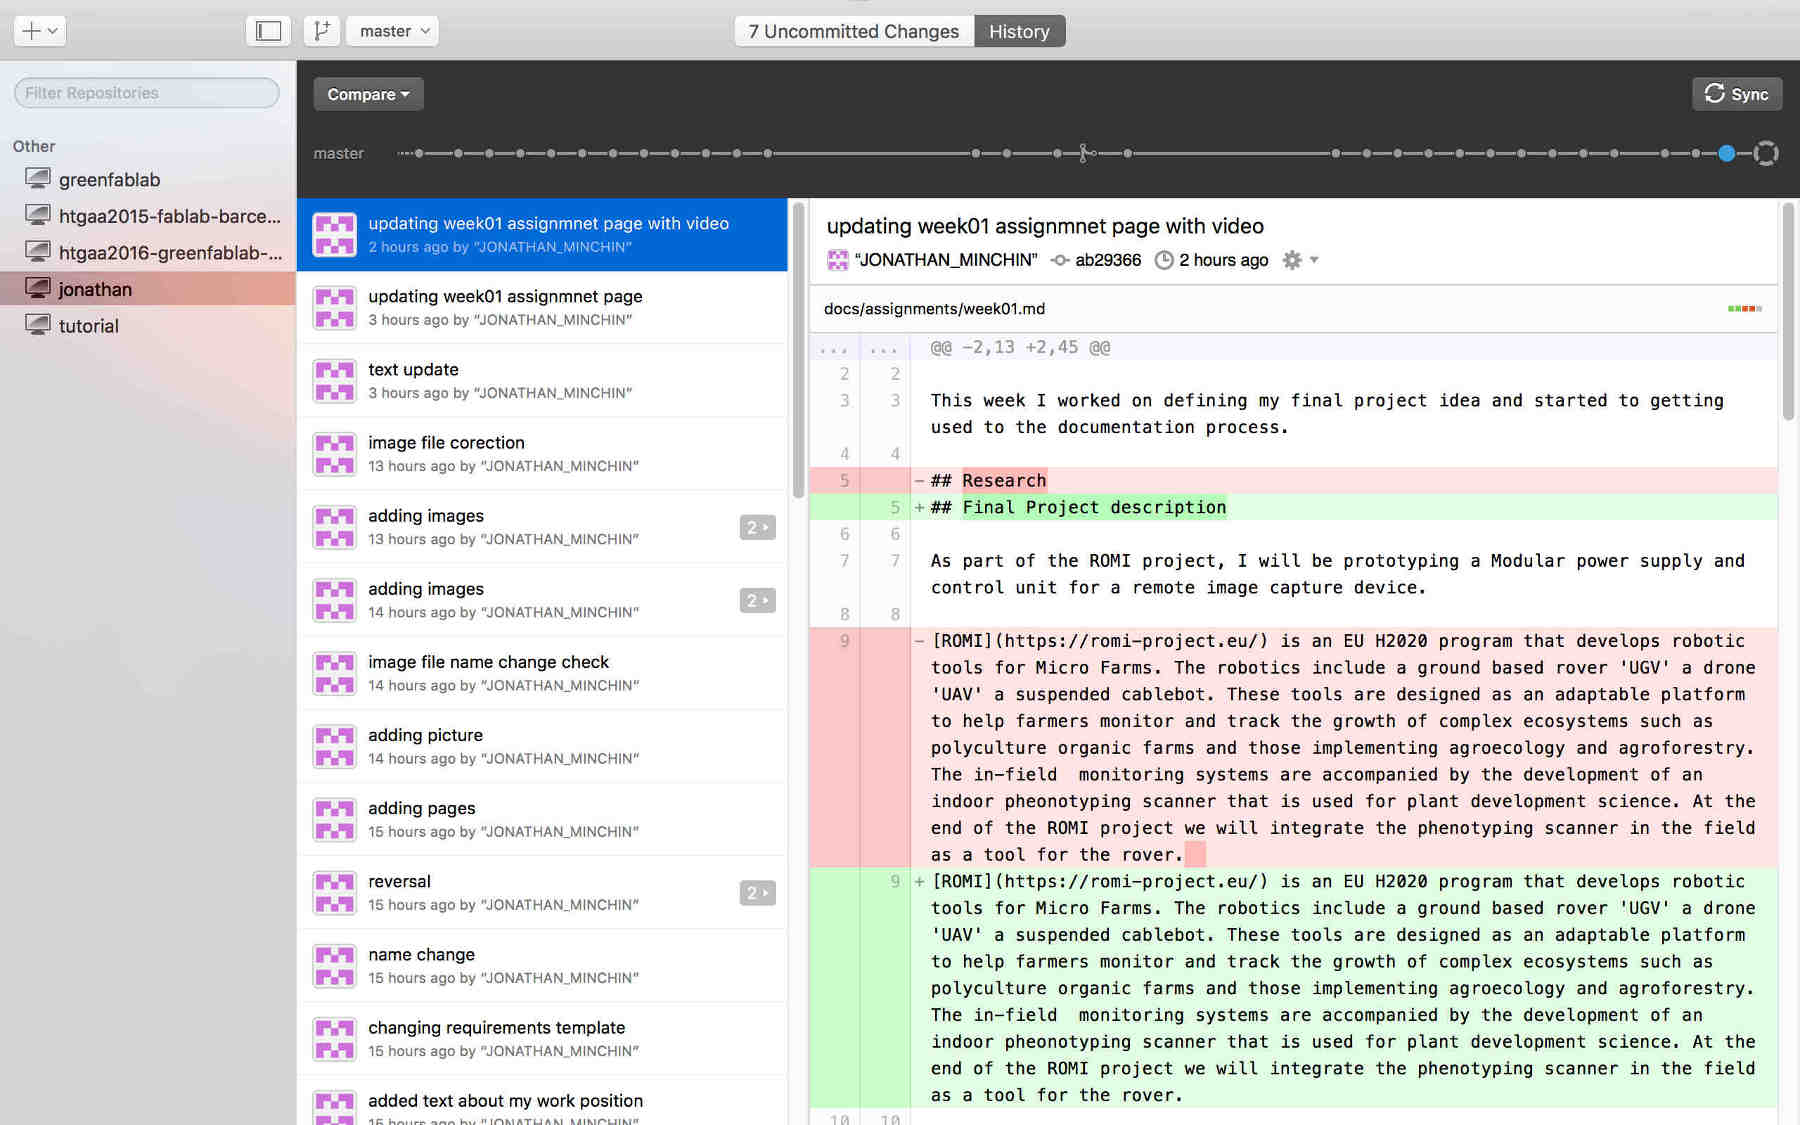
I was curious also to test GIThubs Desktop software, this may be considered cheating and a way not to learn GIT in the terminal yet i found the visualisation of editions useful. Pushing new information through GIT desktop is simple and seems to be effective.
To add files to the academy gitlab some common git commands would need to be ºused. The following example will become a daily and certainly weekly process.
Jonathans-MacBook-Pro-2:docs jonathan$ git add index.md
Jonathans-MacBook-Pro-2:docs jonathan$ git add assignments/week01.md
Jonathans-MacBook-Pro-2:docs jonathan$ git add images
Jonathans-MacBook-Pro-2:docs jonathan$ git commit -m 'adding week01 and images'
Jonathans-MacBook-Pro-2:docs jonathan$ git push
The Git Lab Pipeline that deals and tracks my Git requests is a useful resource for understanding what stage my commits are in and for identifying errors. Finally my webpage should be be made public with the following link : Jonathan Minchin Webpage.
I had used GIMP software to reduce the size of photos that i wanted to add to the site. I had used GIMP many times in the past but realized that I was using an older version for a long time. GIMP has come a long way in the past few years. It is also nice to see that there is a version for android being developed also named Xgimp.
A standard process with GIMP is to reduce the file resolution to 72dpi (dots per inch) and to reduce the image size to below 1800.

I would like to automize this processes by running the script that Niel showed us during the lesson. This would optimize the process by reducing file sizes in a batch.
W1.4 : Plan your project.
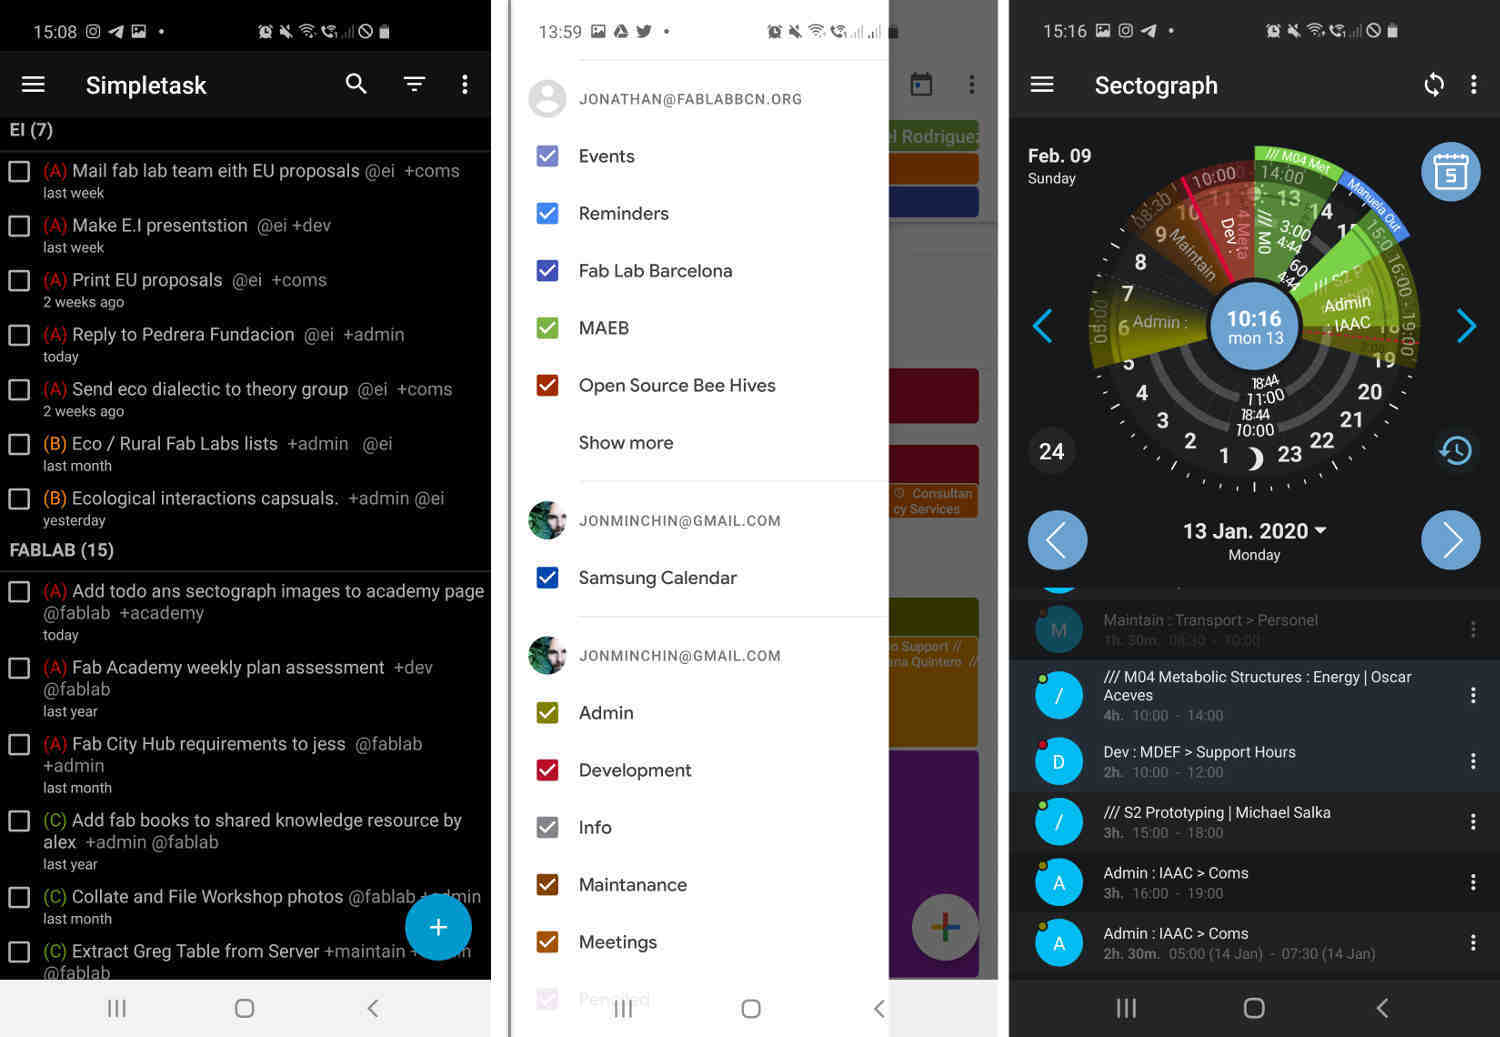
To manage my time I have been developed a task and time tracking method that uses simpletask with todotxt.org to list the tasks i need to do, and allows me to tag them by project and work type.
eg. (A)
Fab Academy weekly plan assessment +dev @fablab.
Then I match the tags and projects i am working on in my calendar. This allows me to sychronize what I think i’m going to do in both list and penciled in futures, and then get a record of what I have actually done.
jonathan$ brew search todo.txt
==> Formulae
todo-txt ✔

==> Casks
todotxt ✔
Another useful tool I have been using is Gantproject. This opensource software allows users to create and share large gant chart files. I have found the Gant planning method important in organizing my work. Below i will paste my Fab Academy Gant chart with some demonstration of Triage planning.

W1.5 : Extended Research
-
TIME PUNCH CARD APP : I would like to use python to script an easy to use ‘time punch card’ application that combines my todo.txt inputs and places them as penciled in calendar inputs. This would then have a representation in Sectograph where i can easily view, adjust and confirm what I am doing at any given time. This would ultimately be able to deliver a record of what time you have spent on different projects, and overlay this with the type of work that you are doing. I believe this will help employers understand their employees in a fair way and also track the real dependencies of given tasks. It will also help farmers in the field.
-
OPEN PAGE VISUALIZER : To improve me web coding skills I would like to create a feature rich gitlab plugin that i can use for a project called openlab this has been a long standing goal of mine and something that i had made a wireframe of some years ago. This will be explored and explained more during the final week about project licensing and business models.
-
FARMERS DASHBOARD I am collaborating with a group called ‘FarmOS‘ from the New Jersey and have created and instance of their operating system for the ROMI project. I will aim to integrate both desktop GIS tools with the Farm OS to create a working Farmers Dashboard for ROMI.
-
ALMANAC WEB APP Over the years i have come to appreciate the valuable use of the Spiral Development model. In fact it is difficult not to engage with it. For this reason I would like to record the yearly cycles of my engagement with the Fab Lab in a Spiral Development Almanac.
Useful Links :
- Class Schedule 2020
- Class page : Principles and practices
- Class page : Project Management
- Class Video : Principles and Practices
- Class Video : Project Management
- Class Video : Recitation - Version control
- Version control Notes
- GIT simple cheat sheet
- GIT extended cheat sheet
- Markdown Cheatsheet
- Jekyll
- Markdown
- todotxt.org
Class Questions :
- How to use the image processing software in a batch?
- How to resize an image in git flavored mark down.
- Reference the Triage planning book.
- How to clone and fork repositories like KiCad simbols