4. Electronics Production
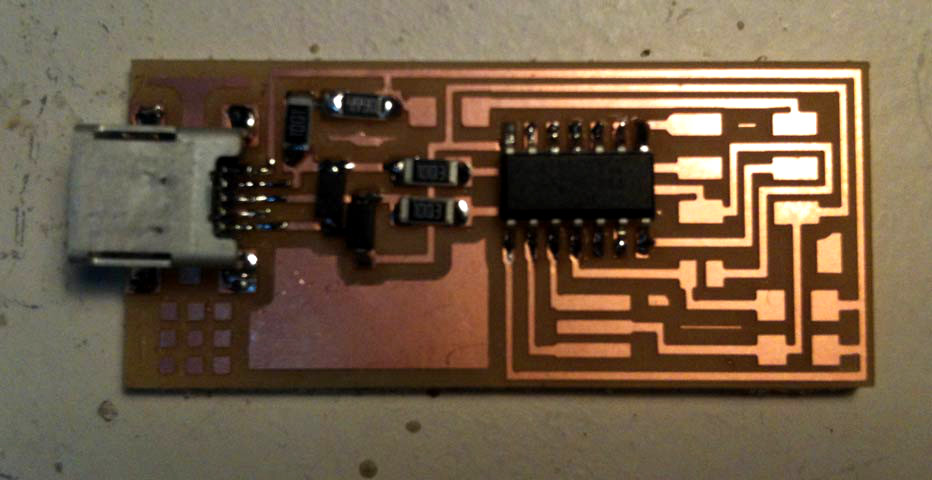
The task for this week was to create our own In-System Programmer or Bootloader. This small device can act as the bridge between a computer and another programmable device. The ISP houses a micro-contoller that will hold firmware ready to be installed to another micro chip. The ISP houses a number of components with an AT-tiny44 at its heart.
- WK 4.1 : Characterize the design rules of your PCB production processor
- WK 4.2 : Make in-circuit programmer
WK 4.1 : Electronics production: FabISP
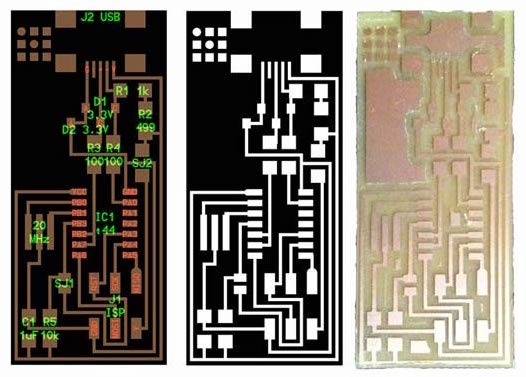
From the Fab Academy class wiki I first chose a template called hello.ISP.44.res. The list of components is as follows:
WK 4.2 : Component List - Stuffing
- Copper Board
- D1 = 3.3v Diode = The line inscribed on the casing indicates the orientation of the cathode
- D2 = 3.3v Diode
- R1 = 1k Resistor
- R2 = 499 Resistor
- R3 = 100 Resistor
- R4 = 100 Resistor
- R4 = 100 Resistor
- R5 = 10k Resistor
- IC1 t44 = Micro-controller
- 20MHz = Resonator
- J1 ISP = the 6 point socket type that the board type is named after
- C1 1uf = Capacitor of 1 (u)micro (f) farad
- SJ1 = Jumper 1 = A part of the circuit to be cut after the micro controller has been programmed
- SJ2 = Jumper 2
PCB Material selection
FR1 = (Phenolic Paper) Fibre Reinforced Paper based
FR4 = (Sheet glass)
WK 4.3 : Milling Notes
I used the Modela MDX-20 milling machine to cut out the trace pattern for the circuit board. This meant using fab modules to first turn the hello.isp.44.res. template into a usable path that the machine could understand.
I had inicially used Fab Modules to read the <b<.png file and convert it to a .rml file readable by the small format milling machine.
There were various calibration tasks to perform before the cutting could proceed.
- Cleaning the copper plate
- Inserting a x64 cutting bit into the chuck.
- setting the x.y.z zero points
- manually resetting and zeroing the z axis by hand
- changing the cutting setting to correspond to the x64 bit
- toggling between views on the machine
- Changing to a x32 cutting bit
- resetting the mill
- repeating the process to cut out the circuit.

WK 4.4 :Soldering Notes
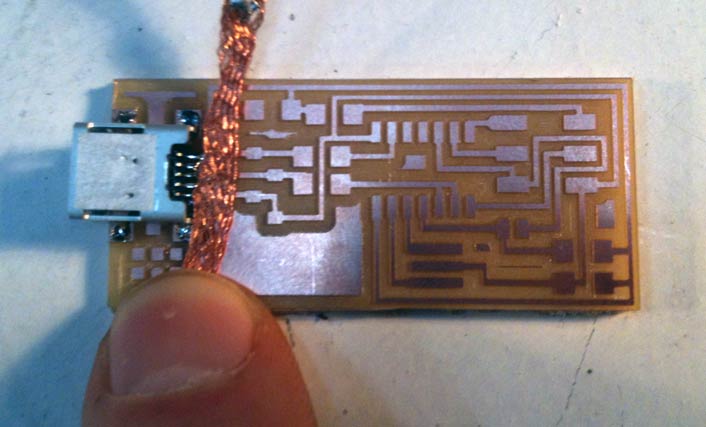
The FabLab BCN has a Weller PU81 soldering iron which allows a user to control the temperature of the contact tip. The tip also has quite a fine point.
The temperature was set to 300 degrees centigrade for this job which is the middle of the temperature range. The solder used was of a thin grade. The trick was to heat the necessary parts first and then let the solder run to it. After smoke testing the device all lights were green and go.
WK 4.5 : Programming
Download 1. Crosspack AVR; a development environment for programming AVR micro-controllers, this was to be installed. Download 2. ‘Make’ could be installed by using Xcode. Xcode is software that is used to program applications on the mac. In turn this could be installed through the mac app store. (A whopping 1.65 gig!)
Next was to follow an adafruit tutorial to access the Crosspack AVR tools.
Finally following the terminal commands on the Wiki allowed me to program the AVR micro-controller. However even after the terminal responded correctly, the device failed to be recognized by the computer.
WK 4.6 : Debugging
To debug this issue I could go down several paths. Firstly
Research
Board House = Shenzhen Batch production Make an In-system programmer
Useful links
- Class page : W4 Electronics Production
- Class Video : W4 Electronics Production
- Barceona Node : W4
- ISP Bootloaders
Questions
- This week is only about milling?
- ISP Bootloader
- In-system programmer?
- FTDI
- SDS Material Safety sheets
- ESP 32 WROOM
- SMS