Week 12 - Output devices
This week is about output devices and there is a lot to cover.
FAB ACADEMY 2020 source
20200415 output devices from Academany on Vimeo.
My Assignment
For my assignment I played with a lot of different output devices going from the simple RGB LED to more complex output devices, e.g. the stepper motors. A recurrent aspect of this week is the use of a particular and very important method to control the intensity of the devices outputs, the Pulse-width Modulation. In the following sections I'll detail the use of a common cathode RGB LED and the use of two LED arrays whose one of them will be wired and controlled using the Charlieplexing method. I'll also deal with several motors of each type: a servo motor, a DC-motor and a stepper motor.
Please follow this link to know about the group assignment.
RGB LEDs
No kidding, this ridiculously simple example helped me a lot to understand the way to program PWM signaling without using libraries.
The example provided on FABACADEMY website was meant to work with a common anode RGB LED. As I didn't have one I simulated its behavior with three independent LEDs. Oddly the script provided by Neil did not give good result as shown in the video.
Home made common-anode(+) RG(B) LED
I made the assumption the code was maybe made for a common cathode RGB LED. The assumption was correct as it can be seen in the following video.
Common-Cathode(-) RGB LED
LED arrays
Bravo Charlie Allen! Before knowing your charlieplexing I thought at least \(n+(n-1)\) pins were required to control a \((n \times (n-1))\) LED array. I never thought that only \(n\) pins were sufficient.
In this section I'll talk about LED arrays. At home I had a 8 by 8 LED array. I first decided to focus on it. To understand how it was wired I check the documentation available and I used a voltmeter to identify pins A and 0.
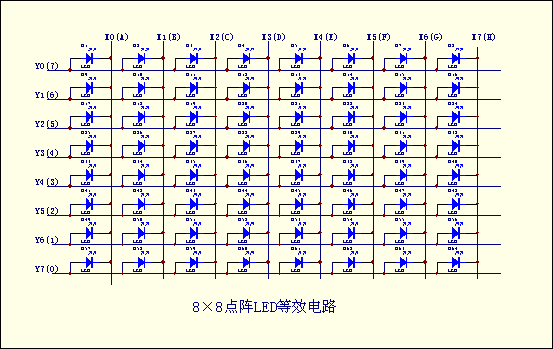
Schematic of the 8 by 8 LED array
In the schematic, the cathodes are represented by letters and anodes by numbers. To find pins A and 0, I connected the positive born of the voltmeter to the first pin of the array and the negative born of the voltmeter to the fifth pin of the array. If the first LED of the first column turned on, I was on the right pin otherwise I had to flip the LED array and do the same procedure.
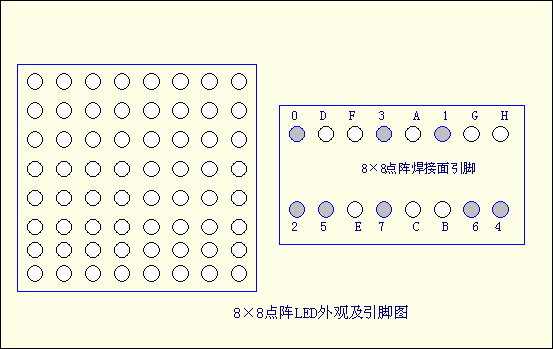
Schematic of the 8 by 8 LED array : 16 pins (0 to 7 and A to H)
By adding some resistors to protect the LEDs and by connecting the array properly, I was able to turn out and off all the LEDs separately.
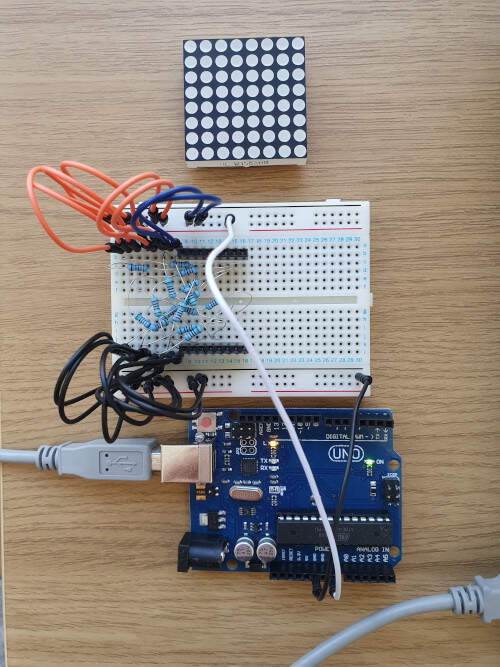
Oh! Did I mention that I started to hate breadboard? I hate breadboard! Really, I mean it. They are only useful when there is nothing else left but if I have to redo that I'll do it on a PCB with a milling machine.
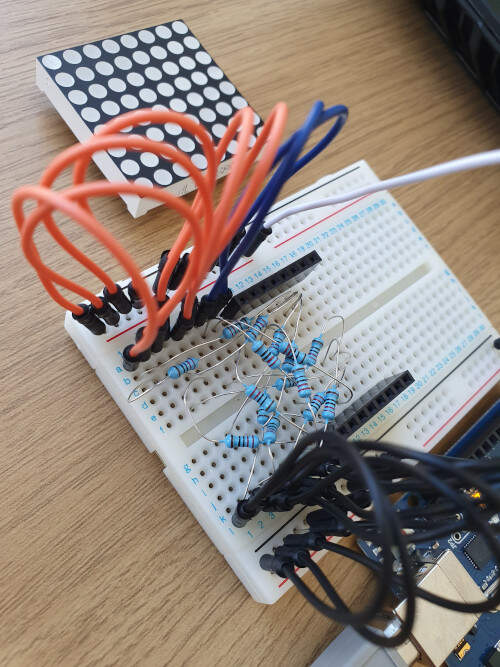
Here I just use the Arduino as a 5V power supply.
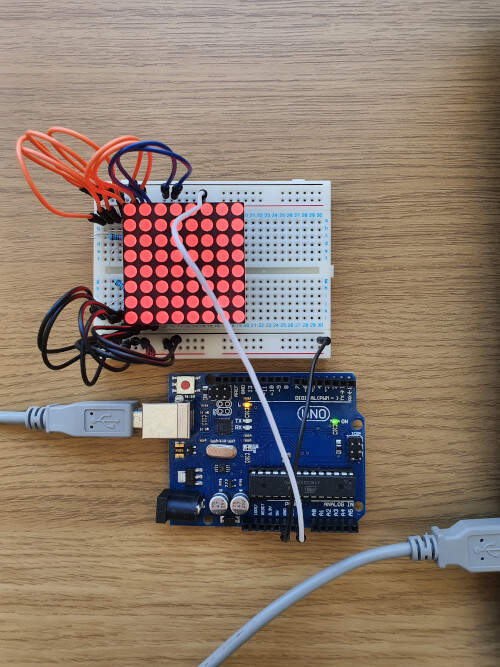
I thought that I could rearrange the cabling to use only 9 pins for controlling the LED array with the Charlieplexing method but I was wrong. As I was really interested by this method I chose to make my own Charlieplexing 5 by 4 LED array by following the example provided by Neil. Here is the result (I hate breadboards even more!).
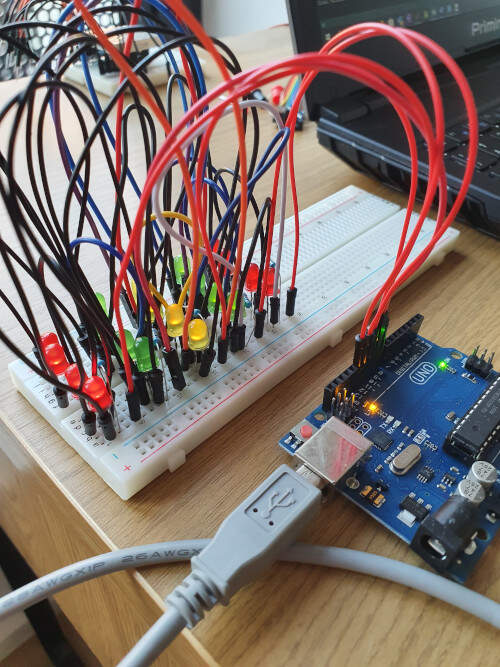
By using the provided C program and by adapting it I was able to control the LED array with only 5 pins. Hereinafter is the code I used.
#include <avr/io.h>
#include <util/delay.h>

#define output(directions,pin) (directions |= pin) // set port direction for output
#define input(directions,pin) (directions &= (~pin)) // set port direction for input
#define set(port,pin) (port |= pin) // set port pin
#define clear(port,pin) (port &= (~pin)) // clear port pin
#define pin_test(pins,pin) (pins & pin) // test for port pin
#define bit_test(byte,bit) (byte & (1 << bit)) // test for bit set

#define led_delay() _delay_ms(1) // LED delay

#define led_port PORTB
#define led_direction DDRB

#define A (1 << PB0) // row 1
#define B (1 << PB1) // row 2
#define C (1 << PB2) // row 3
#define D (1 << PB3) // row 4
#define E (1 << PB4) // row 5

void flash(uint8_t from, uint8_t to, uint8_t delay) {
   //
   // source from, sink to, flash
   //
   static uint8_t i;
   set(led_port,from);
   clear(led_port,to);
   output(led_direction,from);
   output(led_direction,to);
   for (i = 0; i < delay; ++i)
       led_delay();
   input(led_direction,from);
   input(led_direction,to);
   }

void led_cycle(uint8_t number, uint8_t delay) {
   //
   // cycle through LEDs
   //
   uint8_t i;
   for (i = 0; i < number; ++i) {
      flash(B,A,delay);
      flash(C,A,delay);
      flash(D,A,delay);
      flash(E,A,delay);
      flash(A,B,delay);
      flash(C,B,delay);
      flash(D,B,delay);
      flash(E,B,delay);
      flash(A,C,delay);
      flash(B,C,delay);
      flash(D,C,delay);
      flash(E,C,delay);
      flash(A,D,delay);
      flash(B,D,delay);
      flash(C,D,delay);
      flash(E,D,delay);
      flash(A,E,delay);
      flash(B,E,delay);
      flash(C,E,delay);
      flash(D,E,delay);
      }
   }

void setup() {
   //
   // set clock divider to /1
   //
   CLKPR = (1 << CLKPCE);
   CLKPR = (0 << CLKPS3) | (0 << CLKPS2) | (0 << CLKPS1) | (0 << CLKPS0);

}

void loop() {
      led_cycle(1,100);
      led_cycle(3,20);
      led_cycle(100,1);
}
The following video shows the result.
Charlieplexing \((5 \times 4)\) LED array controlled with 5 pins
The charlieplexing method uses the three states of a I/O pin. The pin can either be HIGH, LOW or disconnected (with a very high impedance). As a consequence it is only possible to continuously display one LED at a time. To display any symbol in the LED array I therefore used a trick. In the void led_cycle(uint8_t number, uint8_t delay) function I defined a sequence to draw a symbol (a dog, with a little bit of imagination). Then to give the illusion that all the LEDs of the symbol are turned on at the same time I increased the display frequency: led_cycle(100,1); in the void loop() function.
#include <avr/io.h>
#include <util/delay.h>

#define output(directions,pin) (directions |= pin) // set port direction for output
#define input(directions,pin) (directions &= (~pin)) // set port direction for input
#define set(port,pin) (port |= pin) // set port pin
#define clear(port,pin) (port &= (~pin)) // clear port pin
#define pin_test(pins,pin) (pins & pin) // test for port pin
#define bit_test(byte,bit) (byte & (1 << bit)) // test for bit set

#define led_delay() _delay_ms(1) // LED delay

#define led_port PORTB
#define led_direction DDRB

#define A (1 << PB0) // row 1
#define B (1 << PB1) // row 2
#define C (1 << PB2) // row 3
#define D (1 << PB3) // row 4
#define E (1 << PB4) // row 5

void flash(uint8_t from, uint8_t to, uint8_t delay) {
   //
   // source from, sink to, flash
   //
   static uint8_t i;
   set(led_port,from);
   clear(led_port,to);
   output(led_direction,from);
   output(led_direction,to);
   for (i = 0; i < delay; ++i)
       led_delay();
   input(led_direction,from);
   input(led_direction,to);
   }

void led_cycle(uint8_t number, uint8_t delay) {
   //
   // cycle through LEDs
   //
   uint8_t i;
   for (i = 0; i < number; ++i) {
      flash(C,A,delay);
      flash(A,B,delay);
      flash(C,B,delay);
      flash(B,C,delay);
      flash(D,C,delay);
      flash(E,C,delay);
      flash(B,D,delay);
      flash(C,D,delay);
      flash(E,D,delay);
      flash(B,E,delay);
      flash(D,E,delay);
      }
   }

void setup() {
   //
   // set clock divider to /1
   //
   CLKPR = (1 << CLKPCE);
   CLKPR = (0 << CLKPS3) | (0 << CLKPS2) | (0 << CLKPS1) | (0 << CLKPS0);

}

void loop() {
      led_cycle(100,1);
}
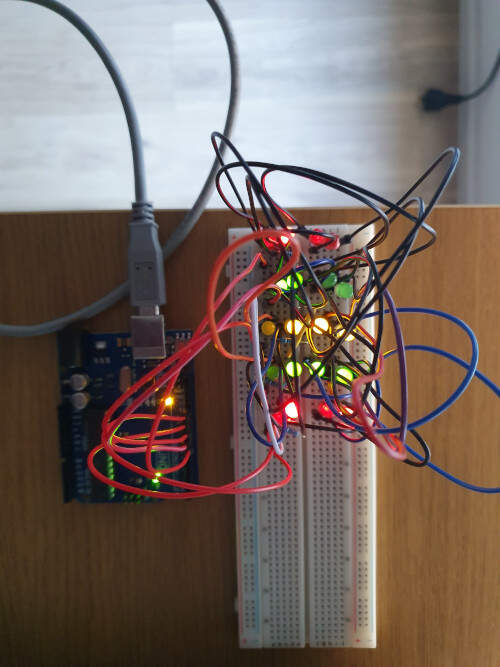
Displaying a dog in the LED array
By changing the sequence in the void led_cycle(uint8_t number, uint8_t delay) function, I was also able to display the letter "F".
void led_cycle(uint8_t number, uint8_t delay) {
//
// cycle through LEDs
//
uint8_t i;
for (i = 0; i < number; ++i) {
  flash(B,A,delay);
  flash(C,A,delay);
  flash(D,A,delay);
  flash(E,A,delay);
  flash(A,B,delay);
  flash(A,C,delay);
  flash(B,C,delay);
  flash(D,C,delay);
  flash(E,C,delay);
  flash(A,D,delay);
  flash(A,E,delay);
  }
}
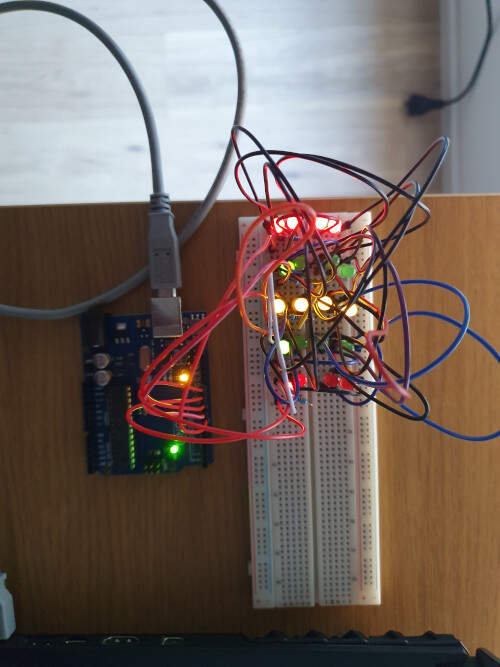
Displaying the letter "F" in the LED array
Servo Motor
For this experiment I used a small servo motor (Tower Pro Micro Servo 9g (SG90)) in combination with an Arduino.
I first used the code provided by Neil. I just changed the pins number and the port types to accommodate the code to the Arduino UNO. I also changed the format of the file (from .c to .ino) and adapted the code the Arduino IDE environment. Then I looked at the behavior of the servo motor.
Test of the code given by Neil on the servo motor
The datasheet of the Tower Pro Micro Servo (SG90) provides the period and the theoretical durations of the PWM for the middle position (0°), 90° and -90°. The period of a PWM cycle is 20 ms and Position "0" (1.5 ms pulse) is middle, "90" (~2ms pulse) is all the way to the right, "-90" (~1ms pulse) is all the way to the left. These are the values used in the following code.
#define output(directions,pin) (directions |= pin) // set port direction for output
#define set(port,pin) (port |= pin) // set port pin
#define clear(port,pin) (port &= (~pin)) // clear port pin
#define pin_test(pins,pin) (pins & pin) // test for port pin
#define bit_test(byte,bit) (byte & (1 << bit)) // test for bit set
#define position_delay() _delay_ms(1000)

#define PWM_port PORTB
#define PWM_direction DDRB
#define PWM_pin_0 (1 << PB0)

#define loop_count 30

uint8_t i;

void setup() {
   //
   // set clock divider to /1
   //
   CLKPR = (1 << CLKPCE);
   CLKPR = (0 << CLKPS3) | (0 << CLKPS2) | (0 << CLKPS1) | (0 << CLKPS0);
   //
   // set PWM pins to output
   //
   clear(PWM_port, PWM_pin_0);
   output(PWM_direction, PWM_pin_0);

}

void loop() {
      //
      // 1 ms on time, -90°
      //
      for (i = 0; i < loop_count; ++i) {
         set(PWM_port,PWM_pin_0);
         _delay_us(1000);
         clear(PWM_port,PWM_pin_0);
         _delay_us(19000);
         }
      //
      // 1.5 ms on time, 0°
      //
      for (i = 0; i < loop_count; ++i) {
         set(PWM_port,PWM_pin_0);
         _delay_us(1500);
         clear(PWM_port,PWM_pin_0);
         _delay_us(18500);
         }
      //
      // 2 ms on time, +90°
      //
      for (i = 0; i < loop_count; ++i) {
         set(PWM_port,PWM_pin_0);
         _delay_us(2000);
         clear(PWM_port,PWM_pin_0);
         _delay_us(18000);
         }

}
In the following video we can see that the theoretical values are far from the real one.
Test of the theoretical values for 90°, 0° and -90° (2000 µs, 1500 µs and 1000 µs)
Practically these values are closer to 2550 µs, 1450 µs and 650 µs respectively for 90°, 0° and -90°.
Practical values for 90°, 0° and -90° (2550 µs, 1450 µs and 650 µs)
When making a different sequence of positions (90° -> 0° -> -90° -> 0°) I have seen that the middle position (0°) was different depending on the transitioning. To solve that issue I adapted the value of the pulse for that position (from -90° to 0°: 1400 µs ; from 90° to 0°: 1450 µs). I guess this behavior is due to the low quality of the servo motor.
Two practical values for 0° (from -90° to 0°: 1400 µs ; from 90° to 0°: 1450 µs)
DC Motor
There are several kinds of DC motor. The inrunner DC motors have a shaft that rotate inside the motor frame contrary to outrunner DC motors whose one part of the frame rotate together with the shaft. There are also very flat DC motors usually called pancake DC motors. At home I only had a small DC motor : the DC Toy / Hobby Motor.
To actuate the DC motor I had a look on the documentation provided by Neil. As I didn't have the material to build my own PCB board I looked at an Adafruit tutorial to make the connections with my small DC Toy / Hobby Motor. The material required was a transistor 2N4401 and 1N4001 - diode rectifier. Fortunately I had this kind of transistor at home and I found a 1N4001 diode rectifier in a old speaker. First I wanted to make sure that my transistor was still working, therefore I made a little experiment. I connected the emitter of the transistor to the ground and a LED to the collector as shown in the figure bellow.
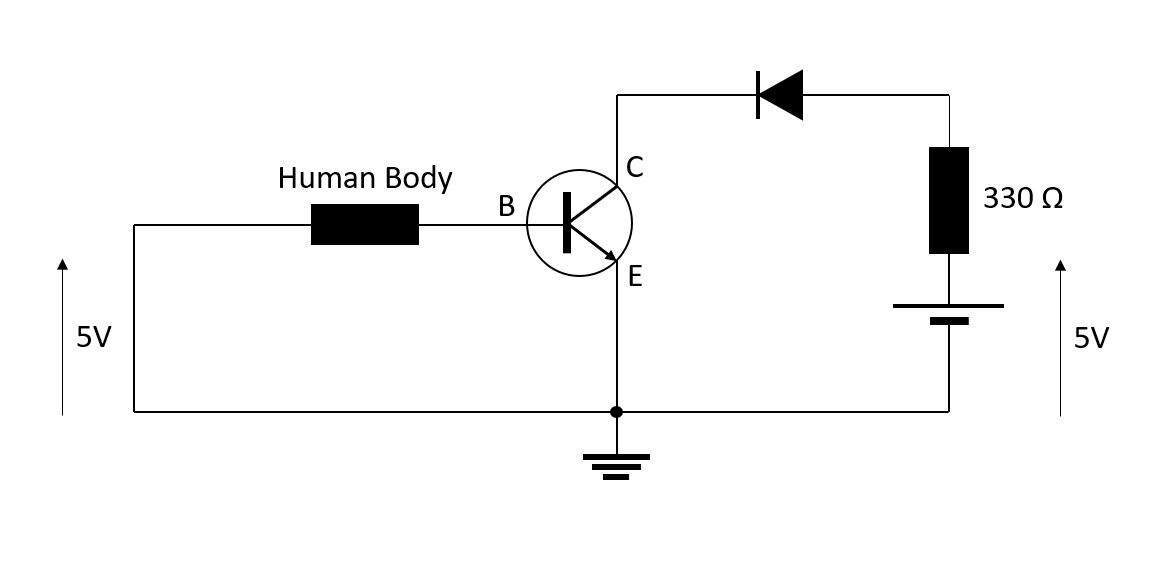
Schematic for turning on a LED with a NPN transistor - 2N4401
In the following video I'm just using the Arduino as a power source for 5V supply. When I'm touching both cables my body acts as very high impedance resistor but yet it allows a very small current to flow through the base of the NPN transistor and the LED turns on.
Use of a NPN transistor - 2N4401
Afterwards I followed the cabling shown in the tutorial. Instead of the resistor of 270 Ω, I used two different resistors (330 Ω and 180 Ω) and compared the effects.

Schematic of the DC motor cabling
Then I modified the script. In this script I used the command analogWrite() to set the speed of the motor instead of making my own PWM function.
int motorPin = 3;
int speed=200;

void setup()
{
  pinMode(motorPin, OUTPUT);
  Serial.begin(9600);
  while (! Serial);
  Serial.println("Enter a speed from 1 to 255 | Write 256 to STOP");
}


void loop()
{
  if (Serial.available())
  {
    int get_serial = Serial.parseInt();
    if (get_serial > 0 && get_serial <= 255)
    {
      speed=get_serial;
      analogWrite(motorPin, speed);
      Serial.println(get_serial);
    }
    if (get_serial == 256)
    {
      analogWrite(motorPin, 0);
      Serial.println("STOP");
    }
  }

}
In the following video I change the speed through the serial communication.
Actuation of a DC-Motor with PWM
I made this experiment two times with two different resistors in the circuit (330 Ω and 180 Ω). With the lowest resistor the minimum analog value of the speed is 170 while the minimum is 200 with the resistor of 330 Ω. Therefore the circuit with the highest resistor is more sensitive.
Stepper Motors
At home I had both a unipolar and a bipolar motor but I only had the material to control one of them, the unipolar 28BYJ-48. (All about stepper motors)
Once again I first tried to use the codes provided by Neil. Unfortunately it didn't work. I guess this is because the board that makes the junction between the stepper motor and the Arduino does not use MOFSET transistors (just like it does in the example provided by Neil) to control the 4 phases. Therefore I followed this tutorial and I adapted the script to use the Serial Communication to set the speed, instead of a potentiometer. Here is the script I used to actuate the stepper motor.
  // include Arduino stepper motor library
  #include <Stepper.h>

  // change this to the number of steps on your motor
  #define STEPS 32

  // create an instance of the stepper class, specifying
  // the number of steps of the motor and the pins it's
  // attached to
  Stepper stepper(STEPS, 8, 10, 9, 11);

  void setup()
  {
    Serial.begin(9600);
    while (! Serial);
    Serial.println("Enter a speed from 2 to 500");
  }

  int direction_ = 1, speed_ = 400, val=0;

  void loop()
  {

   if (Serial.available())
    {
      val = Serial.parseInt();
      Serial.print("VAL = ");
      Serial.println(val);
      if (val > 1 && val <= 500)
      {
        speed_=val;
        Serial.print("SPEED = ");
        Serial.println(speed_);
      }

    }

    stepper.setSpeed(speed_);
    // move the stepper motor
    stepper.step(direction_);

  }
In the following video you can see the result.
Actuation of a unipolar stepper motor
What if I had had more time?
If I had had more time,
- I would have tried to build a solenoid actuator,
- I would have played with displays,
- I would have actuated the DC motor in both directions by using a Dual H-Bridge Motor Driver (How to rotate dc motor in both direction?),
- I would have a look on the H bridge circuit,
- I would have use a simple relay switch to control whatever devices, possibly using PWM,
- I would have tried to understand hardware PWM programming,
- I would have a look on the MOSFET transistor theory, and
- I would like to know how to choose the period of the PWM signal when it is not written in the datasheet.
If I had had the material and access to the FABLAB,
- I would have made my own PCB board to actuate both unipolar and bipolar stepper motors,
- I wouldn't have lost a lot of time wiring the Charlieplexing LED array on a breadboard but I would have made a PCB for it, and
- I would have made a circuit for measuring power consumption.