This week's assignment is to design, build, and connect wired or wireless node(s) with network or bus addresses (individual); to send a message between two projects (in-group).
* This week's group assignment is to send data between projects. We classmates did it together during an online session regarding MQTT.
* I also worked on my own MQTT project to send sensors' data from my ESP32 board to a self-made Node-RED dashboard. Then through Node-RED functions and/or UI, I controlled the actuators of the same board.
* All source files can be downloaded here.
Connect wireless nodes
Group assignment - MQTT + Node-RED
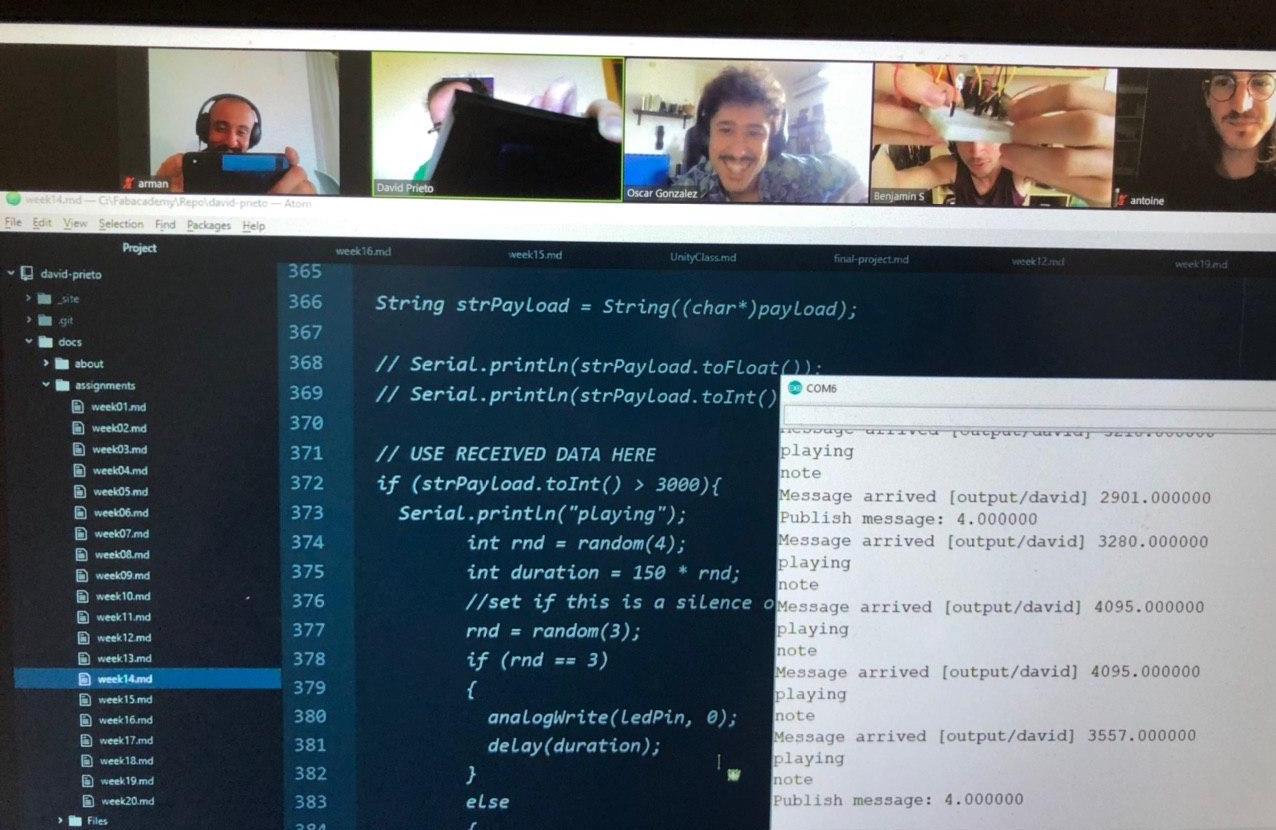
This week, our instructor Oscar set up an MQTT broker on Raspberry Pi and got all the students to send some data from their boards. My classmate David Prieto documented very well the whole process, and I also wanted to work on MQTT as my individual assignment this week, so I only put key recap points of the group work here:
- We subscribed to certain topics to be able to receive messages from others (e.g.
client.subscribe("onput/tue", msg);) and we sent messages to others by publishing a message to a certain topics (e.g.client.publish("input/tue", msg);). - Oscar already provided us with a sample program, and all what we had to do was to fill in our own WiFi credentials, to check the pins we were using, and to change the name of the topics we were subscribing or publishing to.
And here you go the screenshot with happy faces, captured by David:
Individual assignment - MQTT + Node-RED
From what I understood, it was not mandatory for us to fabricate multiple boards for this week's assignment. The purpose of this assignment was to connect wired or wireless nodes, hence, my plan was to utilize my board for the Final Project and to simply send messages from my sensors to my actuators of the same board over a networking protocol. In my case, I decided to try MQTT and added another node to the networking flow, which is a Node-RED dashboard. And thus, I could display sensors' data on the dashboard and control the actuators through Node-RED functions. Somehow somewhat it makes sense, isn't it?
Mosquitto
MQTT is a machine-to-machine connectivity protocol. It was designed as an extremely lightweight publish/subscribe messaging transport. An MQTT broker is a server that receives all messages from the clients, and then routes the messages to the appropriate destination clients. The broker is responsible for receiving all messages, filtering the messages, determining who subscribed to each message and sending the message to those subscribed clients. Mosquitto is a widely-used MQTT broker. Usually, the MQTT broker will be installed on a Raspberry Pi for security reasons, but I installed it directly to my Macbook because it was more convenient. I didn't want to buy a Raspberry Pi.
I followed this instruction to install Mosquitto. Here is the screenshot of Mosquitto installed and connected to Node-RED. Also, after plugging in my ESP32 board, I could detect it as a new client:

In another Terminal window, I installed Node-RED locally following this instruction. I could see Node-RED installed and connected to my MQTT broker:
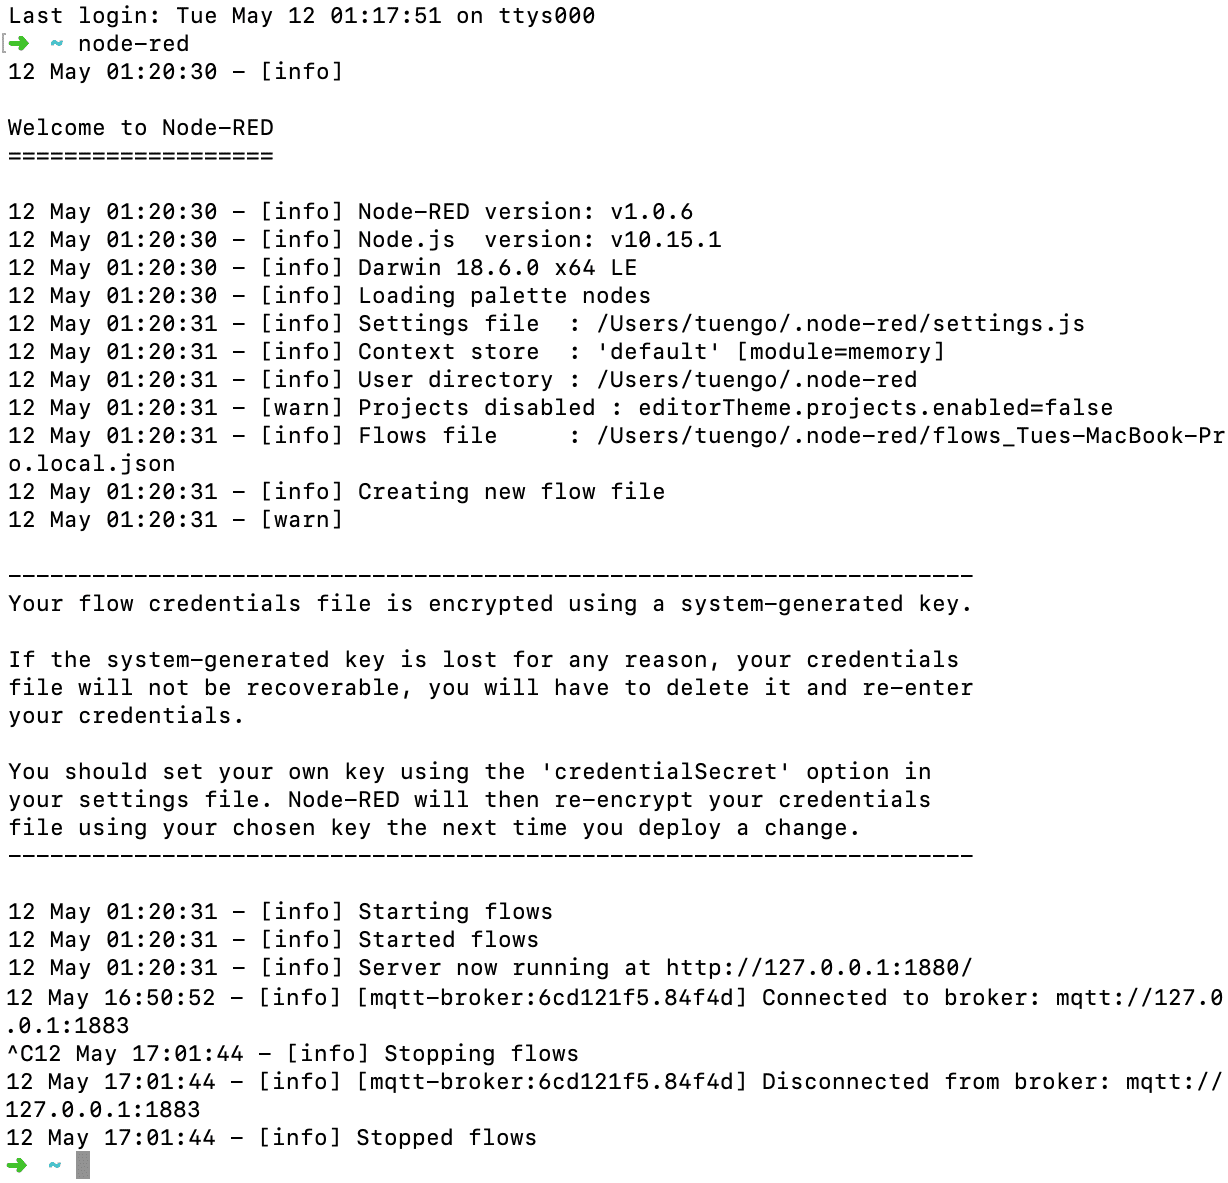
The installation steps seemed good. Let's move on to create a Node-RED dashboard.
Node-RED
Node-RED has usually used for wiring together hardware devices, APIs, and online services over MQTT protocol, but it is not limited to that purpose. It is a powerful tool for building applications with a browser-based editor that makes it easy to wire together flows using the wide range of nodes and nice UI elements that can be deployed to its runtime in a single click.
First, I had to create MQTT nodes for all my inputs and outputs:
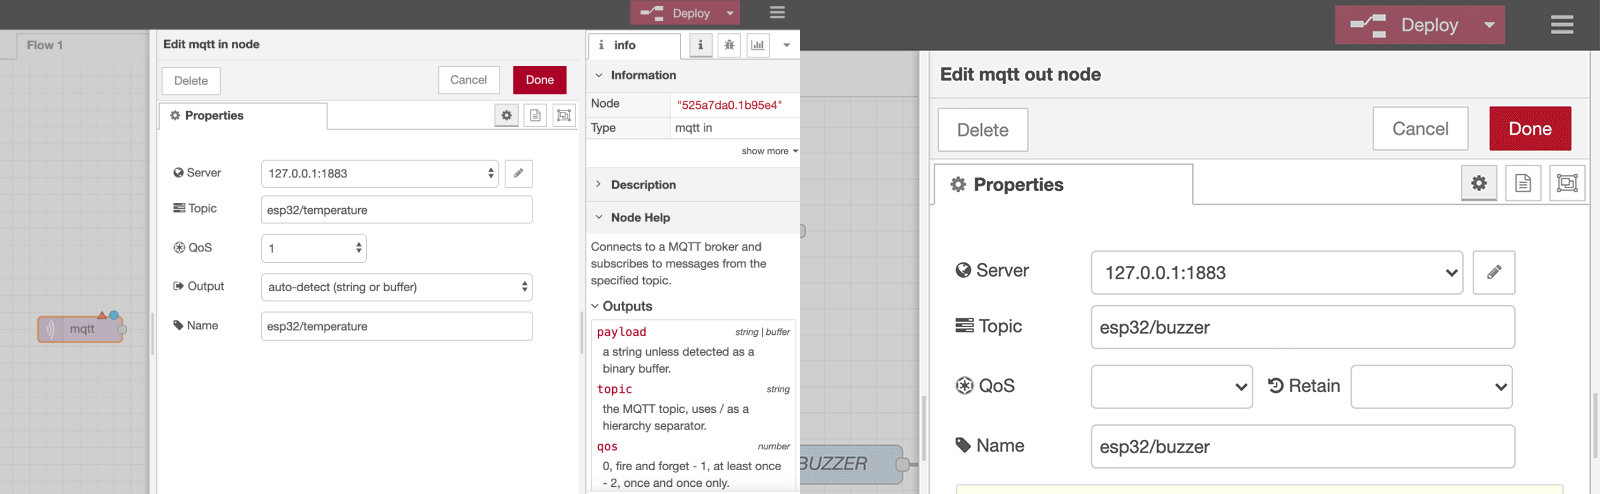
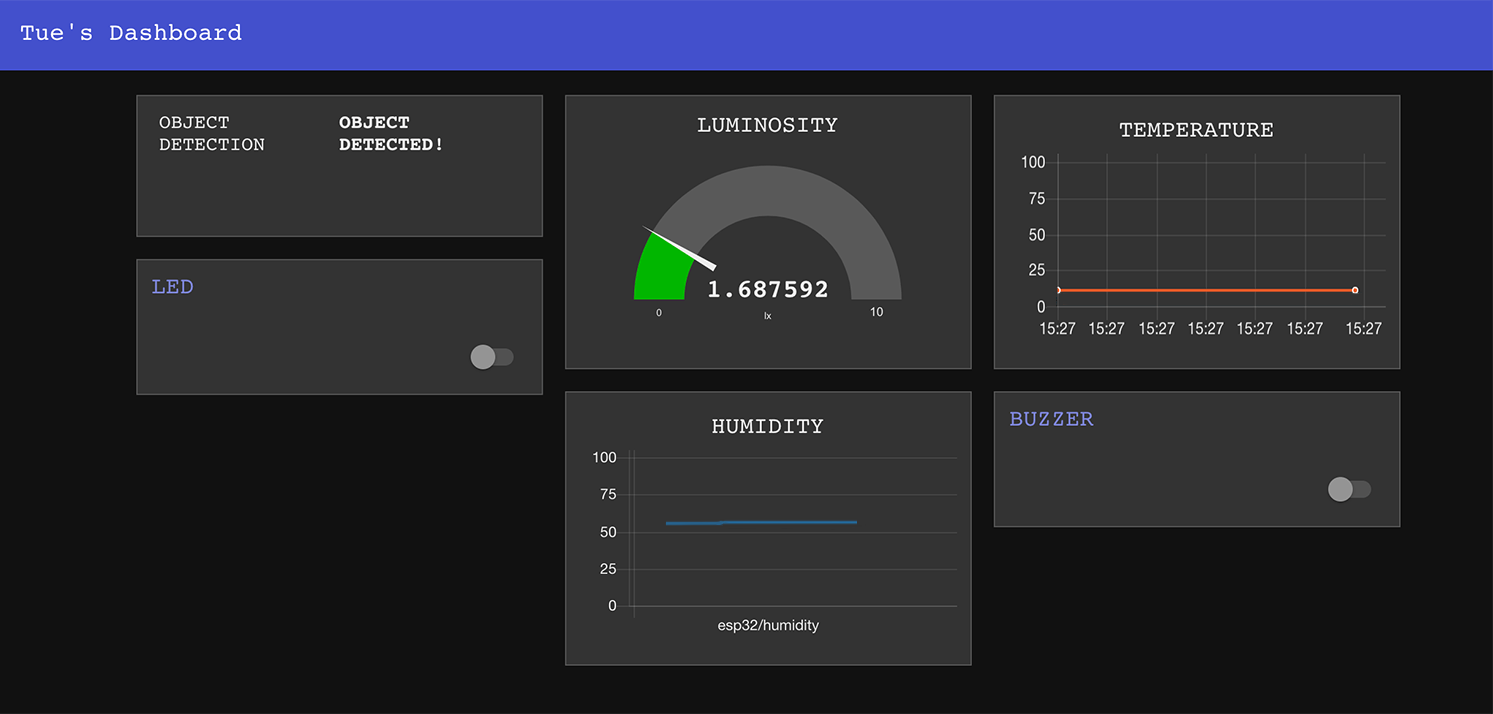
Then, I needed to create some UI dashboard nodes to display my sensors' data as well as sending payloads from the UI switches:
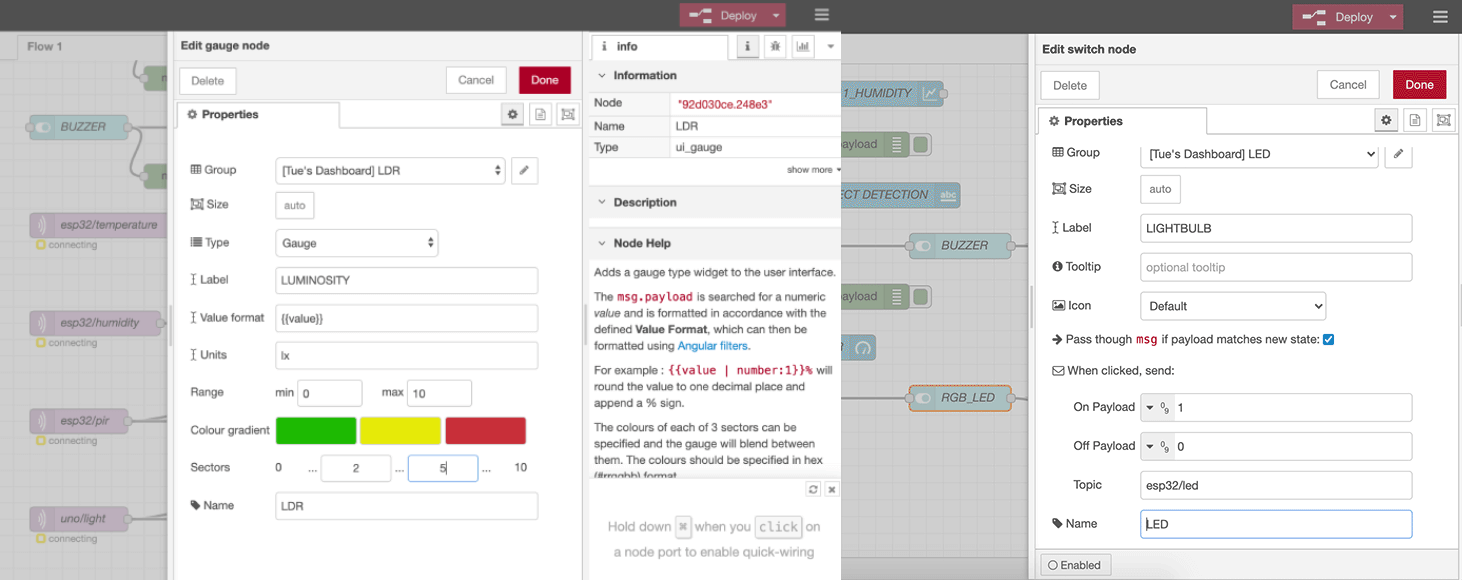
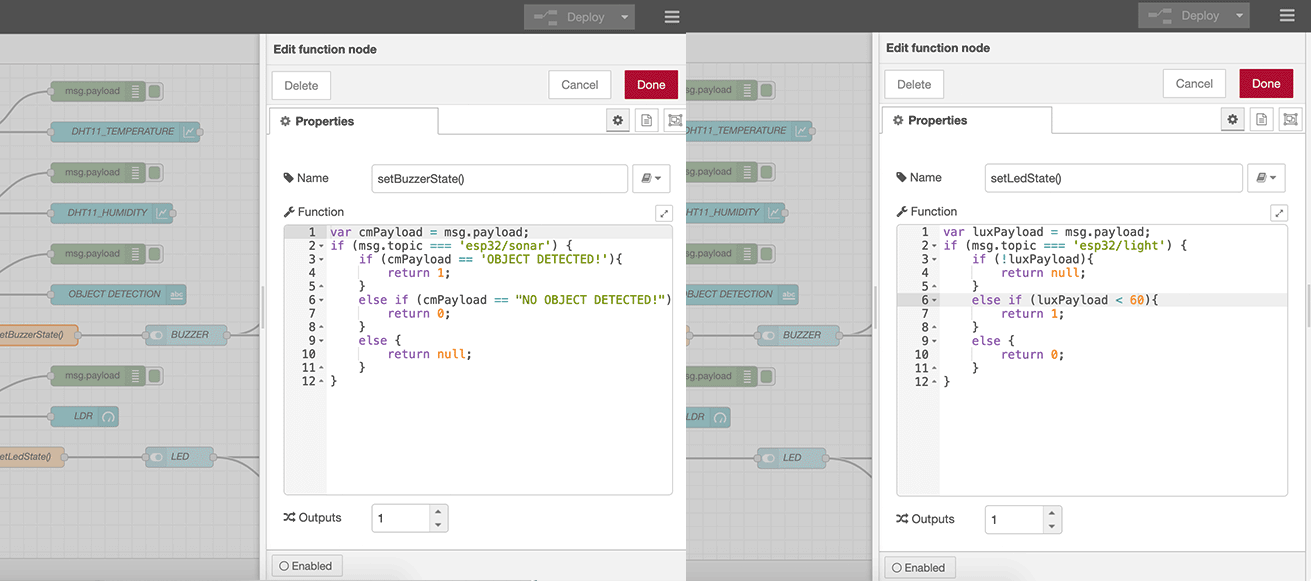
I also created some function nodes, mostly to process the data received from inputs and then to send the related payloads to control the outputs:
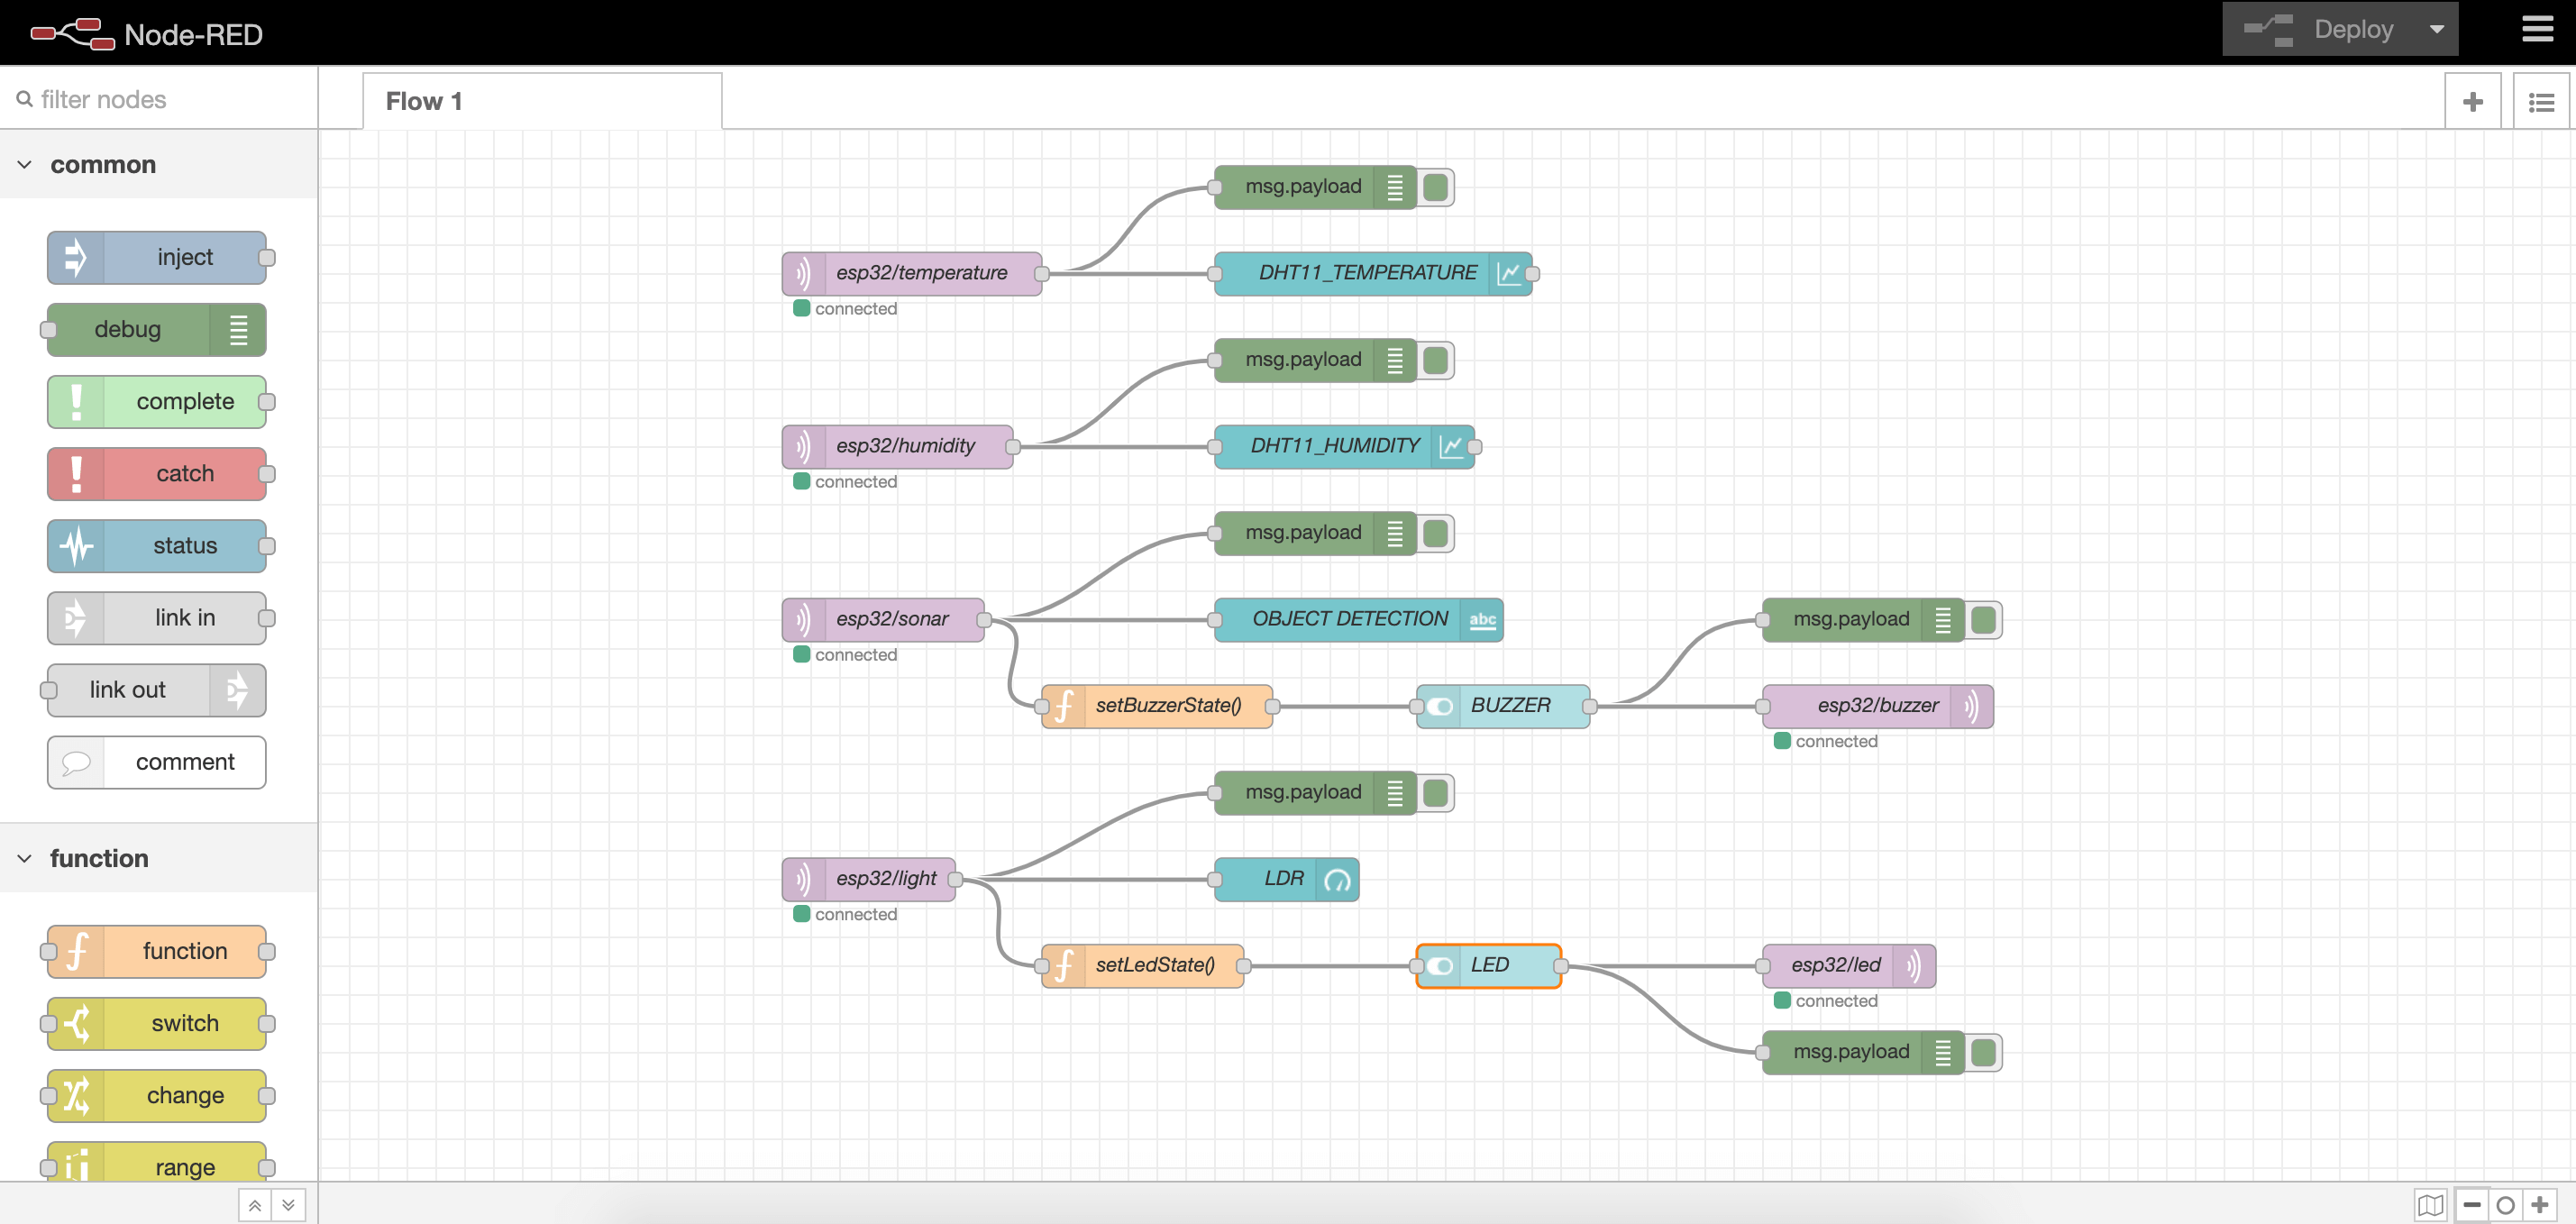
Here you go the final Node-RED flow, ready to be deployed:
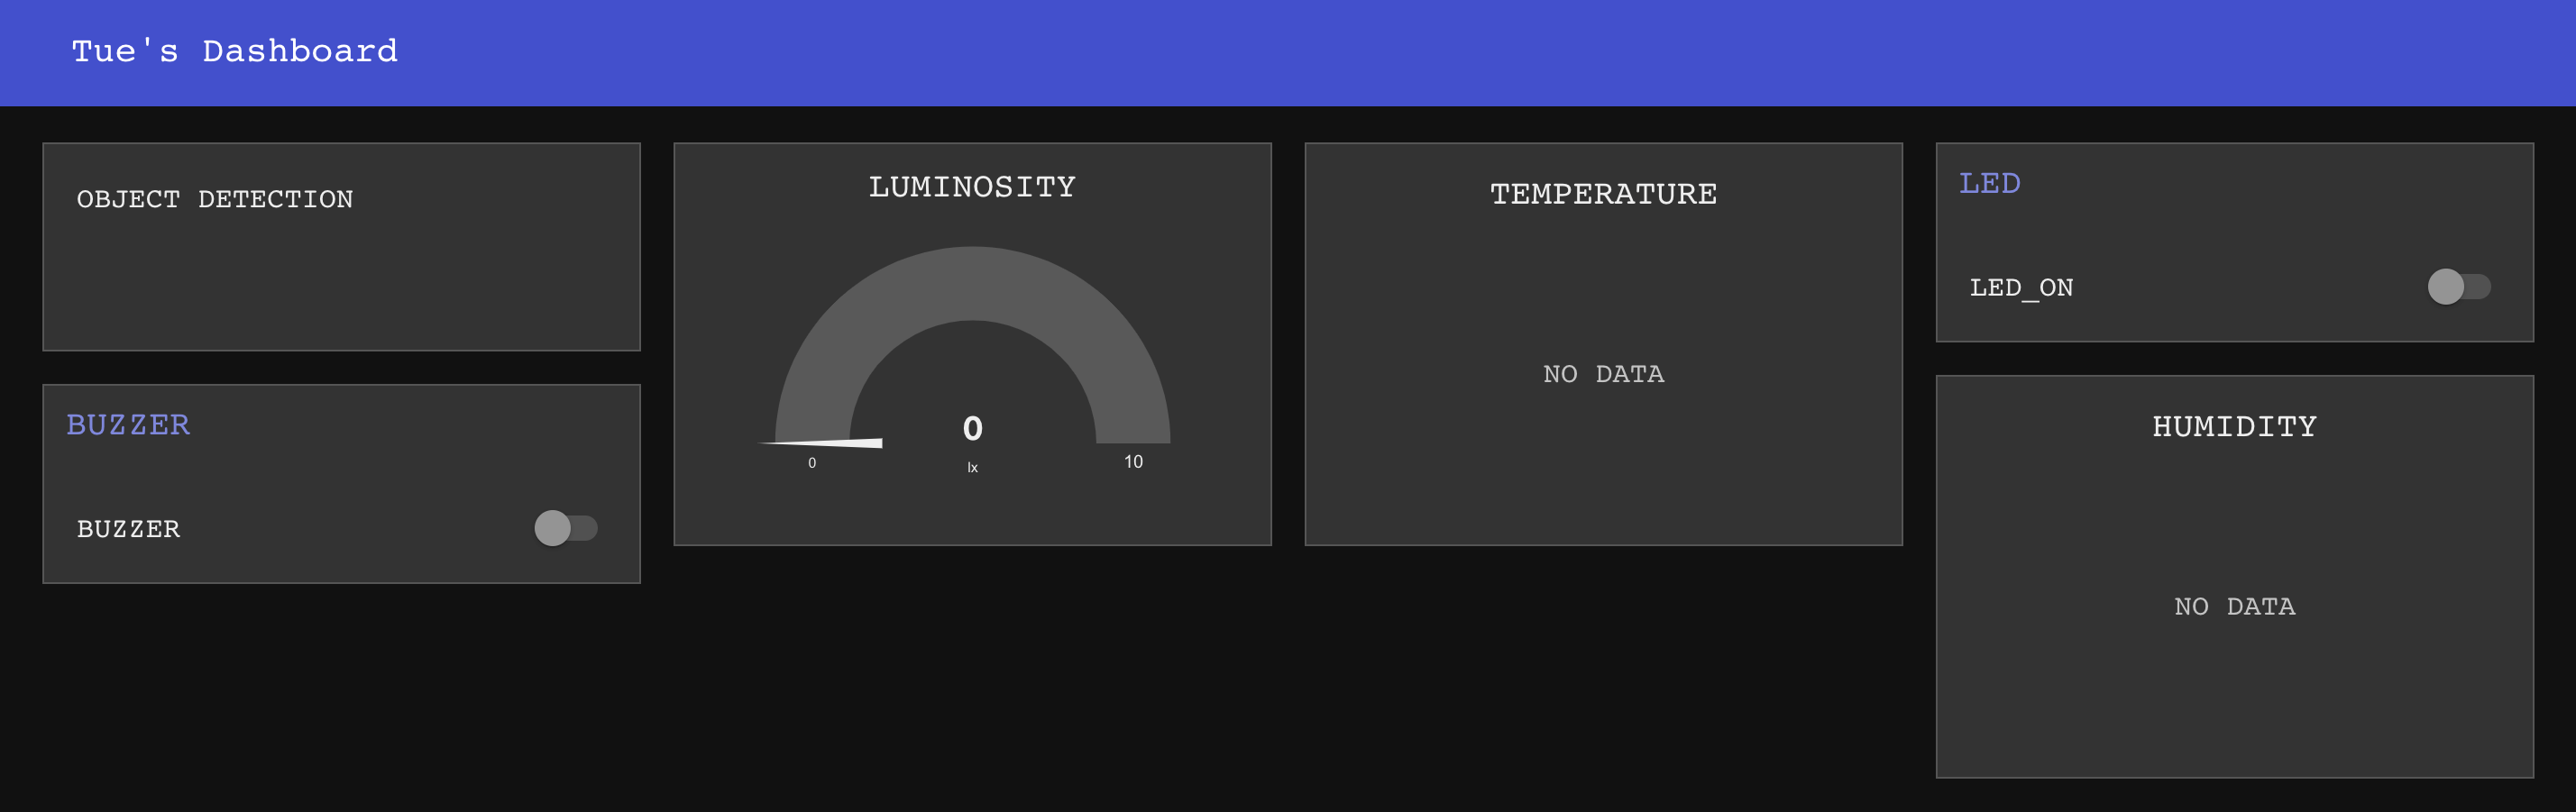
And the dashboard was also ready:
ESP32: PubSubClient
Next, I wrote a program to publish all the sensors' data to Node-RED over MQTT, and also subscribed to the payloads sent by Node-RED. Below is the code I flashed to my ESP32 board:
    /*
     * libraries
     */
    #include <DHT.h>
    #include <NewPing.h>
    #include <Adafruit_NeoPixel.h>
    #include <WiFi.h>
    #include <PubSubClient.h>
    /*
     * pin variables
     */
    #define TRIGGER_PIN 32
    #define ECHO_PIN 35
    #define DHT_PIN 33
    #define LDR_PIN 34
    #define BUZZ_PIN 14
    #define RGB_PIN 26
    /*
     * useful variables and initializations
     */
    int ldrValue;
    float tempValue;
    float humValue;
    float distance;
    #define DHTTYPE DHT11
    NewPing sonar(TRIGGER_PIN, ECHO_PIN, 200);
    DHT dht(DHT_PIN, DHTTYPE);
    #define LED_COUNT 10
    Adafruit_NeoPixel strip(LED_COUNT, RGB_PIN, NEO_GRB + NEO_KHZ800);
    /*
     * timer variables
     */
    unsigned long now = millis();
    unsigned long lastMeasure = 0;
    /*
     * wifi & mqtt credentials
     */
    const char* ssid = "SSID";
    const char* password = "PASSWORD";
    const char* mqtt_server = "SERVERADDRESS";
    WiFiClient espClient;
    PubSubClient client(espClient);
    /*
     * setup connections
     */
    void setup() {
        Serial.begin(115200);
        /*
         * sensors and actuators setup
         */
        pinMode(BUZZ_PIN, OUTPUT);
        dht.begin();
        strip.begin();
        strip.show();
        strip.setBrightness(150);
        /*
         * wifi & mqtt setup
         */
        Serial.println();
        Serial.print("Connecting to ");
        Serial.println(ssid);
        WiFi.begin(ssid, pass);
        WiFi.mode(WIFI_STA);
        while (WiFi.status() != WL_CONNECTED) {
            Serial.print(".");
            delay(500);
        }
        Serial.println("");
        Serial.println("WiFi connected");
        Serial.println("IP address: ");
        Serial.println(WiFi.localIP());
        client.setServer(mqtt_server, 1883);
        client.setCallback(callback);
    }
    /*
     * loop()
     */
    void loop() {
        /*
         * refresh mqtt subscriptions
         */
        if (!client.connected()) {
            reconnect();
        }
        client.loop();
        /*
         * publish every 30 seconds
         */
        now = millis();
        if (now - lastMeasure > 30000) {
            lastMeasure = now;
            // publish sensors' data to MQTT
            char tempMsg[50];
            snprintf (tempMsg, 50, "%f", readTemp());
            char humMsg[50];
            snprintf (humMsg, 50, "%f", readHum());
            char luxMsg[50];
            snprintf (luxMsg, 50, "%f", readLDR())
            client.publish("esp32/temperature", tempMsg);
            client.publish("esp32/humidity", humMsg);
            client.publish("esp32/light", luxMsg);
            if (readDistance() <= 8) {
                client.publish("esp32/sonar", "OBJECT DETECTED!");
            } else {
                client.publish("esp32/sonar", "NO OBJECT DETECTED!");
            }
        }
    }
    /*
     * callback function
     */
    void callback(char* topic, byte* payload, unsigned int length) {
        Serial.print("Message arrived on topic: ");
        Serial.print(topic);
        Serial.print(". Message: ");
        String messageTemp;
        // check payload from MQTT
        for (int i = 0; i < length; i++) {
            Serial.print((char)payload[i]);
            messageTemp += (char)payload[i];
        }
        Serial.println();
        // turn LED and buzzer on
        if (topic == "esp32/led") {
            if (messageTemp == "1") {
            blinkWhite();
            }
        }
        if (topic == "esp32/buzzer") {
            if (messageTemp == "1") {
            buzz();
            }
        }
        Serial.println();
    }
    /*
     * subscribe to topics
     */
    void reconnect() {
        while (!client.connected()) {
            Serial.print("Attempting MQTT connection...");
            String clientId = "ESP32Client-";
            clientId += String(random(0xffff), HEX);
            // subscribe
            if (client.connect(clientId.c_str())) {
                Serial.println("connected");
                client.subscribe("esp32/led");
                client.subscribe("esp32/buzzer");
            } else {
                Serial.print("failed, rc=");
                Serial.print(client.state());
                Serial.println(" try again in 5 seconds");
                delay(5000);
            }
        }
    }
    /*
     * read sensors
     */
    int readLDR() {
        delay(500);
        ldrValue = analogRead(LDR_PIN);
        return ldrValue;
    }
    int readTemp() {
        delay(500);
        tempValue = dht.readTemperature();
        return tempValue;
    }
    int readHum() {
        delay(500);
        humValue = dht.readHumidity();
        return humValue;
    }
    int readDistance() {
        delay(500);
        distance = sonar.ping_cm();
        return distance;
    }
    /*
     * control actuators
     */
    void buzz() {
        digitalWrite(BUZZ_PIN, HIGH);
        delay(500);
        digitalWrite(BUZZ_PIN, LOW);
        delay(500);
    }
    void blinkWhite() {
        colorWipe(strip.Color(255, 255, 255), 500);
    }
    void colorWipe(uint32_t color, int wait) {
        for(int i = 0; i < strip.numPixels(); i++) {
            strip.setPixelColor(i, color);
            strip.show();
            delay(wait);
        }
    }
}
I could see the board was connected to WiFi, however, I could not establish an MQTT connection.

After debugging for a while, I realized that I was using the IP address of my WiFi router as the server address instead of the the IP address of the Wifi hotspot provided by my phone (of which I used as WiFi credentials in my Arduino sketch). After using the correct IP address, I could successfully send messages over MQTT to control the buzzer of my board:

And I could also see updates on the Node-RED dashboard. Yay!
Conclusion
I was looking for ways to enhance the communication part of my Final Project. MQTT and Node-RED seem to be elegant and promising solutions. I still need to think further about how to get the most out of MQTT and deploy useful features for my Final Project.