This page is dedicated to describing the process of building my Final Project during the Fab Academy 2020 at Fab Lab Barcelona.
Introduction
I have a constant curiosity for going deep dive into the subsequent implications of the relationship between humans and machines which has led me to the questions of how new jobs will be created and what to do today to nurture the future workforce. In my opinion, intelligent systems and robots will create jobs that have never existed before and our educational system must be revamped to aid younger generations prepare for that. During my first year in Barcelona when I was studying my Master's degree, I was developing an online community-based platform helping postgraduates and life-long learners find courses and educational programs that match the requirements of future technical jobs. I would like to take on a different approach by building a tangible solution that allows people to take ownership of their own learning. Besides, I have 2 nephews, one is 6 years old and one is 4 years old. As a dedicated aunt, I've always wanted to build or develop some toys that could engage them in STEAM activities, so when they grow up they will be more than well-prepared to adapt to future jobs. That's why I came up with a modular and connected toy that can teach kids programming - the language of the future, and furthermore, give them the ability to build simple IoT devices.
What does it do?
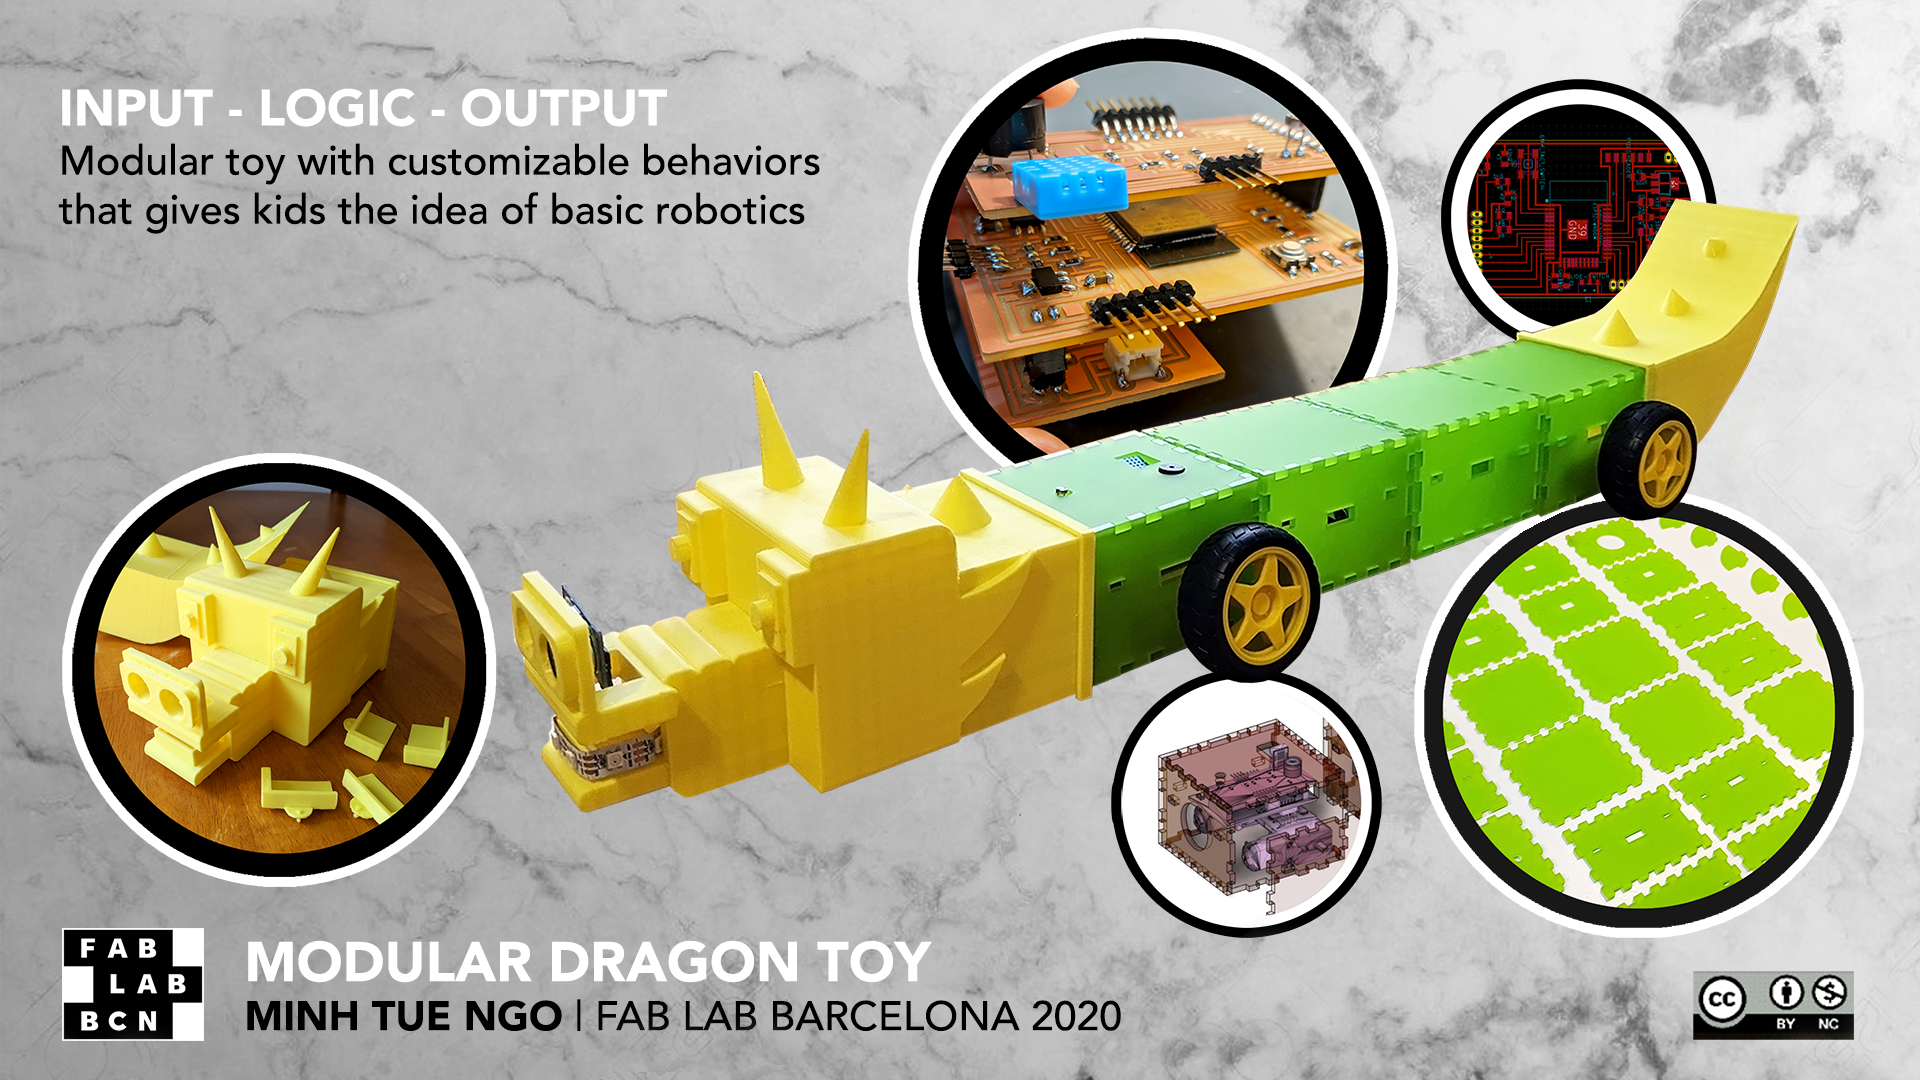
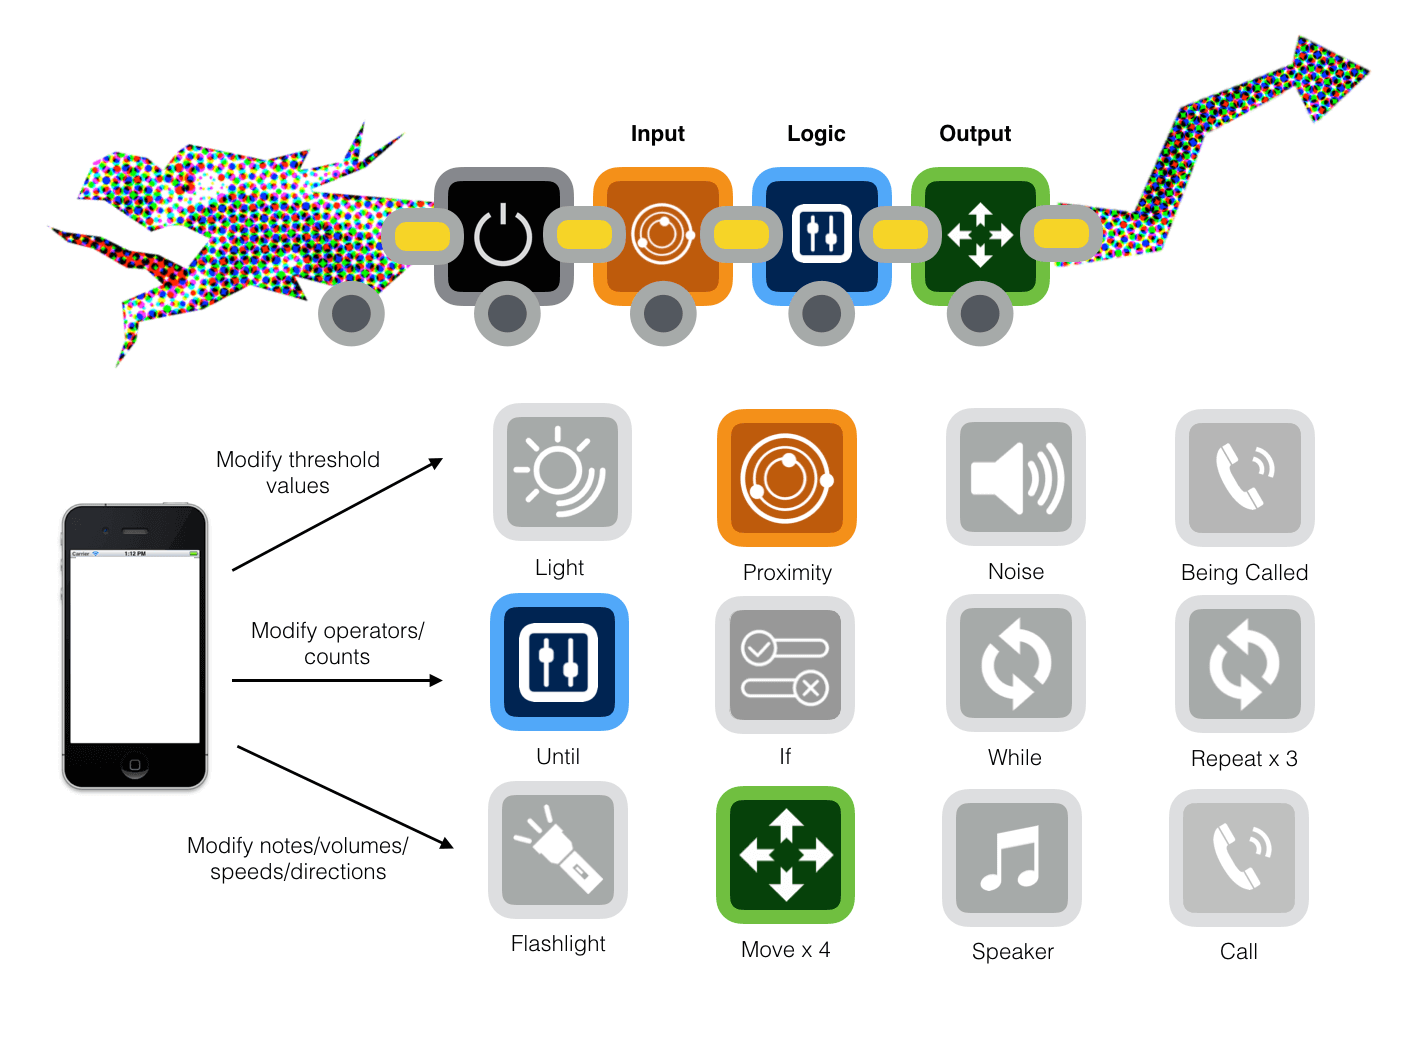
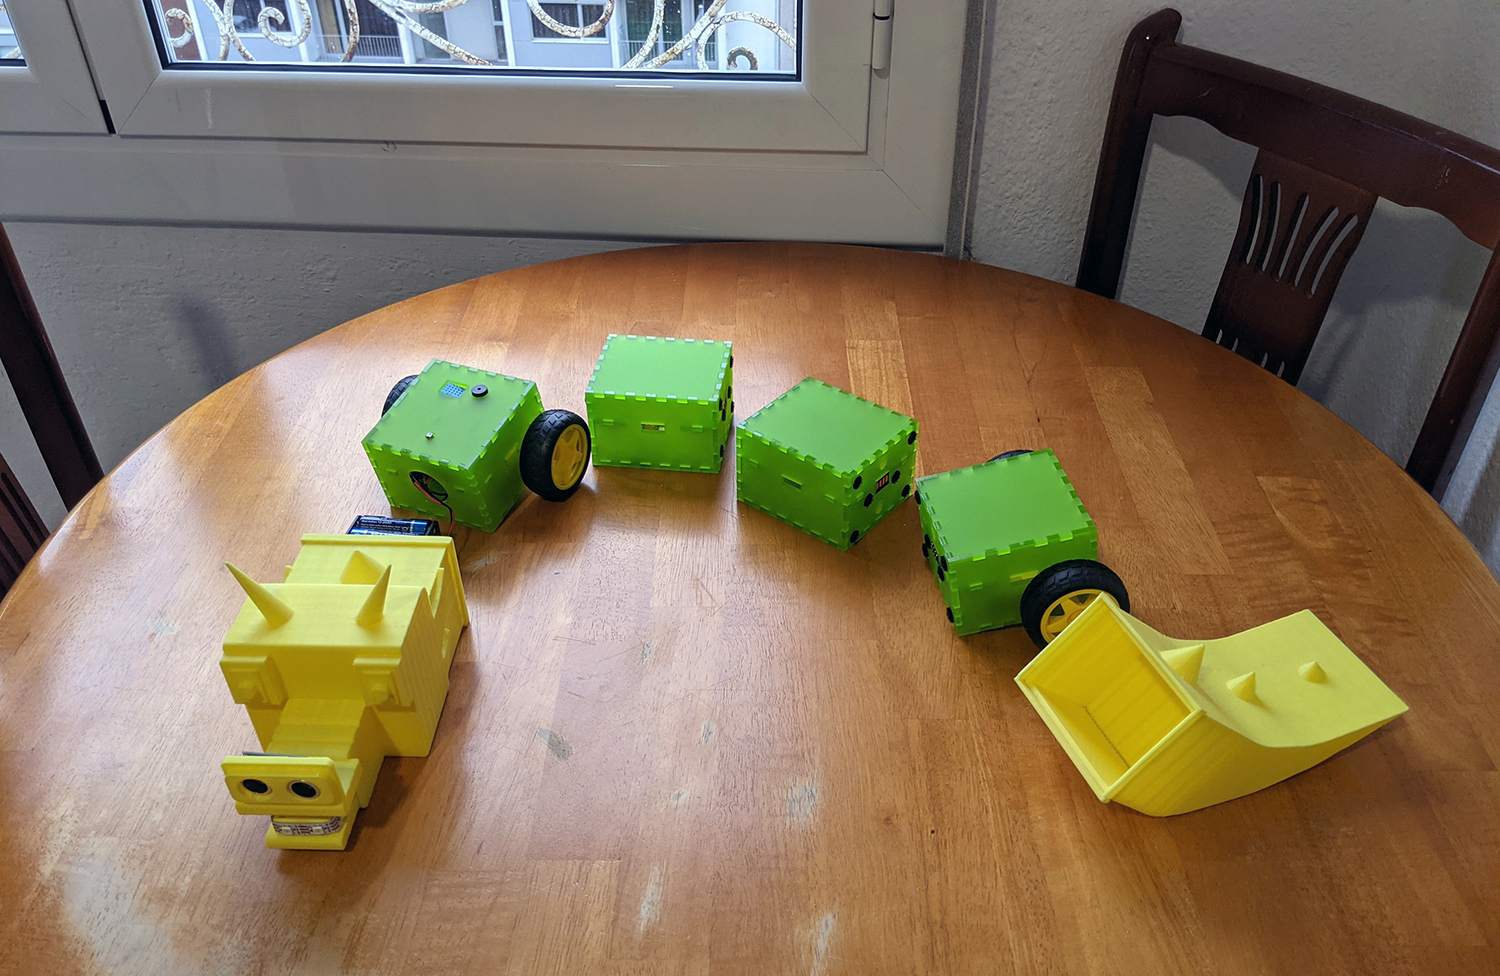
My idea is to create an off-the-screen and modular robot with customizable behaviors that can give preschoolers the basic ideas of programming and robotics. There will be 3 groups of blocks: Input, Logic, Output. Kids will need at least one block of each group to perform the desired task. I want the robot to symbolize a cool and modular animal, hence, I sketched here a dragon with customized habits that can be defined by kids through a trial-and-error process:
The main target users are kids 4-7 years old. I intended to include a mobile/web app, but in the end, I didn't have enough time to work on it.
Who has done this before?
I found some STEAM toys (which are quite successful) with a similar idea, so I think my dragon would be useful and loved by my nephews!
Some cool projects by the alumni of Fab Academy and MIT's CBA that are related to my idea:
- Self-built IoT devices from LEGO bricks
- DIS/ORDER modular circuit
- Soldercubes self-soldering modular robot
- Interactive cardboard cubes
What makes my idea different?
This concept is not new, in fact, it has a long history with many innovative approaches. Even though, the new values I'd like to contribute are:
- The Debugging process: After immersing myself into technology for a while, I realized the most crucial skill kids need to develop is a debug mindset. My robot should be able to inform kids (or parents) whether each step is successful or there is an error at some point.
- The Logic blocks: Other toys usually simplify the Input-Output relationship with a default If-Then logic. I'd like to invest further in different types of programming concepts. They could be other flow controls (while, for, iteration loop) or operators (and, or, greater than, less than, equal).
- An Object-Oriented approach: I'm thinking about how to resemble a function with those blocks, maybe with a Call output and a Being Called input. This could be something very interesting since my dragon could be considered as an object and would be able to perform communication. But this could be developed in the future (after the Fab Academy).
Project development plan
I thought that being hung up on sensors and actuators will both distract me from making an almost-there prototype and distract the kids from trying out as many programming concepts as possible. Hence, my MVP for Fab Academy will have 2 Input blocks (including Proximity and Dark), 2 Output blocks (including Move Back and Flashlight), and at least 2 Logic blocks (including If and Until). Instead of making +6 actual blocks, I will just make 3 blocks and replace the IDs in order to demonstrate different scenarios.
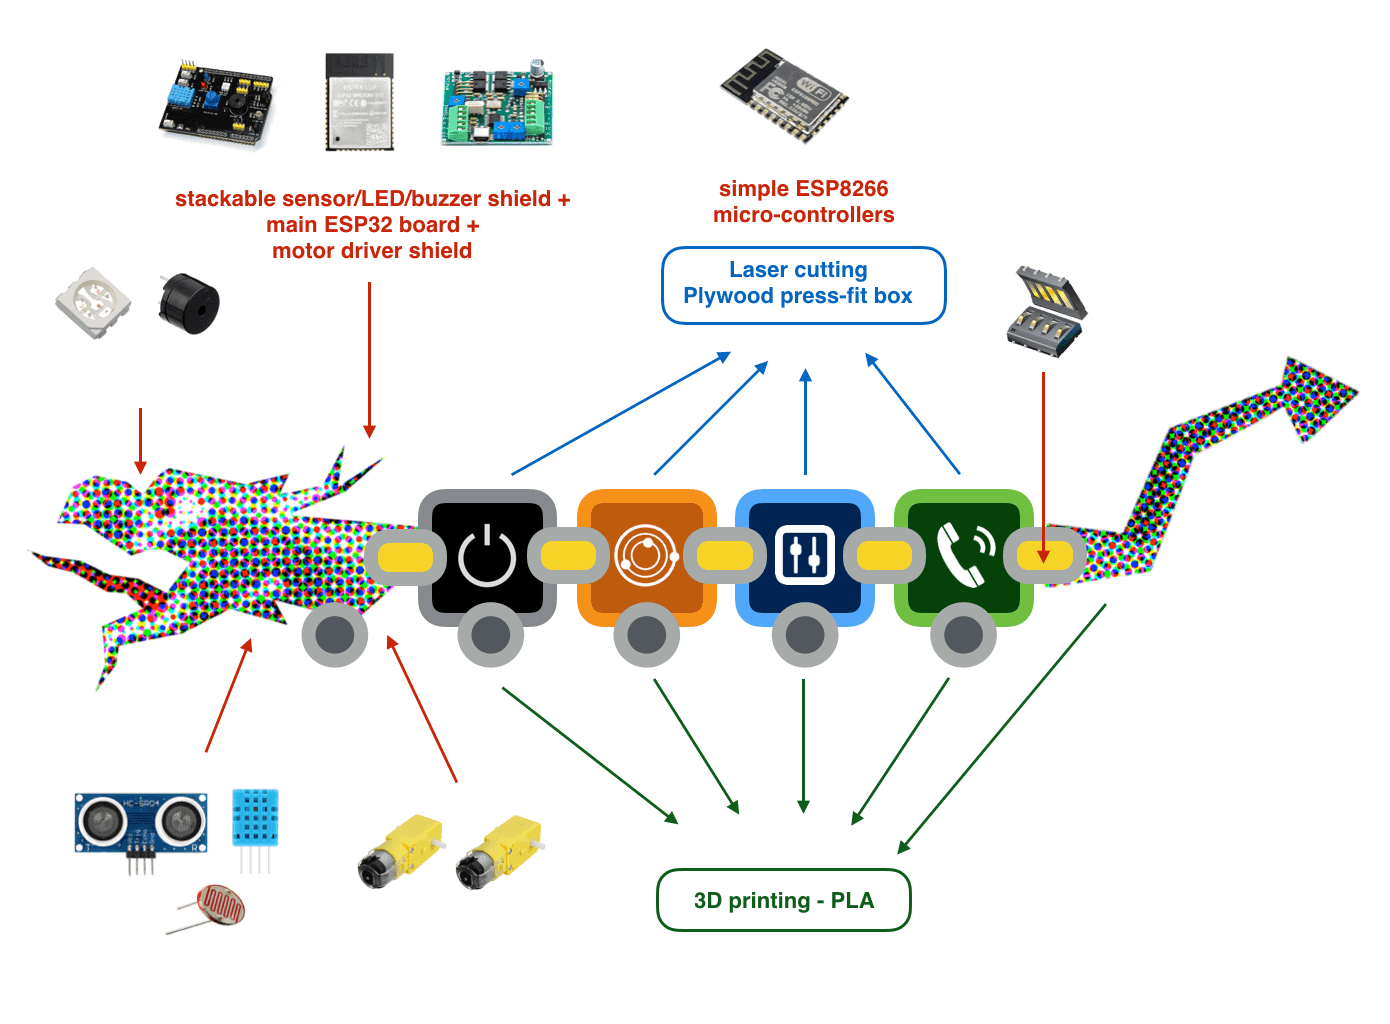
I used ESP32 and ESP8266 chips for my Final Project. The below pictures show how I planned to connect the block physically and electrically:
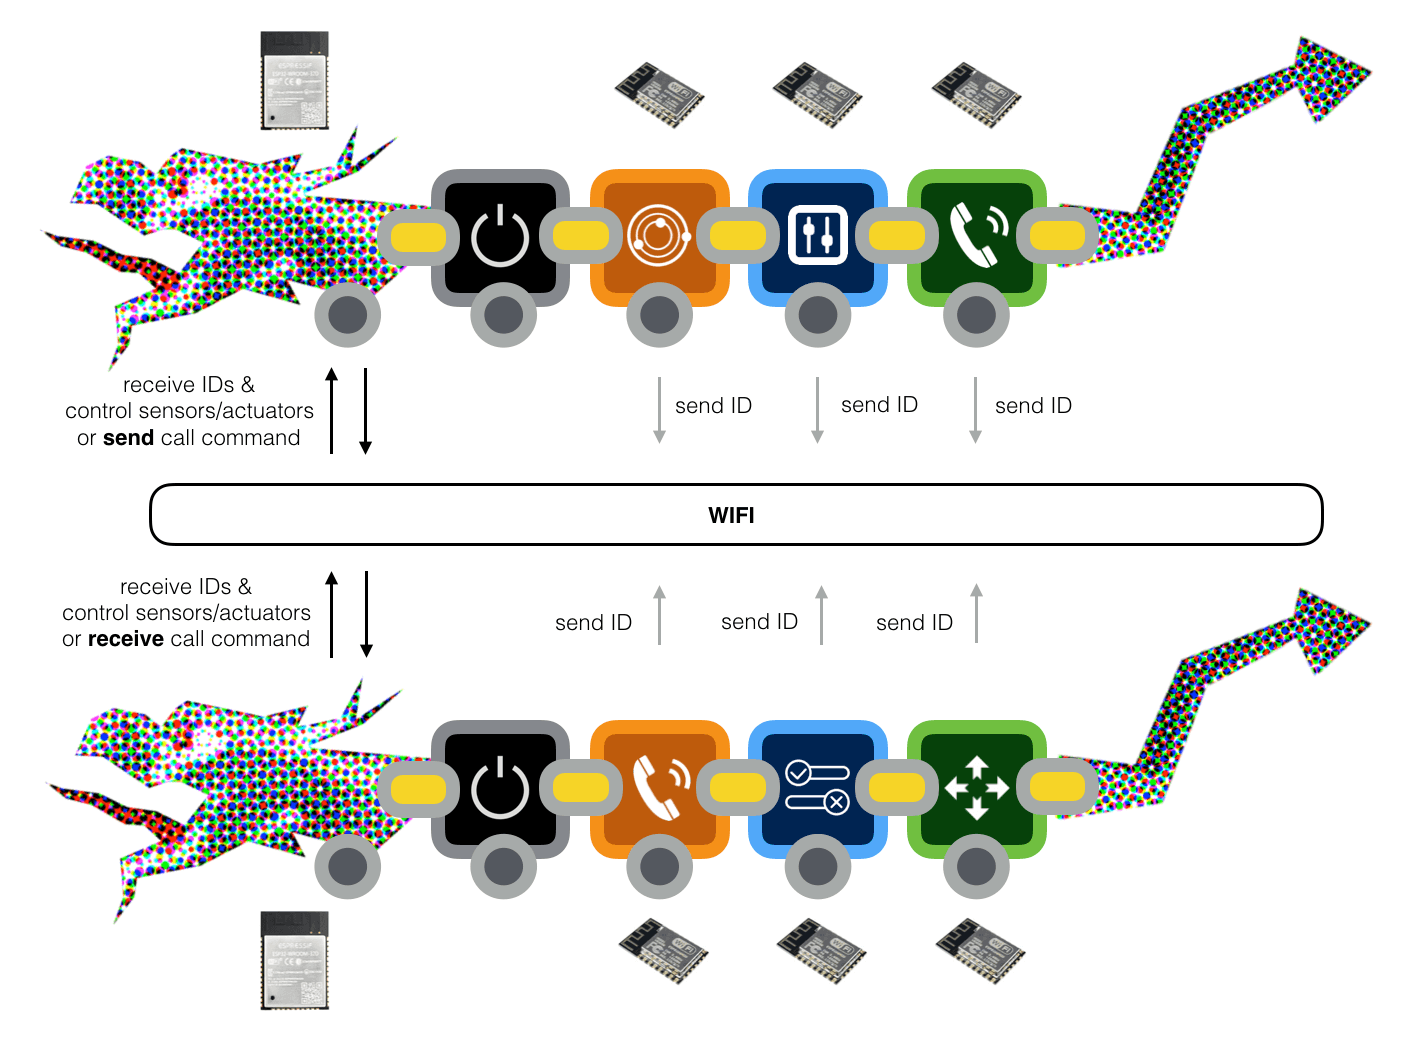
And how I planned to exchange and process data between them:
Here is a summary of work breakdown for my Final Project:
| Requirement | Scope | Process | CAD/EDA software | CAM software | Programming IDE | Machine | Material |
|---|---|---|---|---|---|---|---|
| Subtractive fabrication | Press-fit blocks | Laser-cutting | Fusion 360 | Rhino + TROTEC JobControl | N/A | Trotec Speedy 400 | Acrylic 4mm |
| Additive fabrication | Dragon's head, tail, and adapters | FDM 3D printing | Fusion 360 | Simplify3D | N/A | A Duet3D-powered printer made by our Fab Lab Manager Mikel Llobera | PLA 1.75mm |
| Electronics design & production | Micro-controller boards, multi-sensor/actuator shields | PCB milling & soldering | KiCad | Fab Modules | N/A | Roland MonoFab SRM-20 | PCB 50 x 70 x 1.6mm |
| Embedded micro-controller programming | Micro-controller boards | Embedded programming | N/A | N/A | Arduino IDE | N/A |
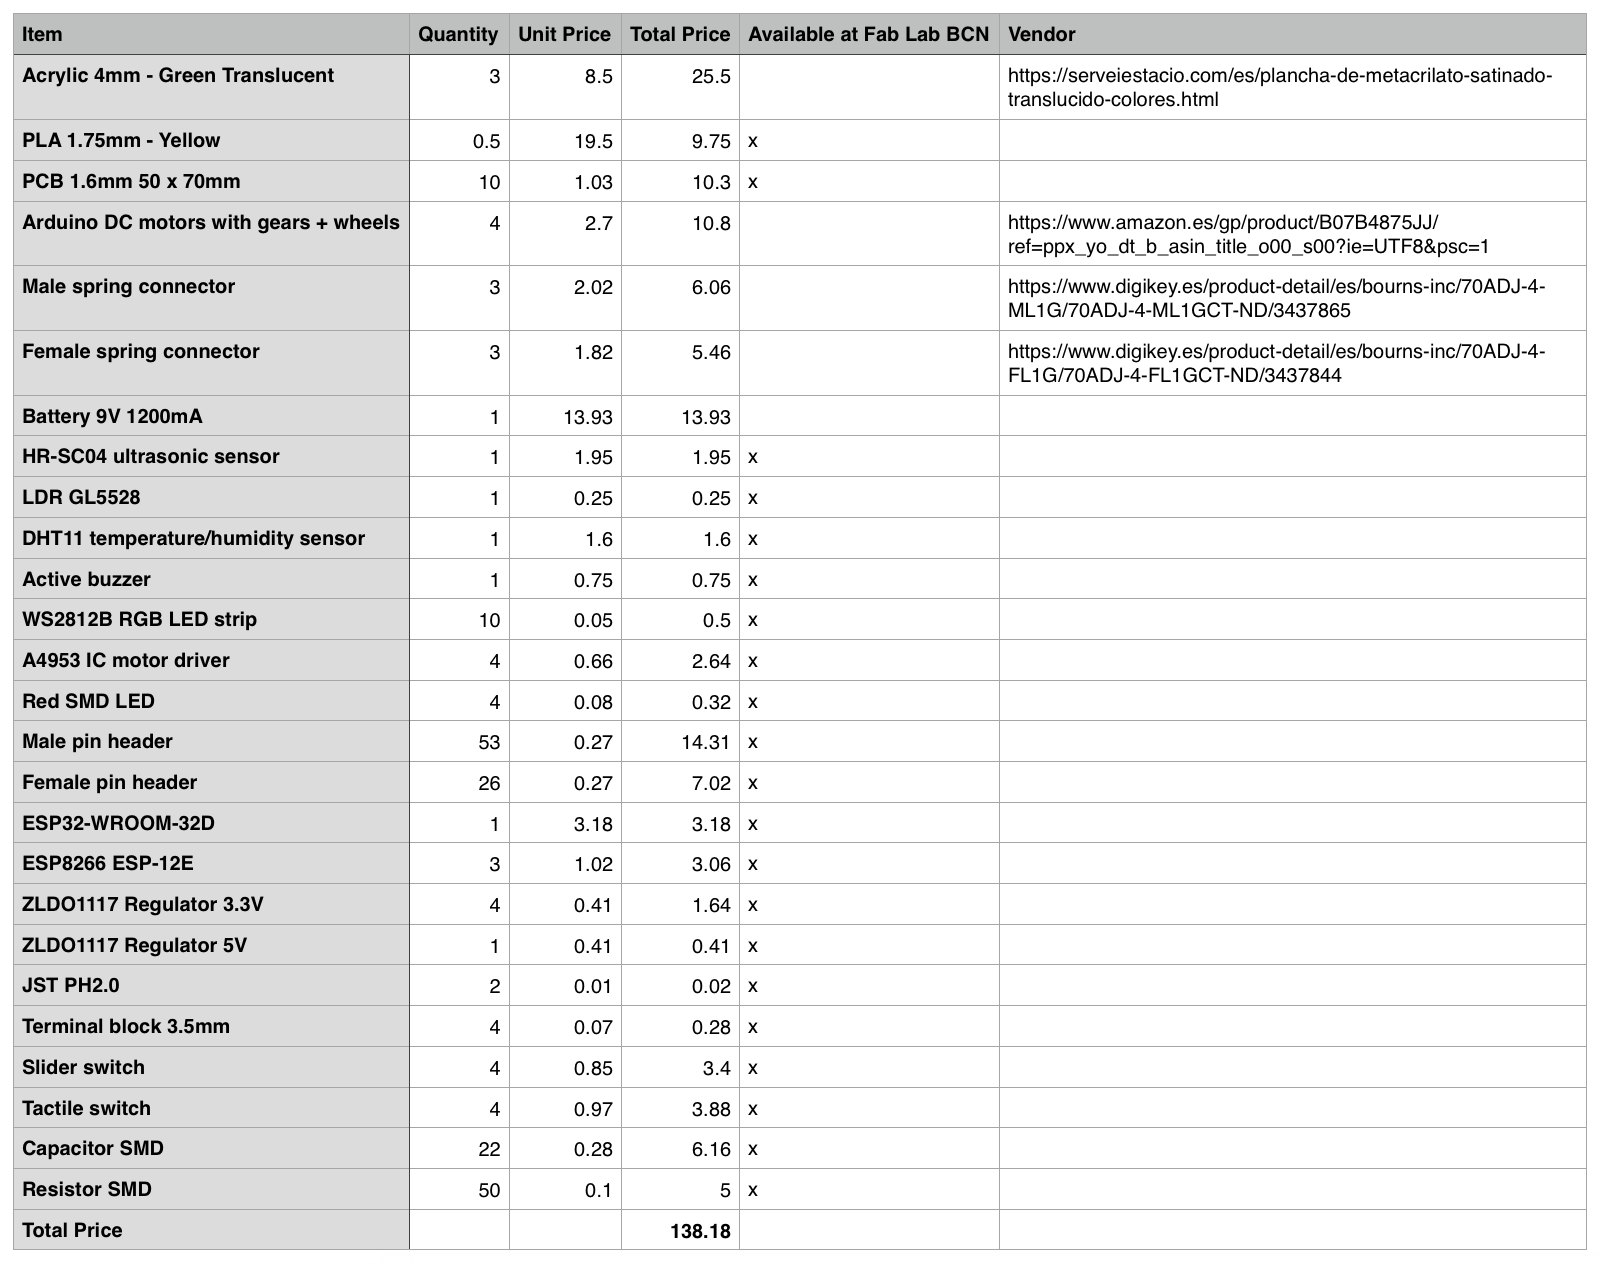
I also include here the final BOM. The .csv file can be downloaded here.
Project evolution
Electronics design
ESP32 main control board
My idea is to use the ESP32-WROOM-32D chip as the central micro-controller that manipulates all the input and output devices, for a couple of reasons:
- I can easily program the ESP32 chip without external programming adapter.
- ESP32 chips can be programmed using many frameworks (Arduino, ESP-IDF) and IDE (Arduino IDE, PlatformIO).
- The ESP32/ESP8266 chips can communicate with each other via Wifi without an extra Wifi module.
- The ESP32 chip is really powerful: it has a lot of memory, many PWM pins, and many ADC channels.
- It also supports a wide range of serial communication protocols: SPI, I2C, ESP-NOW, MQTT, etc.
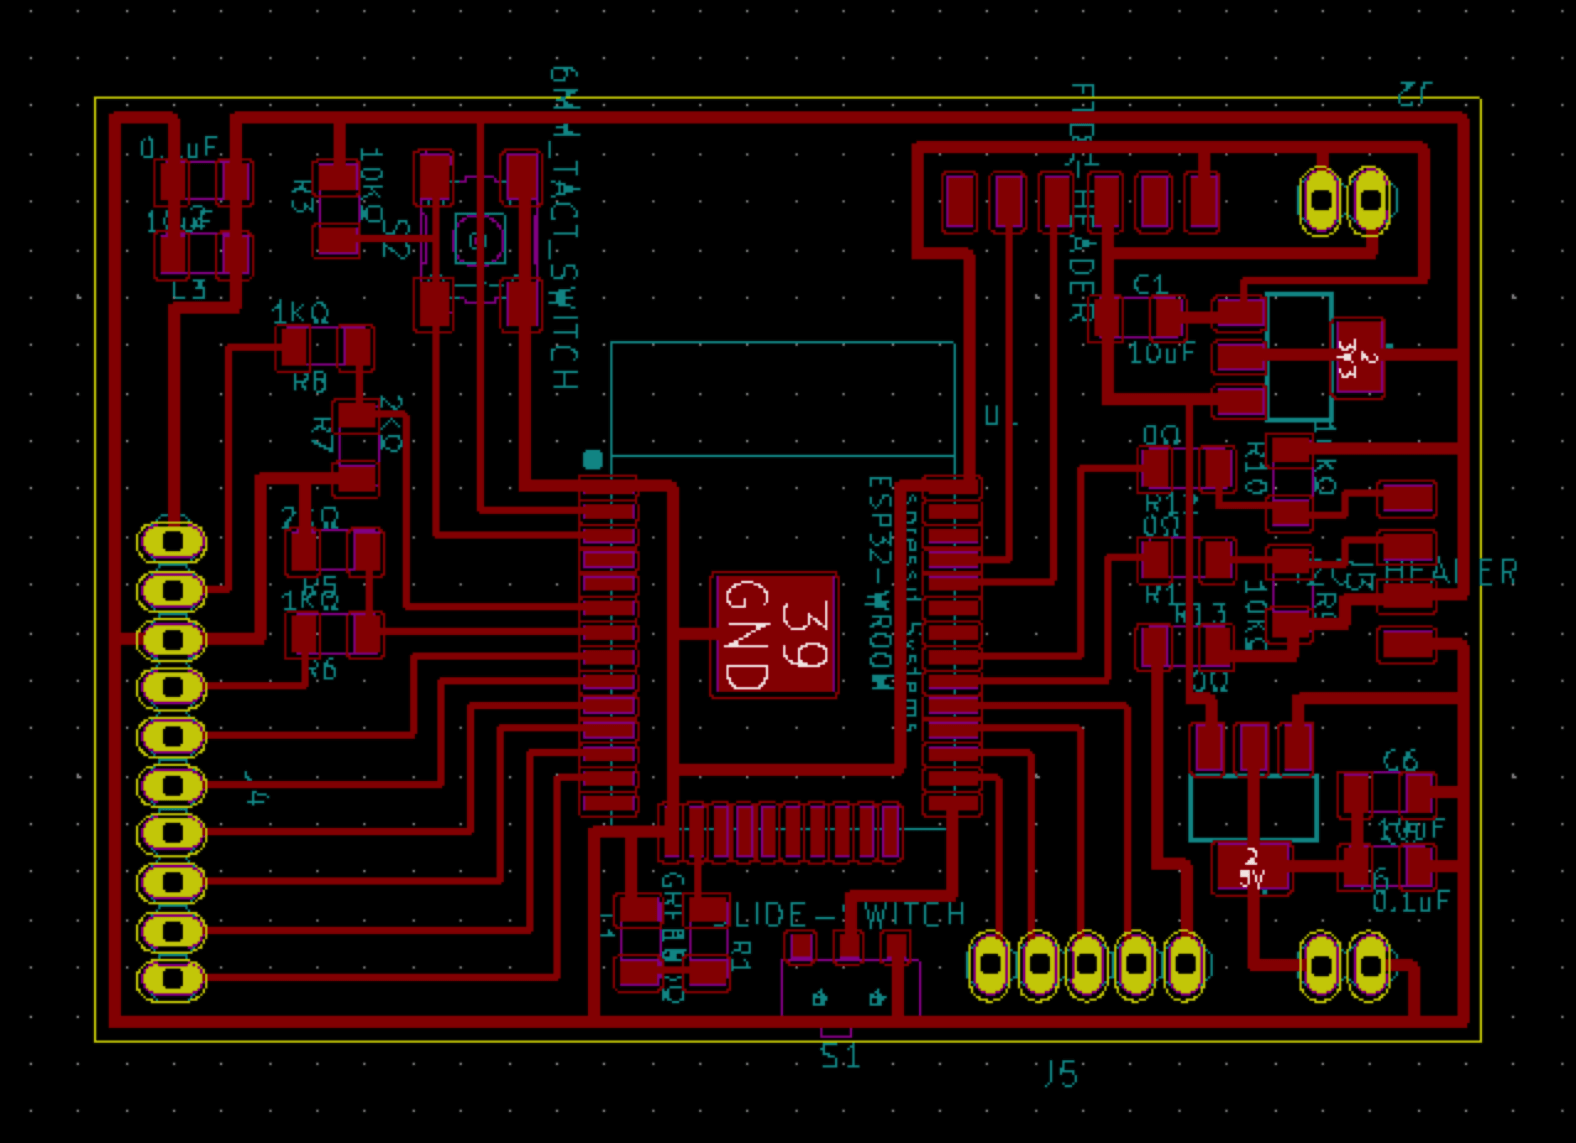
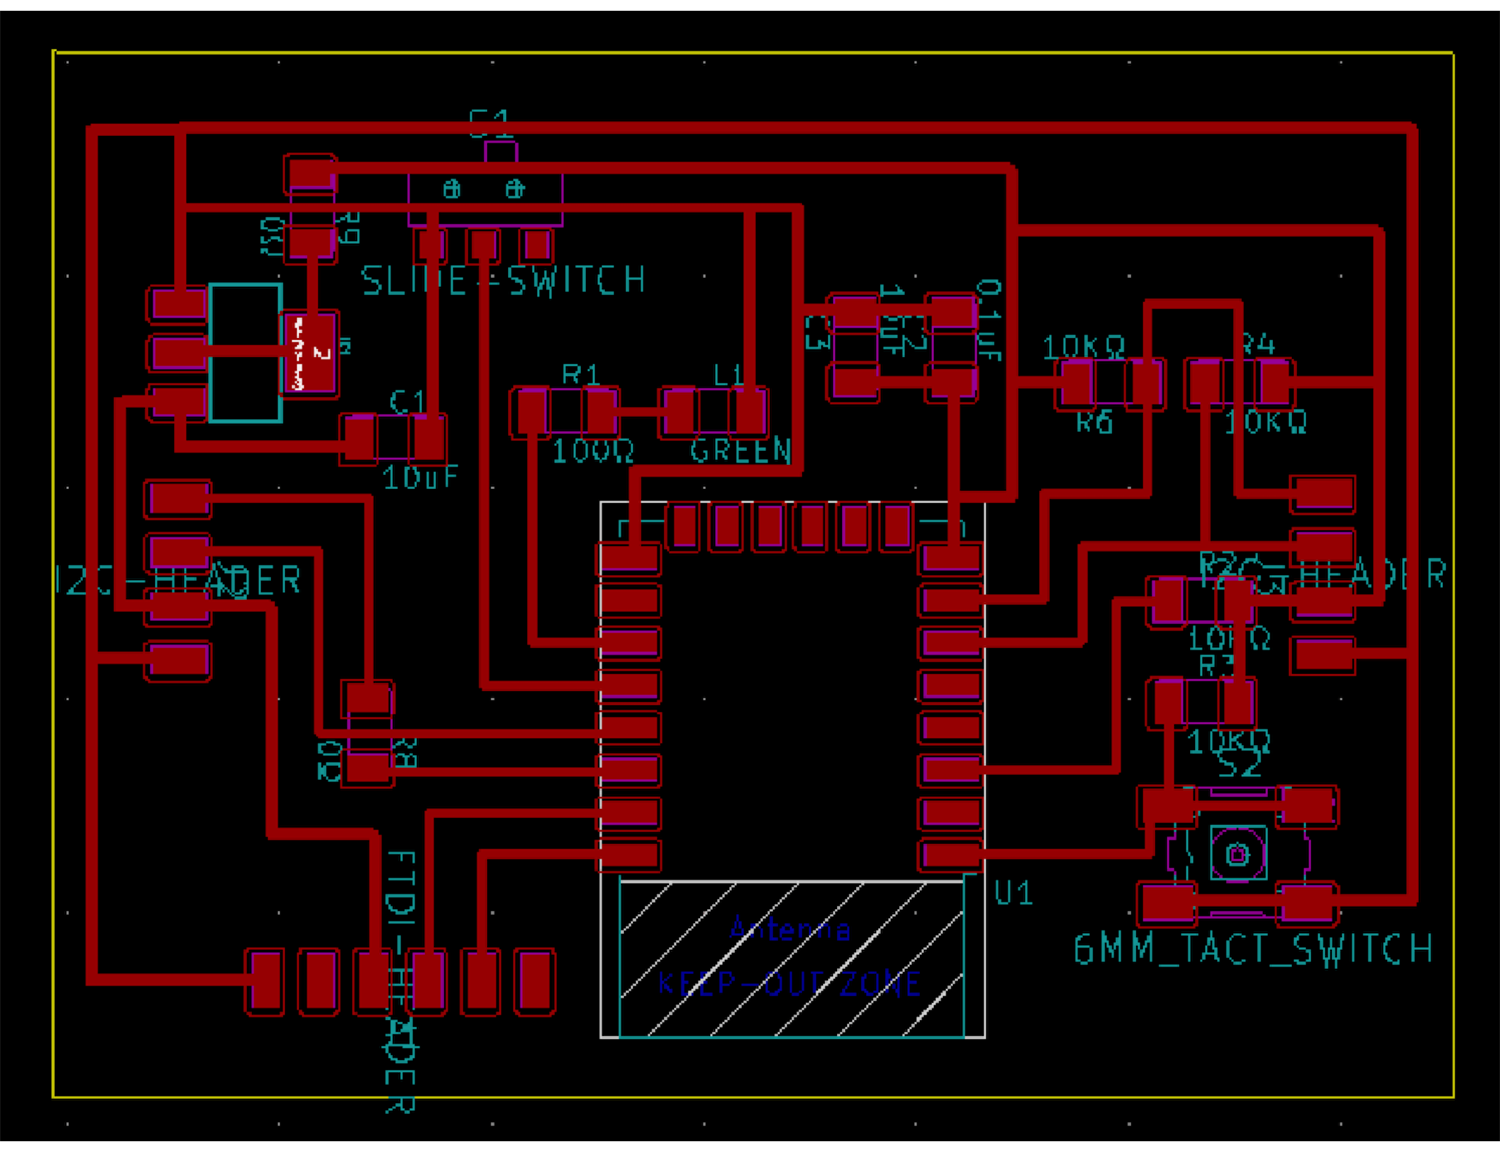
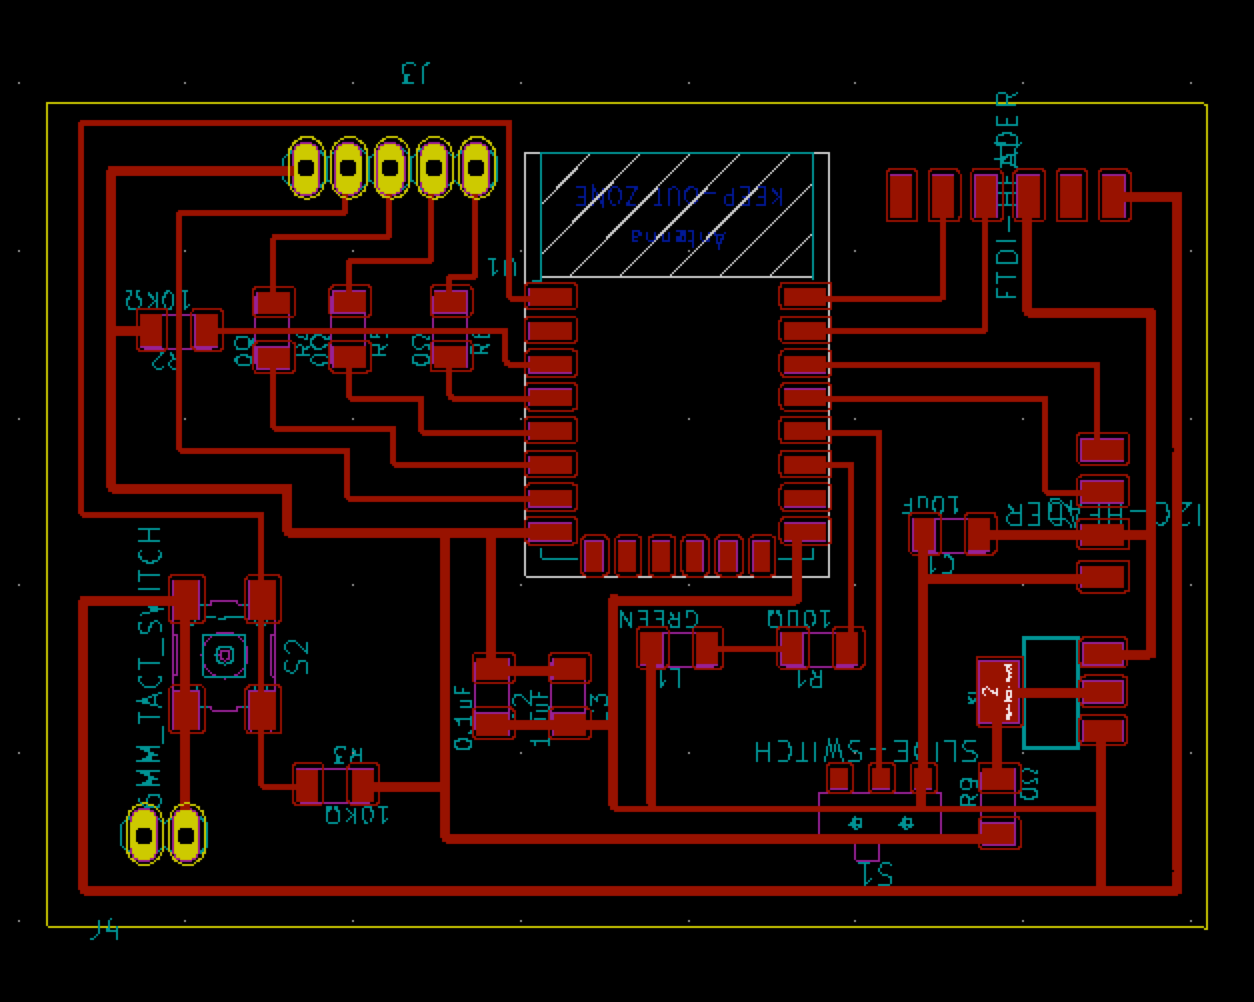
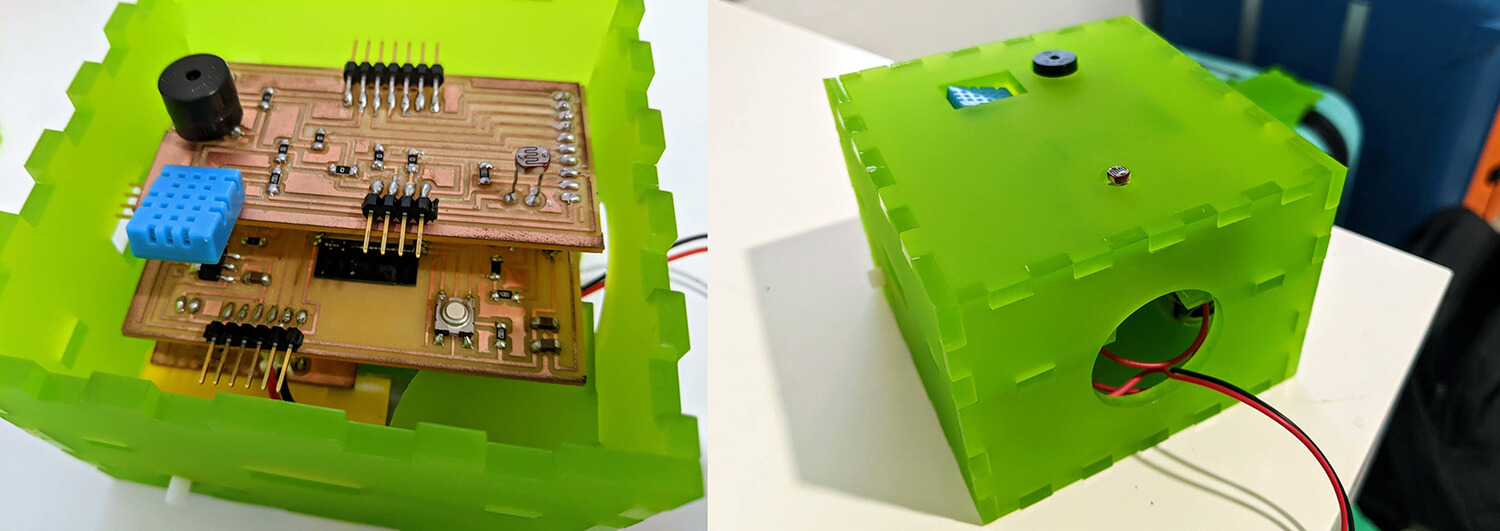
The board was designed during the 9th week and has these building blocks: the programming switch and the reset button (to flash programs to the chip), a user-programmable LED (for debugging), an FTDI area including the FTDI header, a 3.3V LDO regulator and 5V LDO regulator (to convert higher voltage from USB and the battery to voltage levels that are not damaging to the components). There are also voltage divider circuits for shifting down logic levels from the 5V sensors. Beside the pin headers for stacking the shields, I also included the header for I2C communication (GND, VCC, SDA, SCL).
ESP32 sensor shield
The sensors are connected to the main control board via a multi-sensor stackable shield which includes: an HC-SR04 ultrasonic sensor, a DHT11 temperature/humidity sensor and an LDR. I also put the LED strip and the active buzzer in the same shield with the sensors.
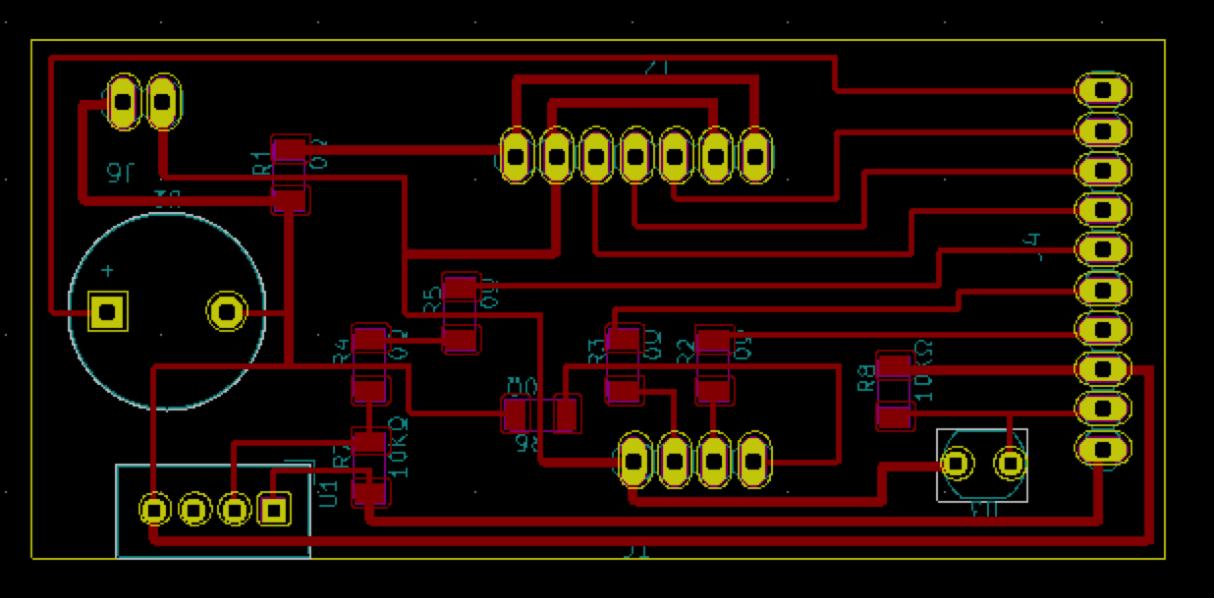
The only thing I should pay attention to was placing the sensors and actuators in a way that will make it easier for wiring and assembling. I have here 2 headers for the ultrasonic sensor (which will be placed at the nose of the dragon) and the LED strip (which will be placed at the teeth).
ESP32 motor shield
The DC motors are connected to the main control board via a motor stackable shield with 2 H-bridge circuits. I decided to use 2 A4953 chips to handle 2 DC motors. The shield was designed and tested during the 11th week with a task left: finding the right battery option.
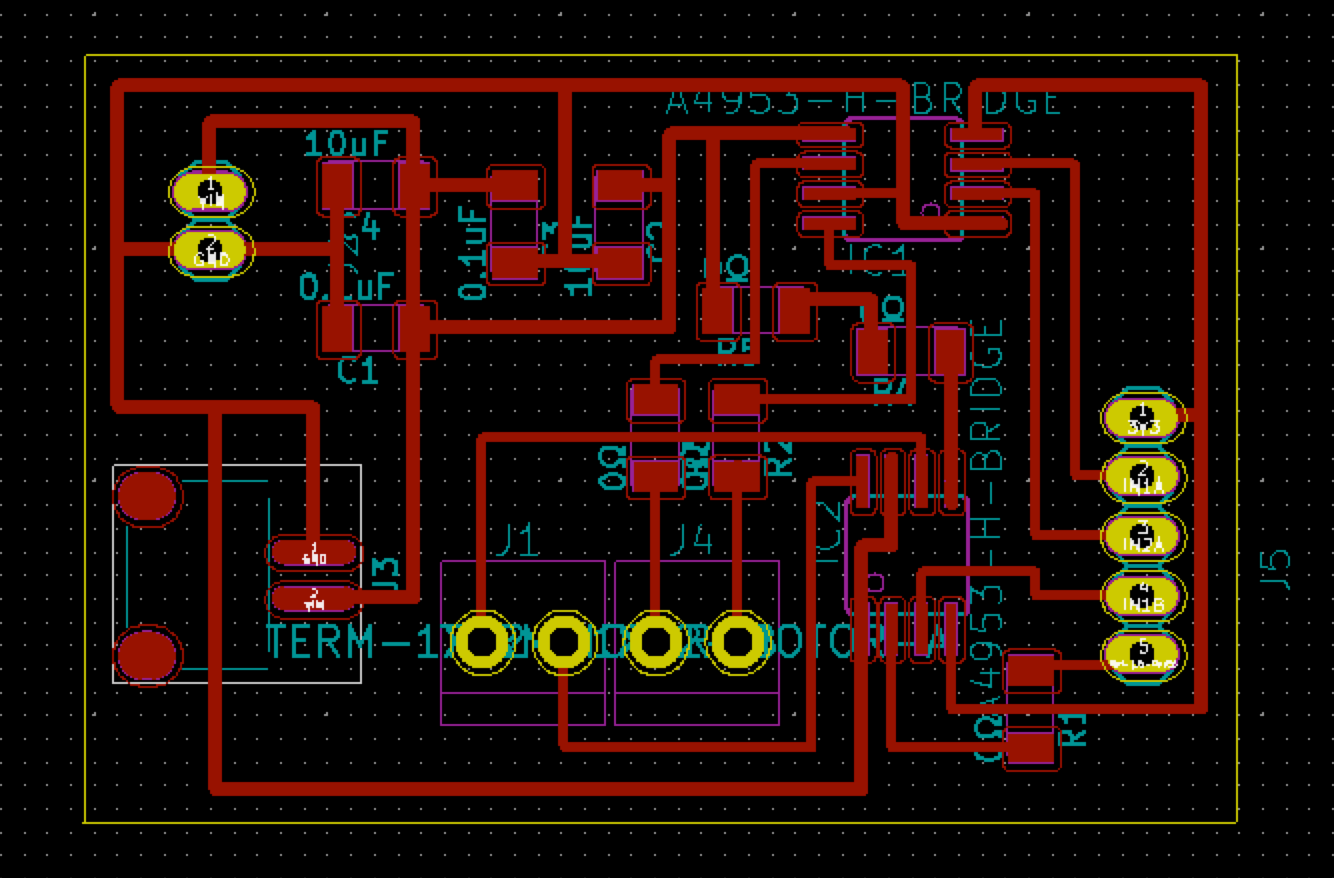
For the power supply, I finally decided to use a 9V - 1200mA battery, since it will be sufficient for an ESP32 MCU in active mode (~250mA), 2 DC motors that require up to 1A continuous consumption each, and other components. The motor shield will be powered first and from the shield, power will be passed to the ESP32 board and the DC motors. Although the DC motors only require ~6V power supply to work happily, the A4953 chips seem to be more picky: they need an input voltage that is greater than 7.9V.
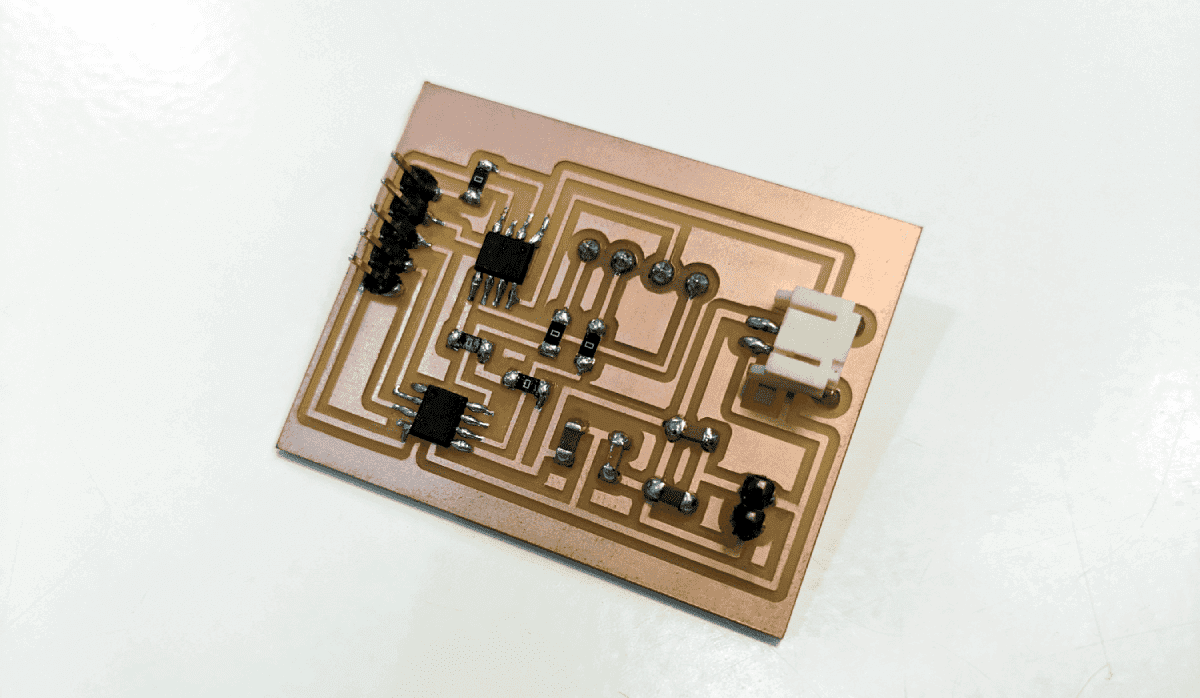
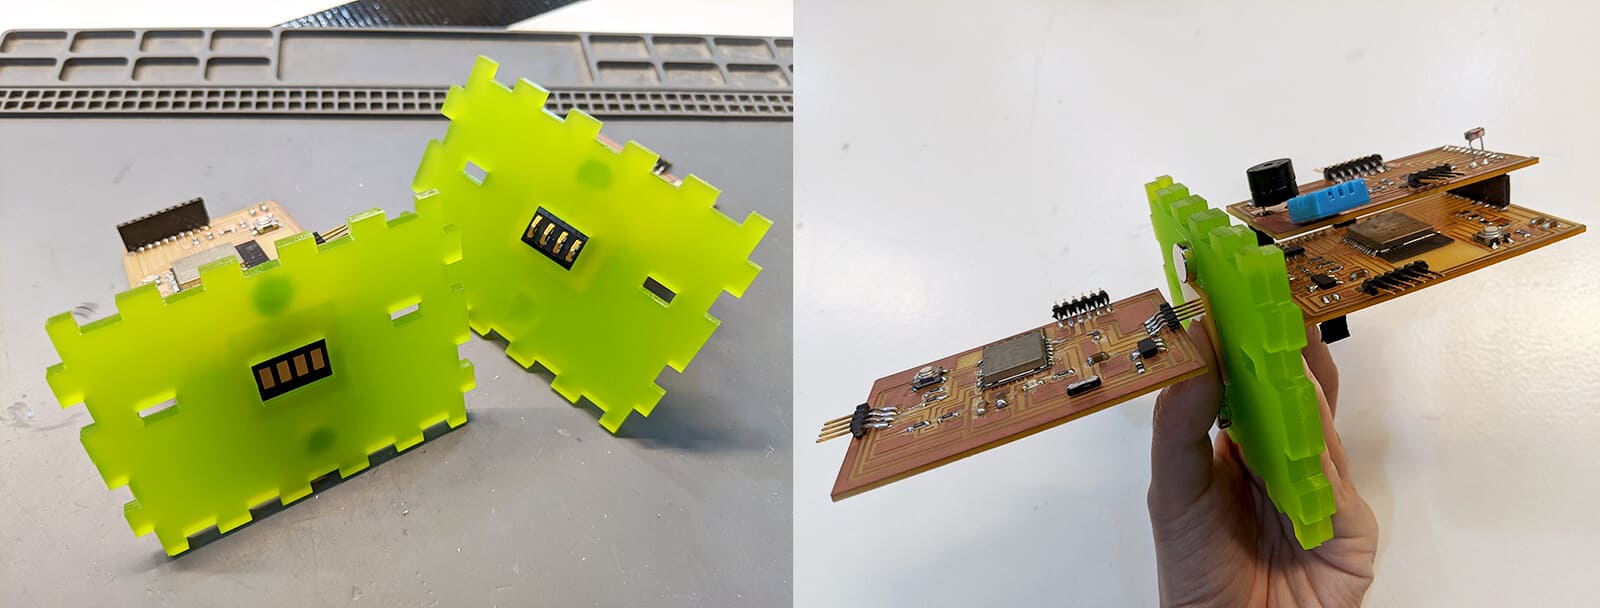
ESP8266 boards
Inside blocks there are simpler boards with ESP8266 micro-controllers which will send certain IDs over WiFi or I2C connectors. The IDs are string text stating which input or output devices they're referring to, for example: Dark, Light, Hot, Cold, Forward, Backward, Fire, etc. I used these male and female connectors to pass power and I2C data between blocks.
I wanted to include 2 more wheels for the last block. Hence, I added headers for a motor shield for the boards controlling the Output blocks.
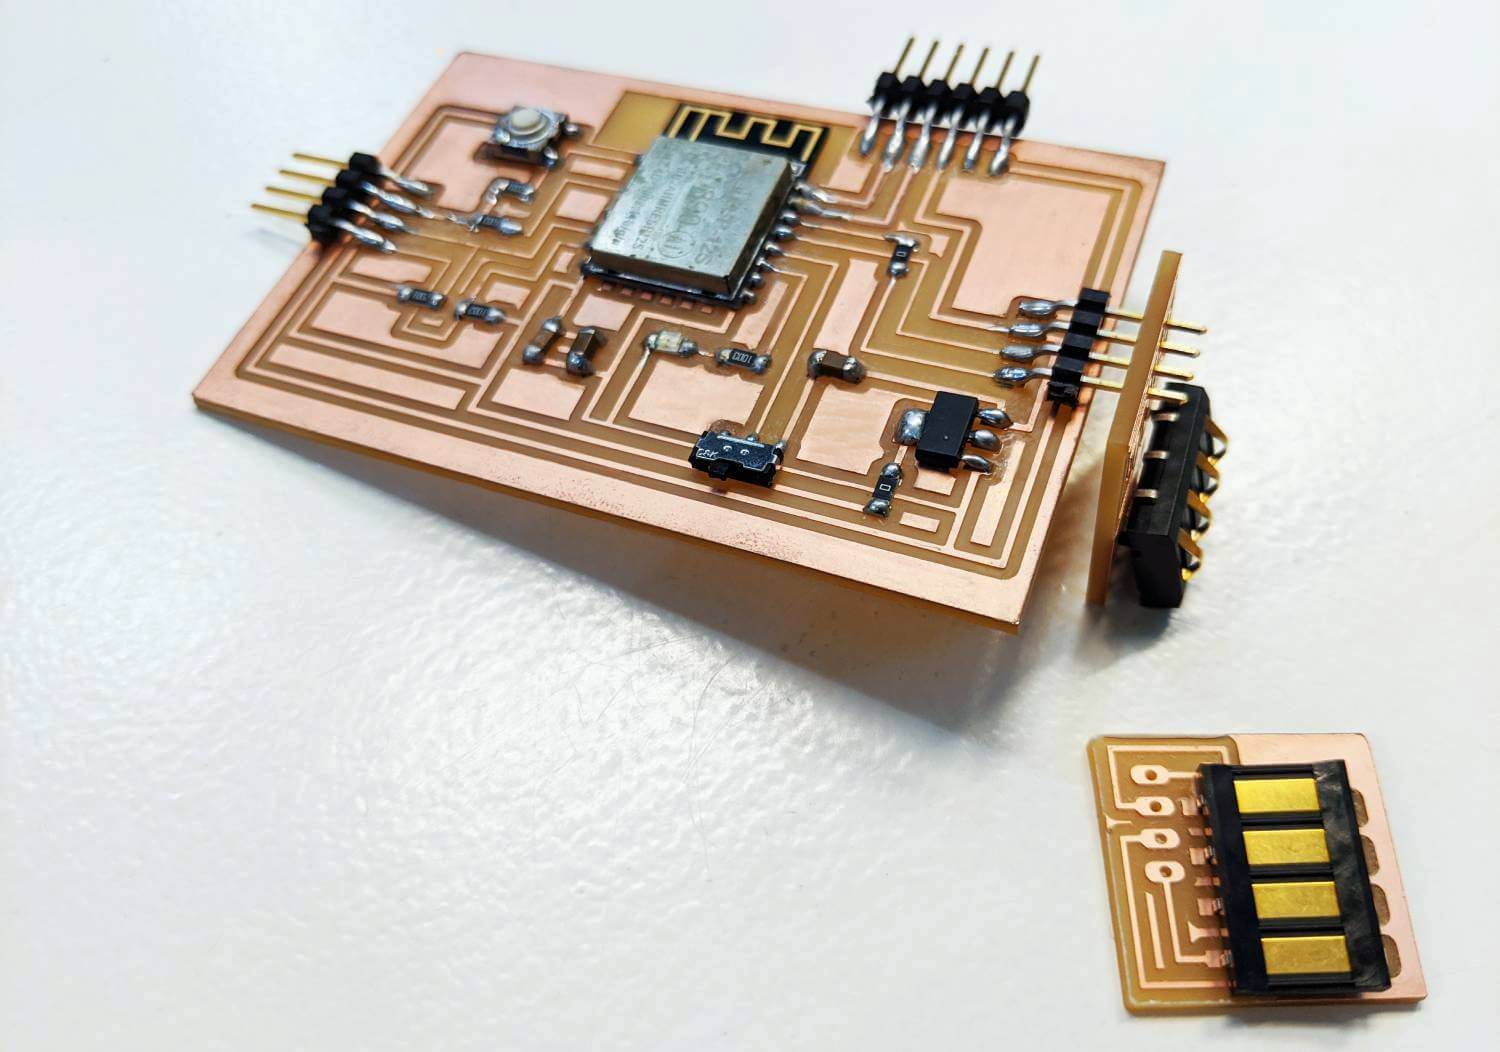
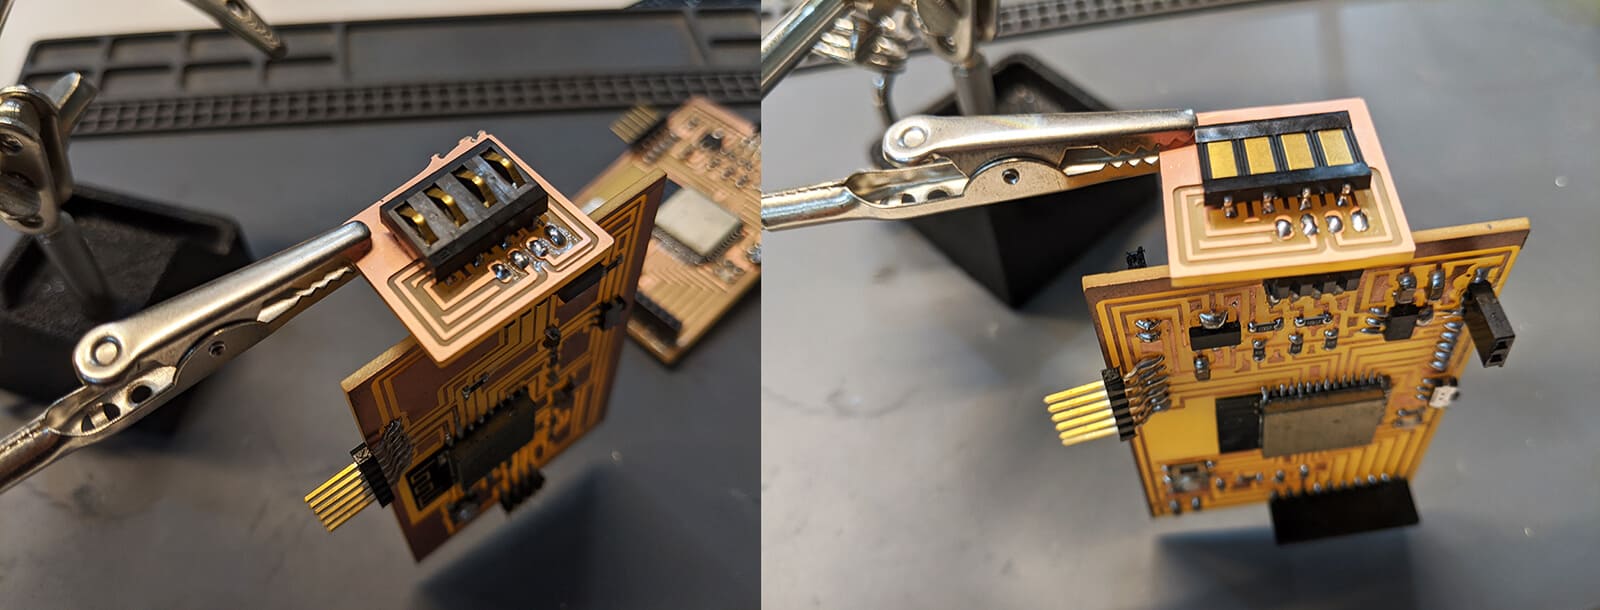
Electronics production
I used Fab Modules to generate toolpaths, and the Roland SRM-20 machine to mill the boards. Not much to say about the PCB fabrication process.
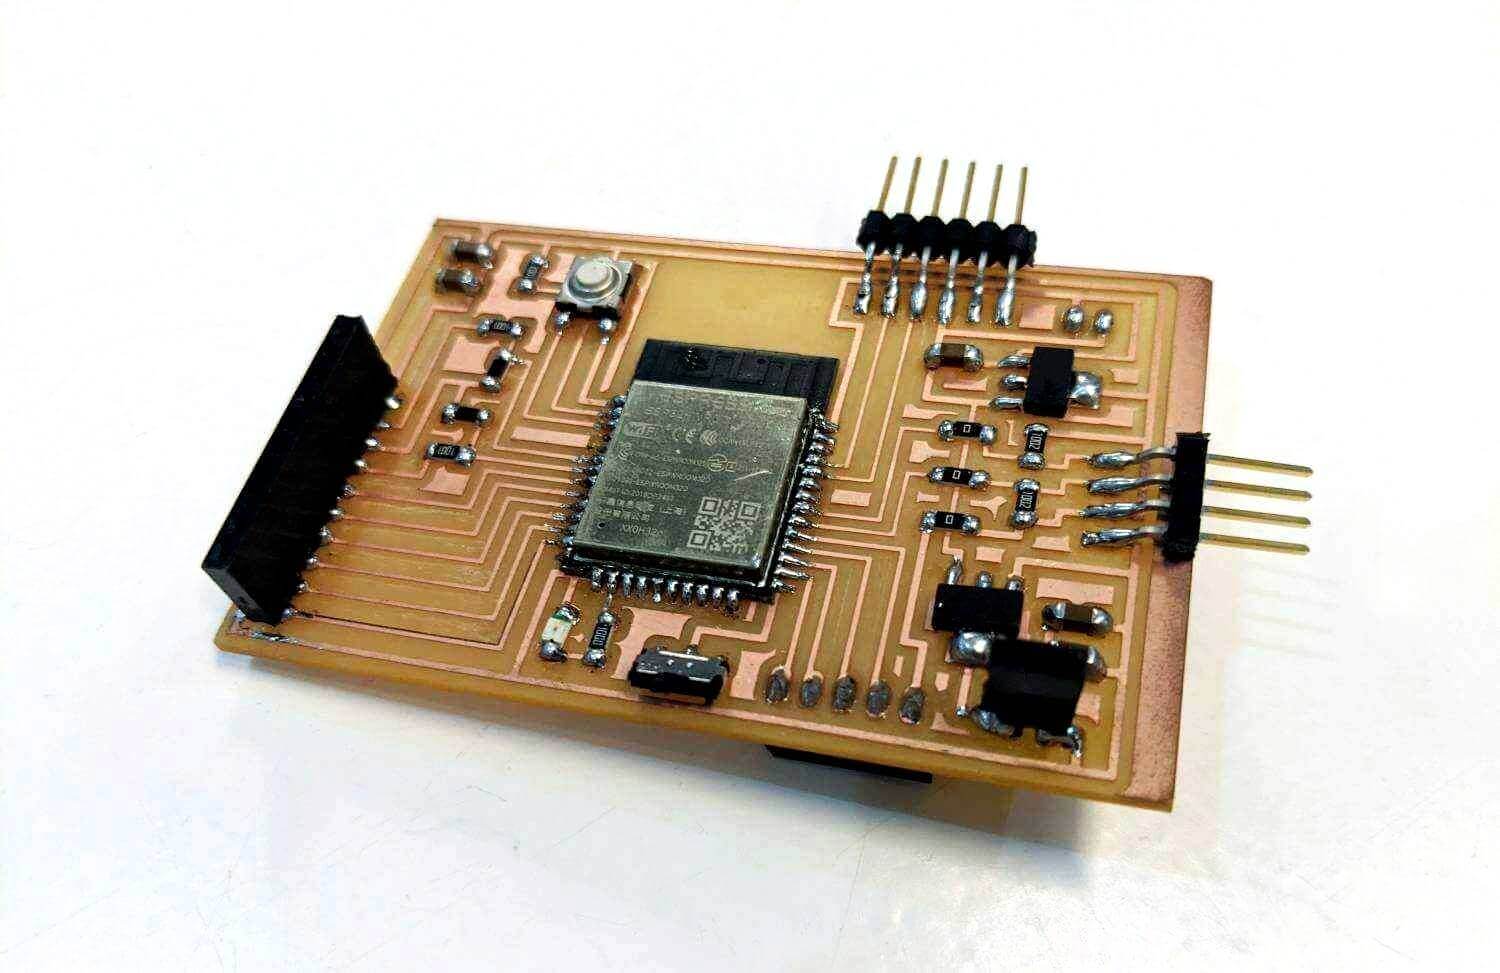

I spent almost 1.5 weeks milling and soldering all the PCBs. At the end, it was super satisfied to see this BIG MAC of PCBs. Om nom nom!
And here you go an ESP8266 board and the connectors. I made small extra boards with the footprints of the connectors, and the design was quickly done in Illustrator. The connectors will be soldered onto these boards, and there are also holes connected to the I2C headers of the ESP8266 boards.
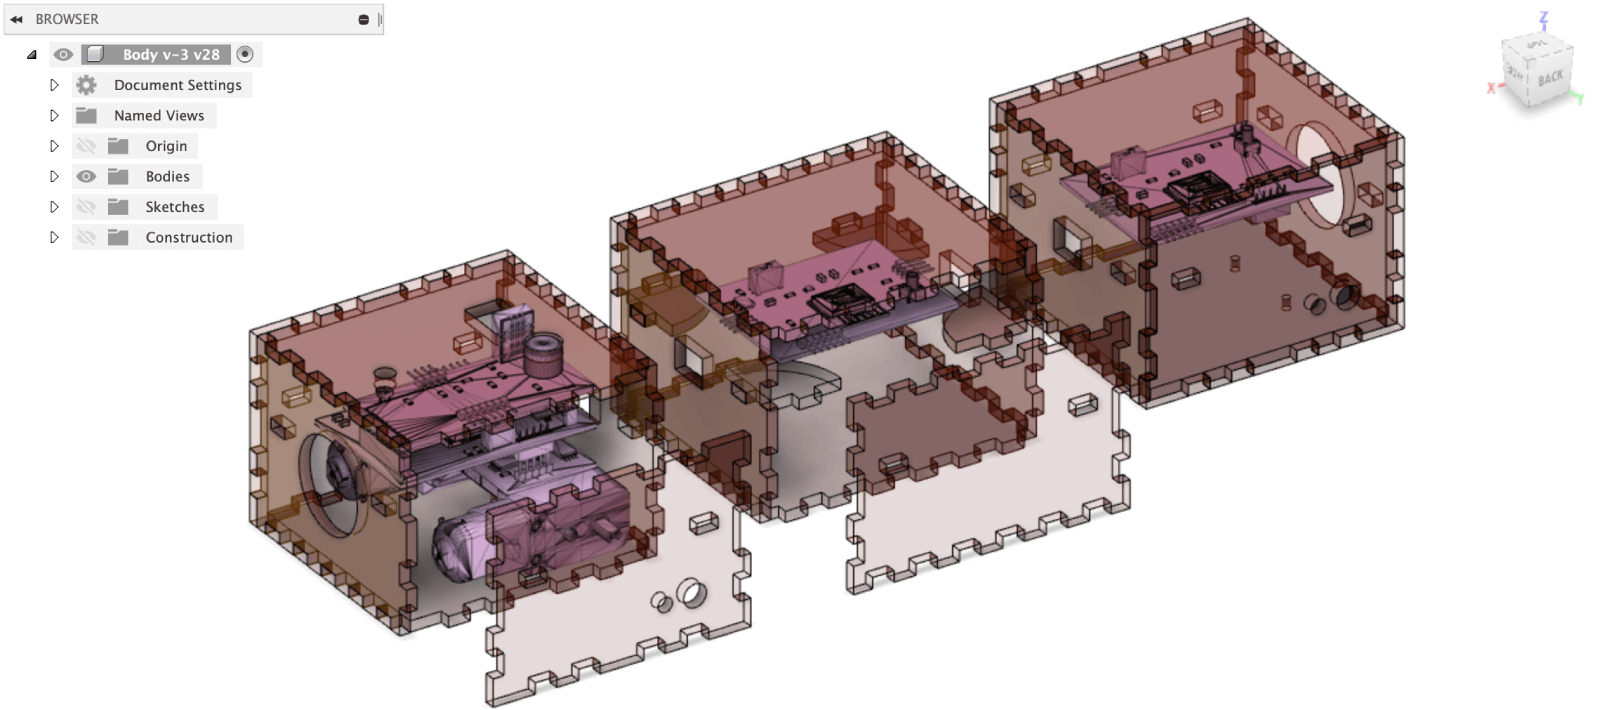
Computer-aided design
Press-fit laser-cut blocks
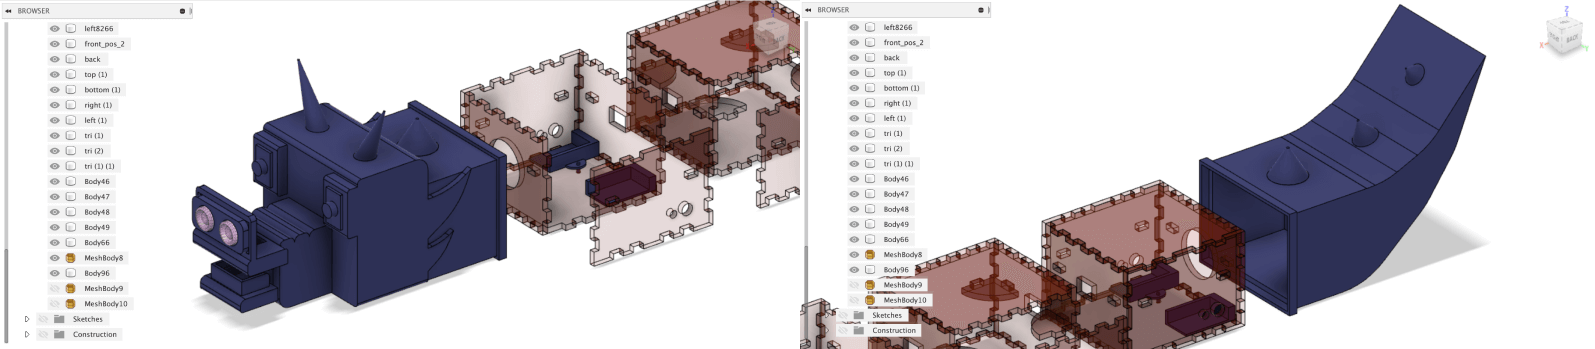
The first step I did was to import all the 3D models of the PCBs (the .step files exported from KiCad) into Fusion 360, placed them in the correct order, and created sketches accordingly. The imported meshes already have the correct dimensions, hence I could know whether my measurements with the caliper were precise or not.
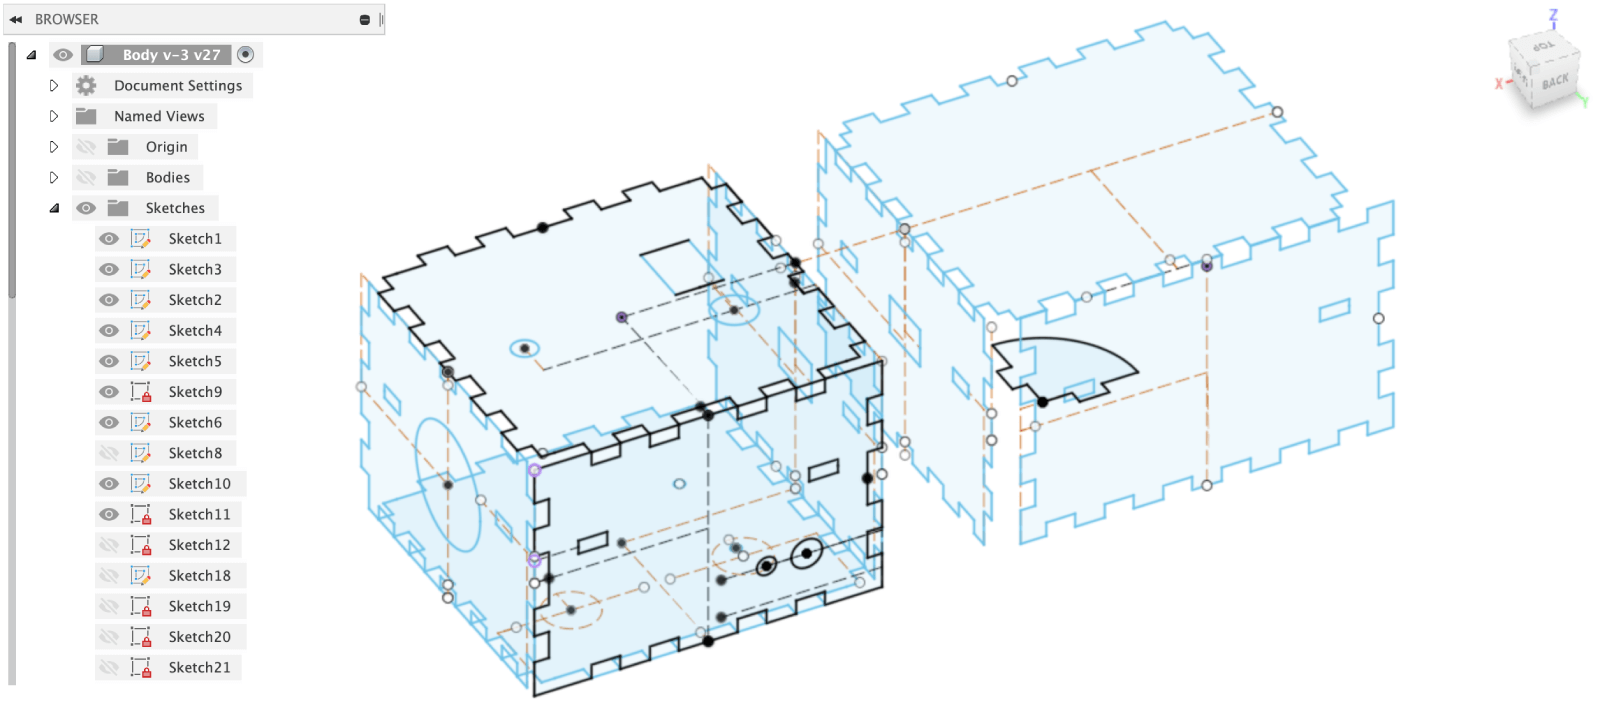
I bought the Arduino kit's DC motors which already have plastic gears and wheels, therefore I only had to design adapters that will hold the motors to the bottom of the blocks.
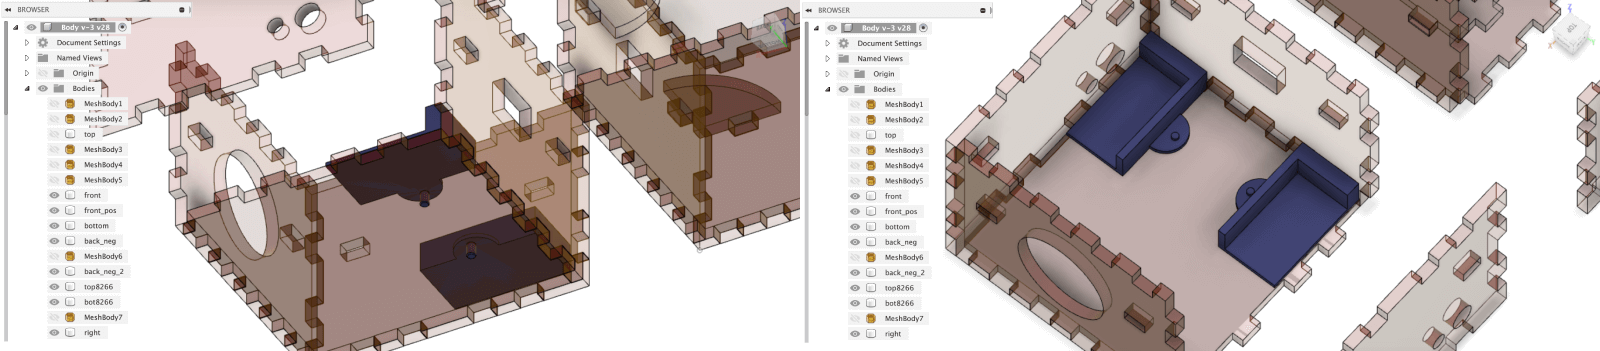
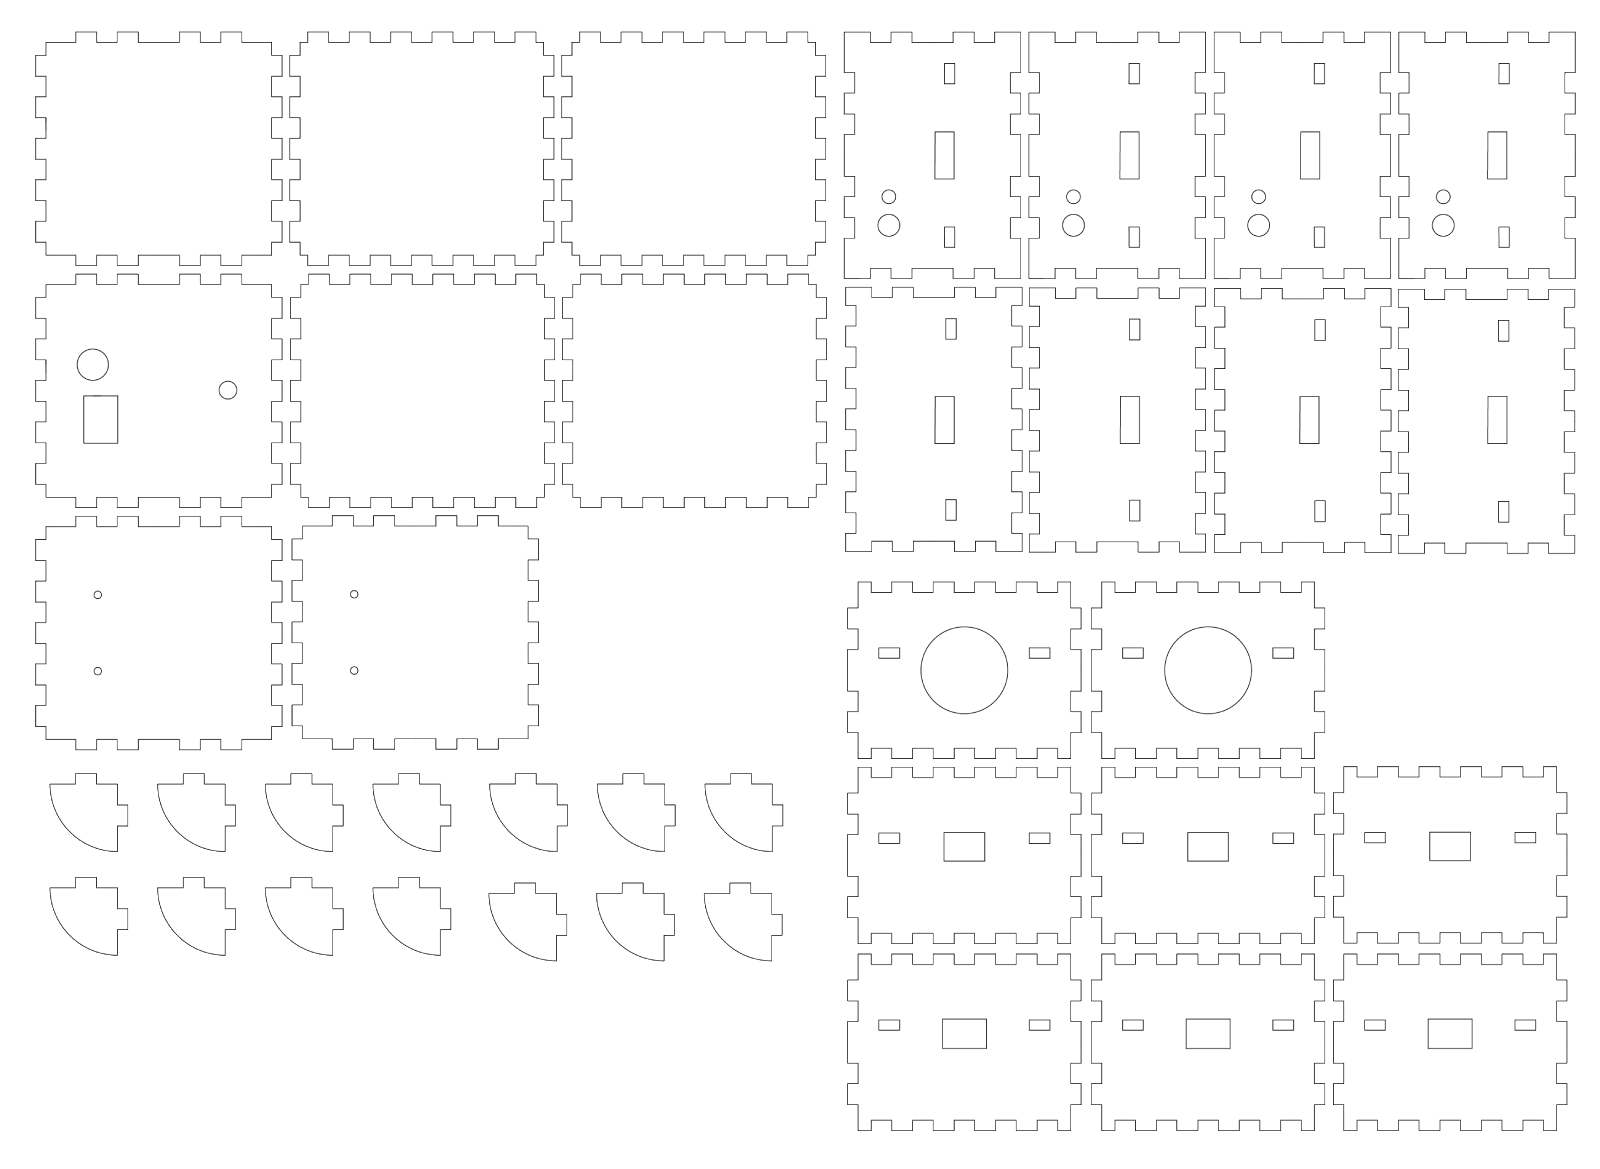
Below are screenshots of the final 3D model and the final .dxf files I used for laser-cutting:
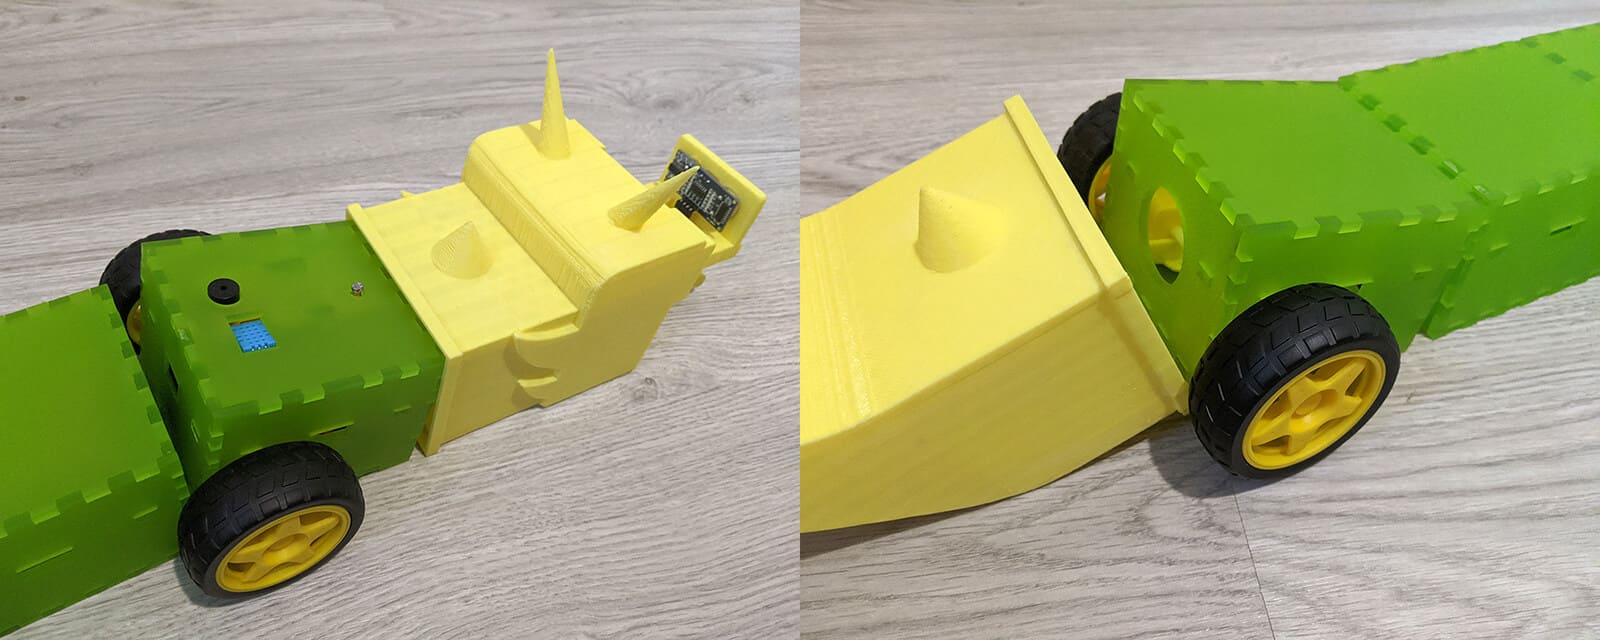
3D-printed head and tail
I designed the nose of the dragon as the holder of the HR-SC04 sensor, and the LED strip will be placed within the dragon's "teeth". I also had to make sure there are enough spaces for the batteries to be placed at the head of the dragon. I intended to design the head and the tail in Blender, but then I changed my mind since I didn't want to exchange files between CAD programs. And it's obvious that I'm not a Fusion 360 expert, erh.
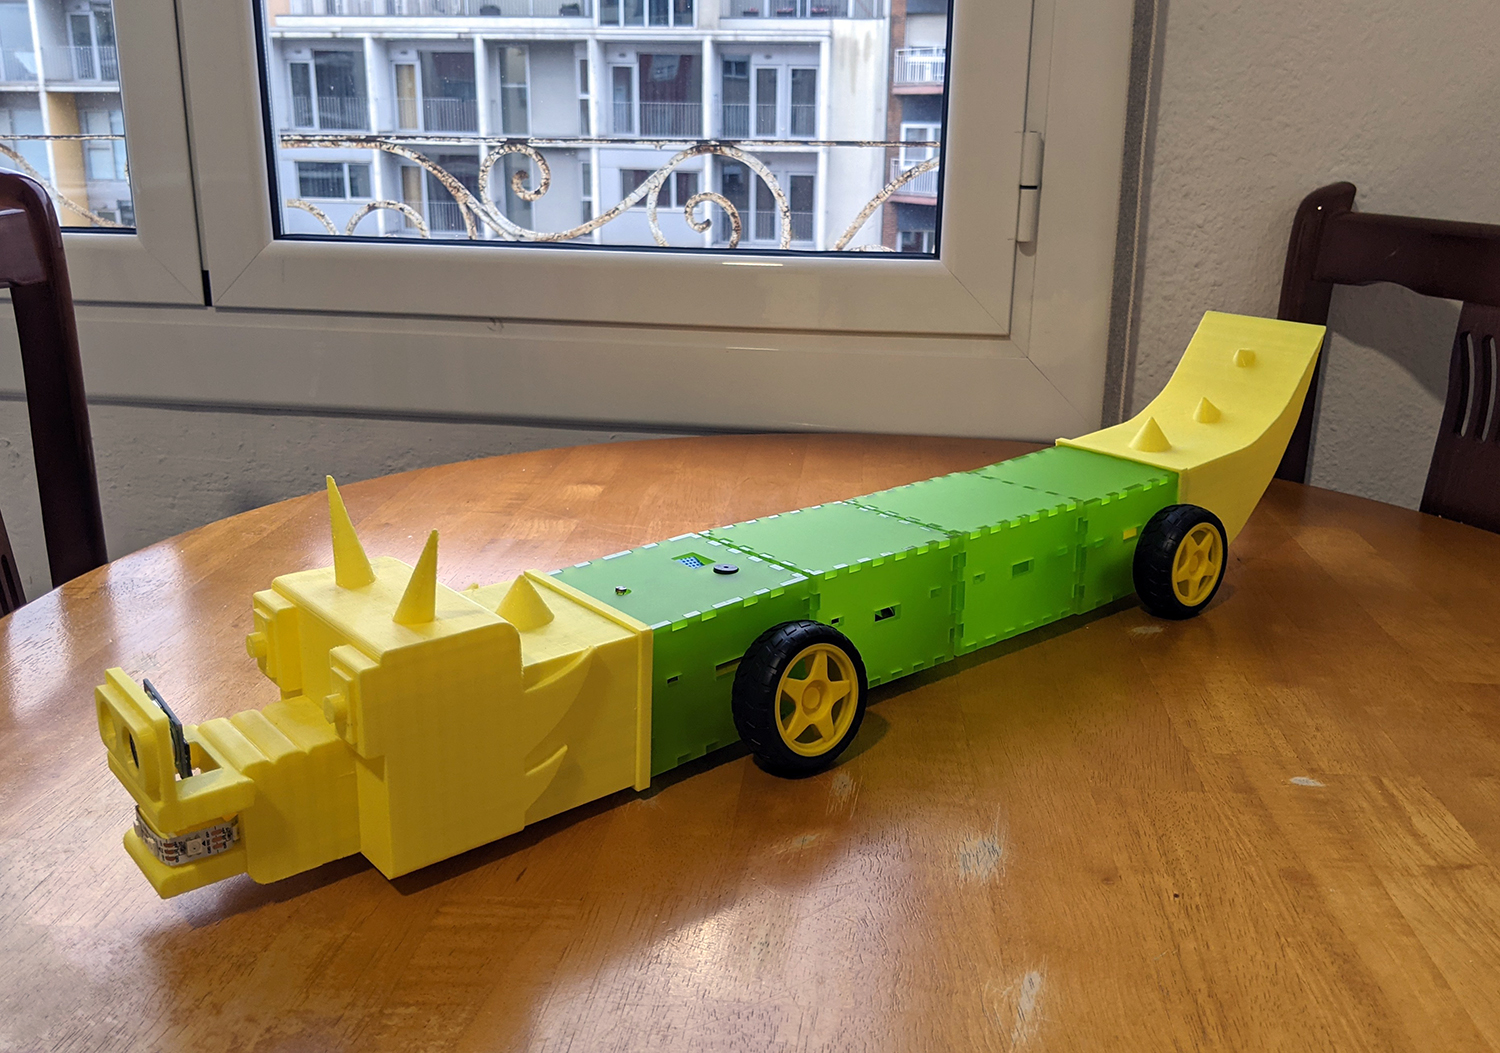
The final design looks a bit "robotic", but I indeed think it looks better and is easier to fabricate than a complicated, mas suave one:
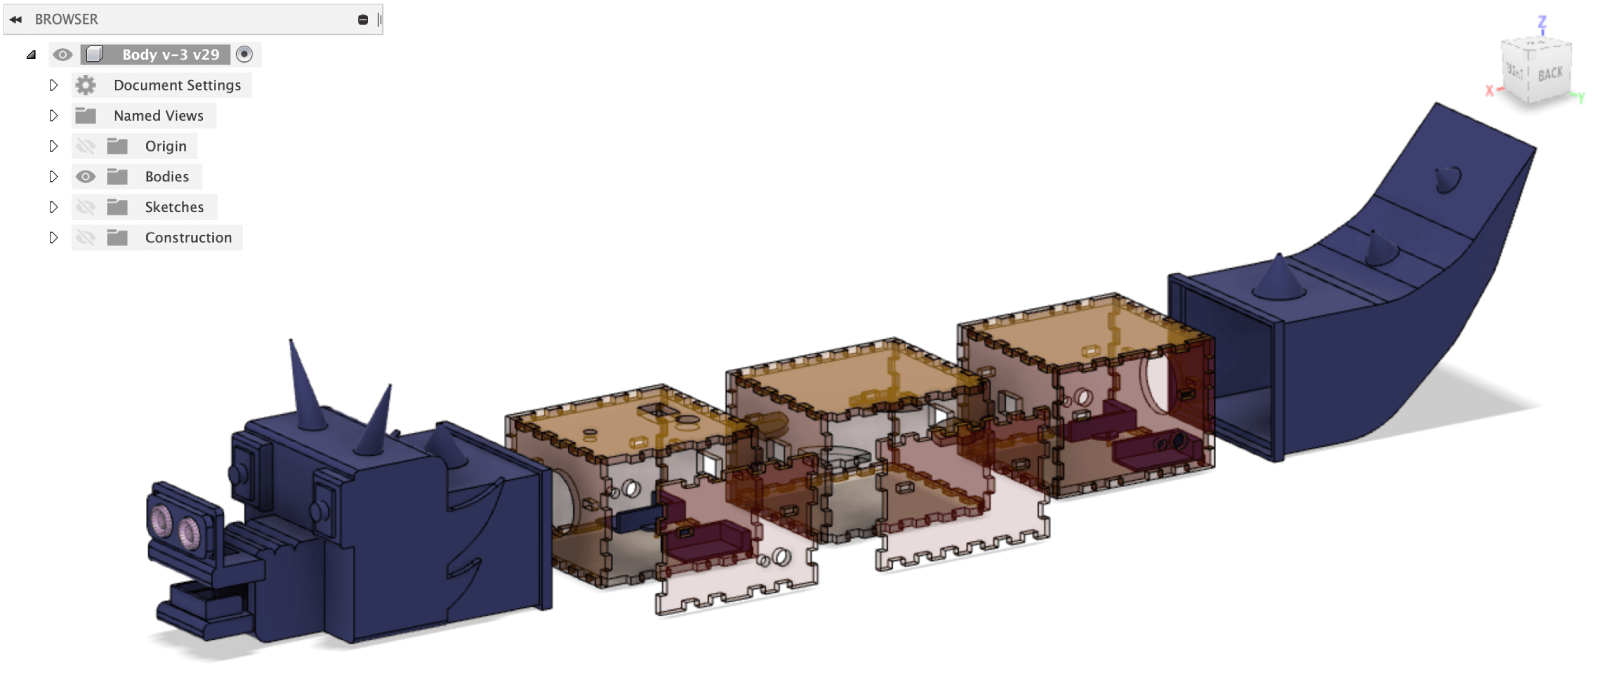
The blue parts will be 3D-printed, and the yellow parts will be laser-cut. Ready to fabricate!
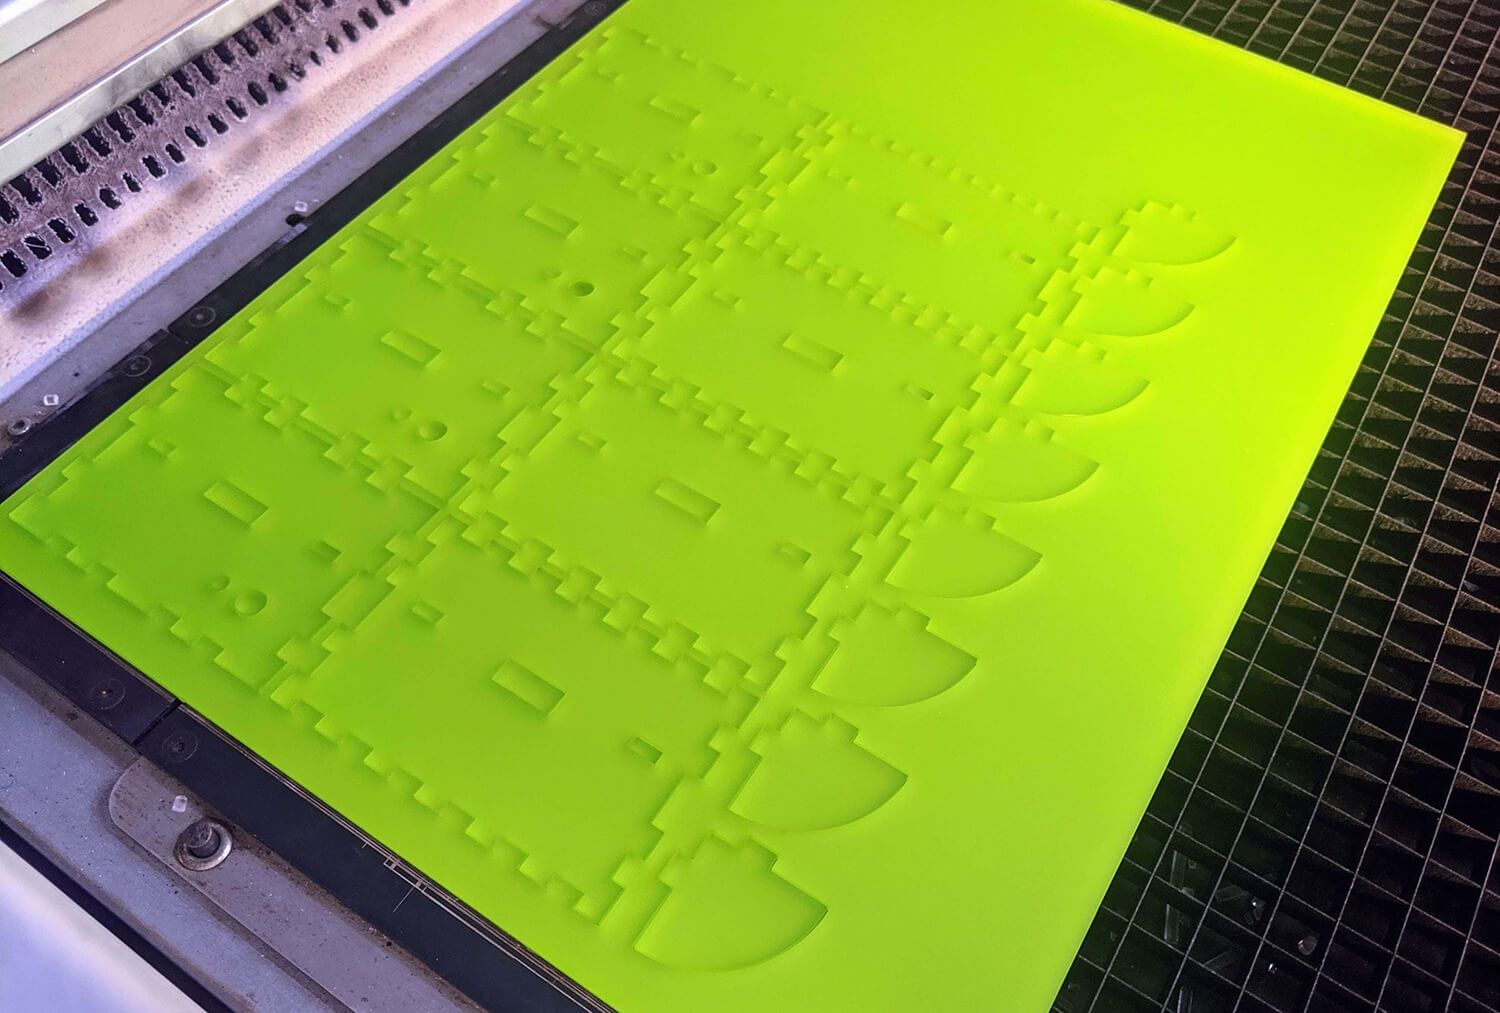
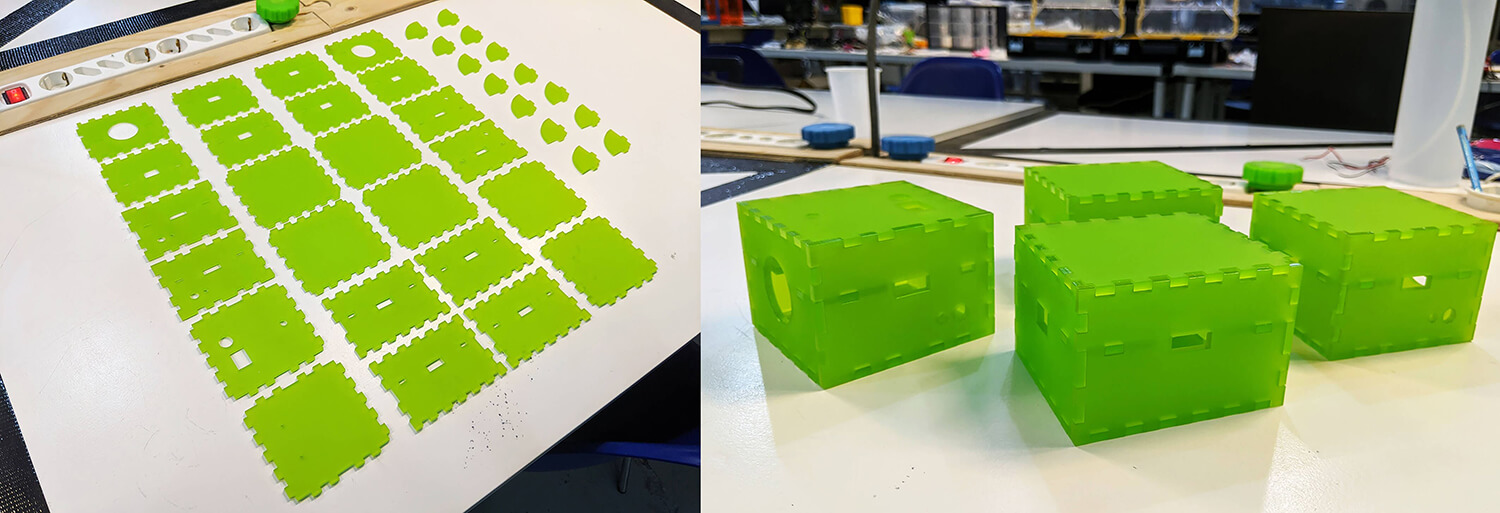
Subtractive fabrication - Laser-cutting
I used my buddy Trotec Speedy 400 to cut my pieces with speed=0.5, power=90, PPI/Hz=20,000. First I quickly cut a kerf test similar to the one I used during the 3rd week and this helped me confirm the kerf value to be used would be 0.12mm in order to assemble 2 pieces securely. I modified the parameter in Fusion 360 and continued to cut the rest of my design with that final value.
The kerf width of each joint seemed to be a bit inconsistent. I assumed that the laser cutter has different performances at different axes. But in the end, the pieces perfectly joined together without being broken or loose.
The measurements for placing all electronic components were also OK.
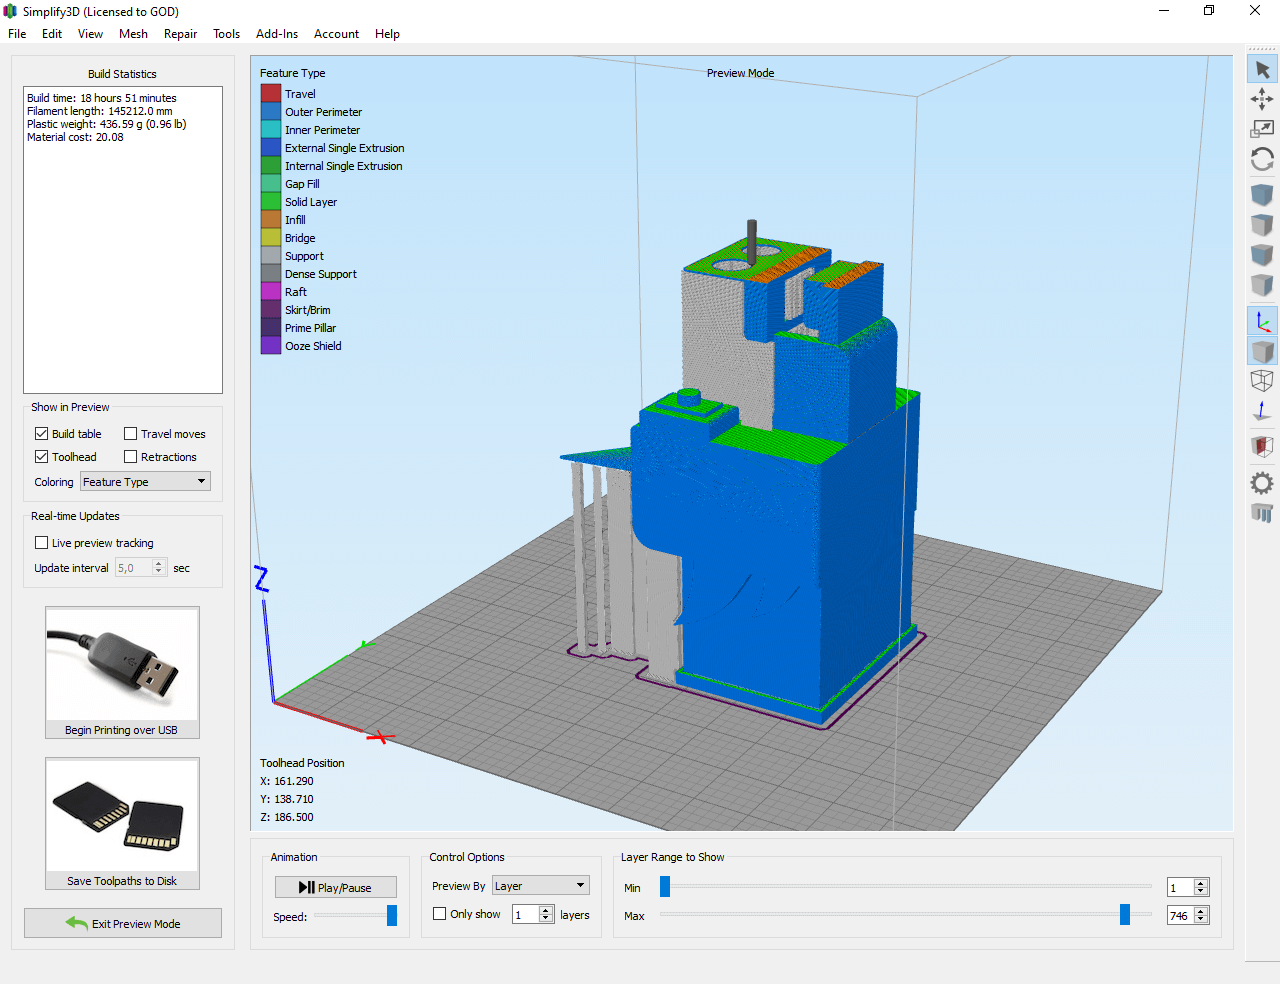
Additive fabrication - 3D printing
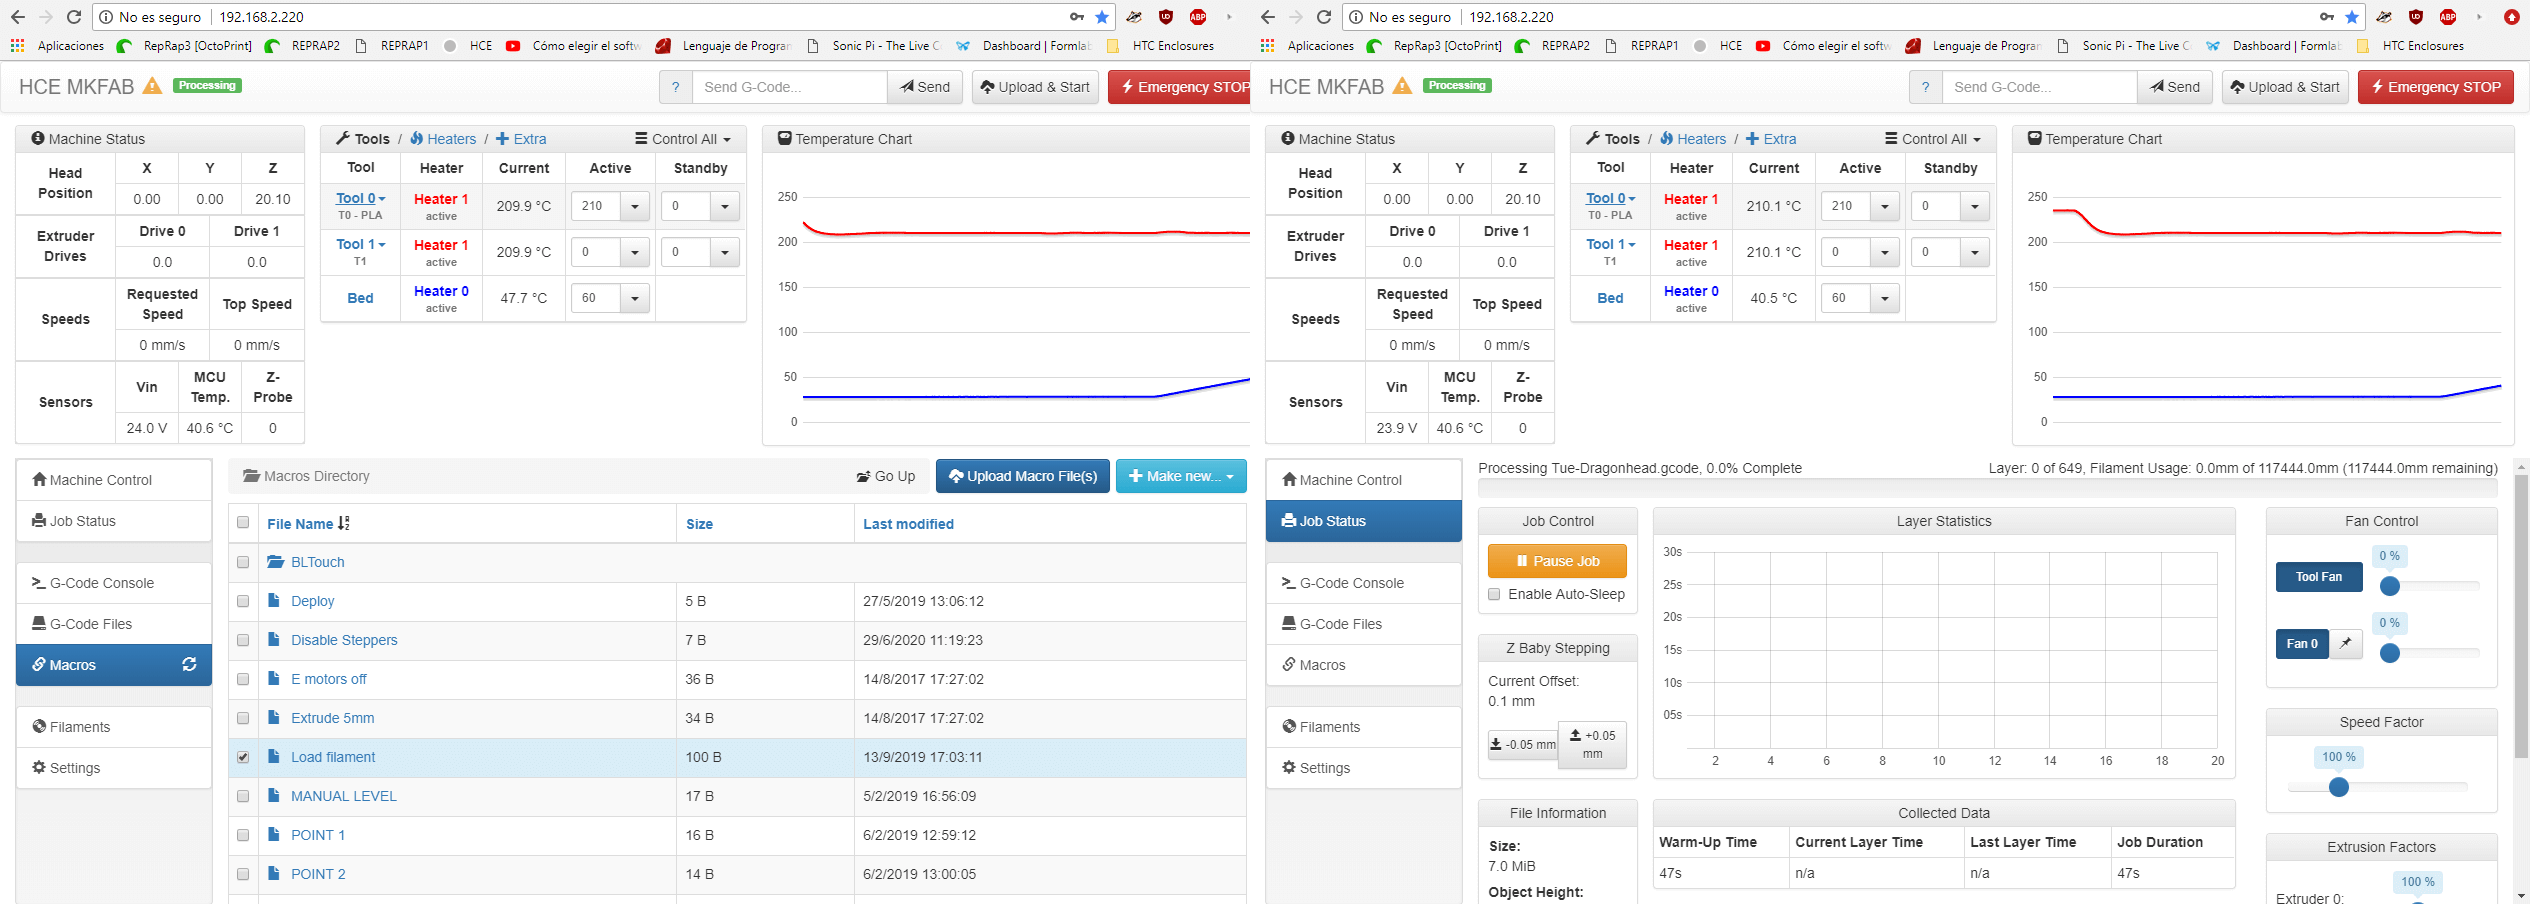
Since the estimated printing time in Cura was too long (4 days for both the head and the tail of the dragon), I decided to use Hypercube - a Duet3D-powered printer made by our Fab Lab Manager Mikel Llobera. Mikel and Josep also guided me through the process, staring with slicing the model in Simplifiy3D. The estimated printing time was reduced to ~19hrs!
The electronic parts come together with a web interface that allows us to control the printer, from loading filament, heating the bed, and print .gcode files.
After 1 night, the printing process was finished. They look pretty good in terms of clean and neat surfaces. I was a bit worried because my models need lots of supports, supports everywhere! But they were removed quite easily, and I only had to sand the models a bit for a smoother surface.
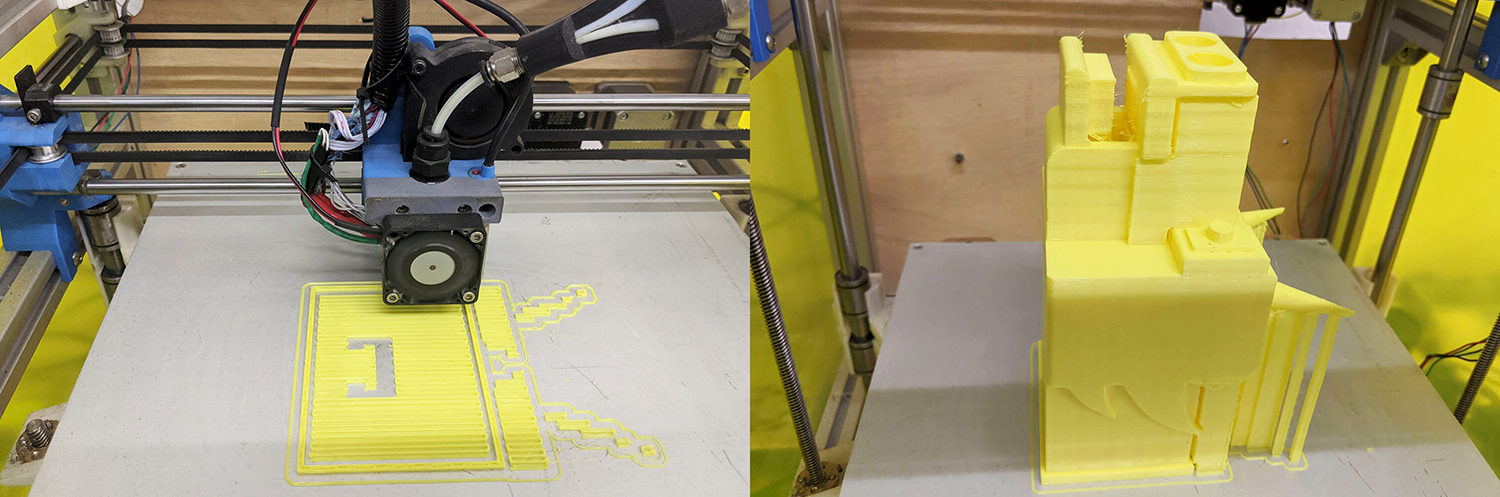
However, I was not really satisfied with the printing accuracy. The press-fit blocks could fit (barely) into the dragon's head, but the tail was shrunk and it was really struggling for me to assemble the blocks into it.
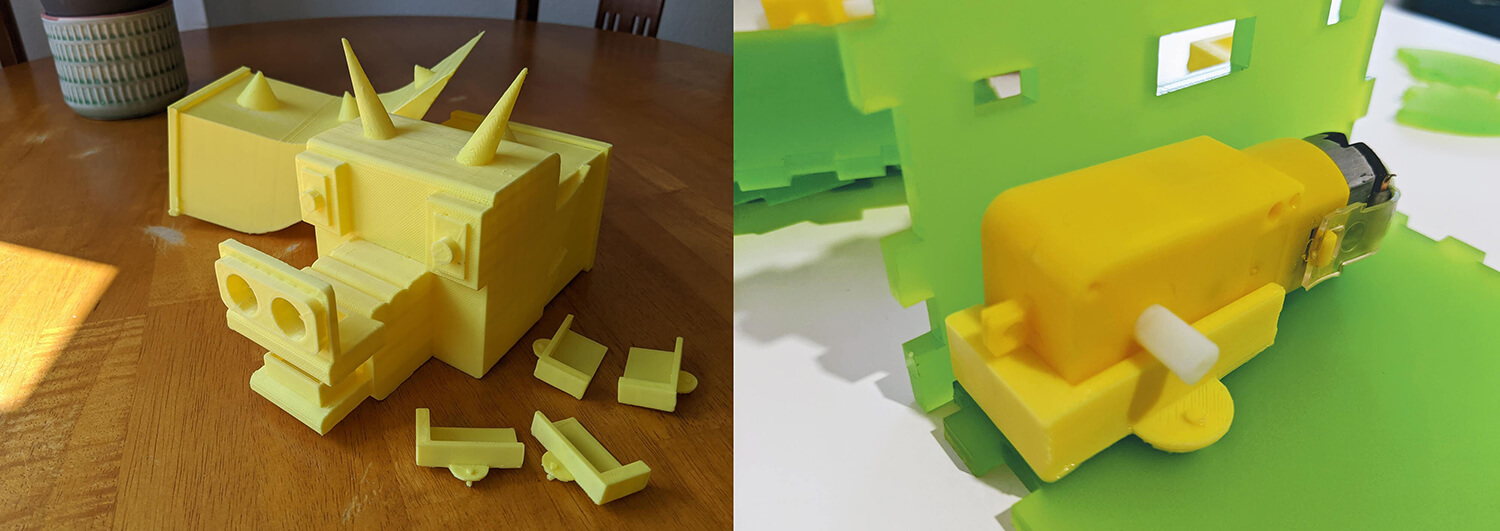
Assembly
Before assembling the parts together, I soldered the boards and the connectors. Since I miscalculated the distance from the I2C headers of the boards to the holes in the laser-cut blocks, I indeed had to re-design and re-mill the connector boards.
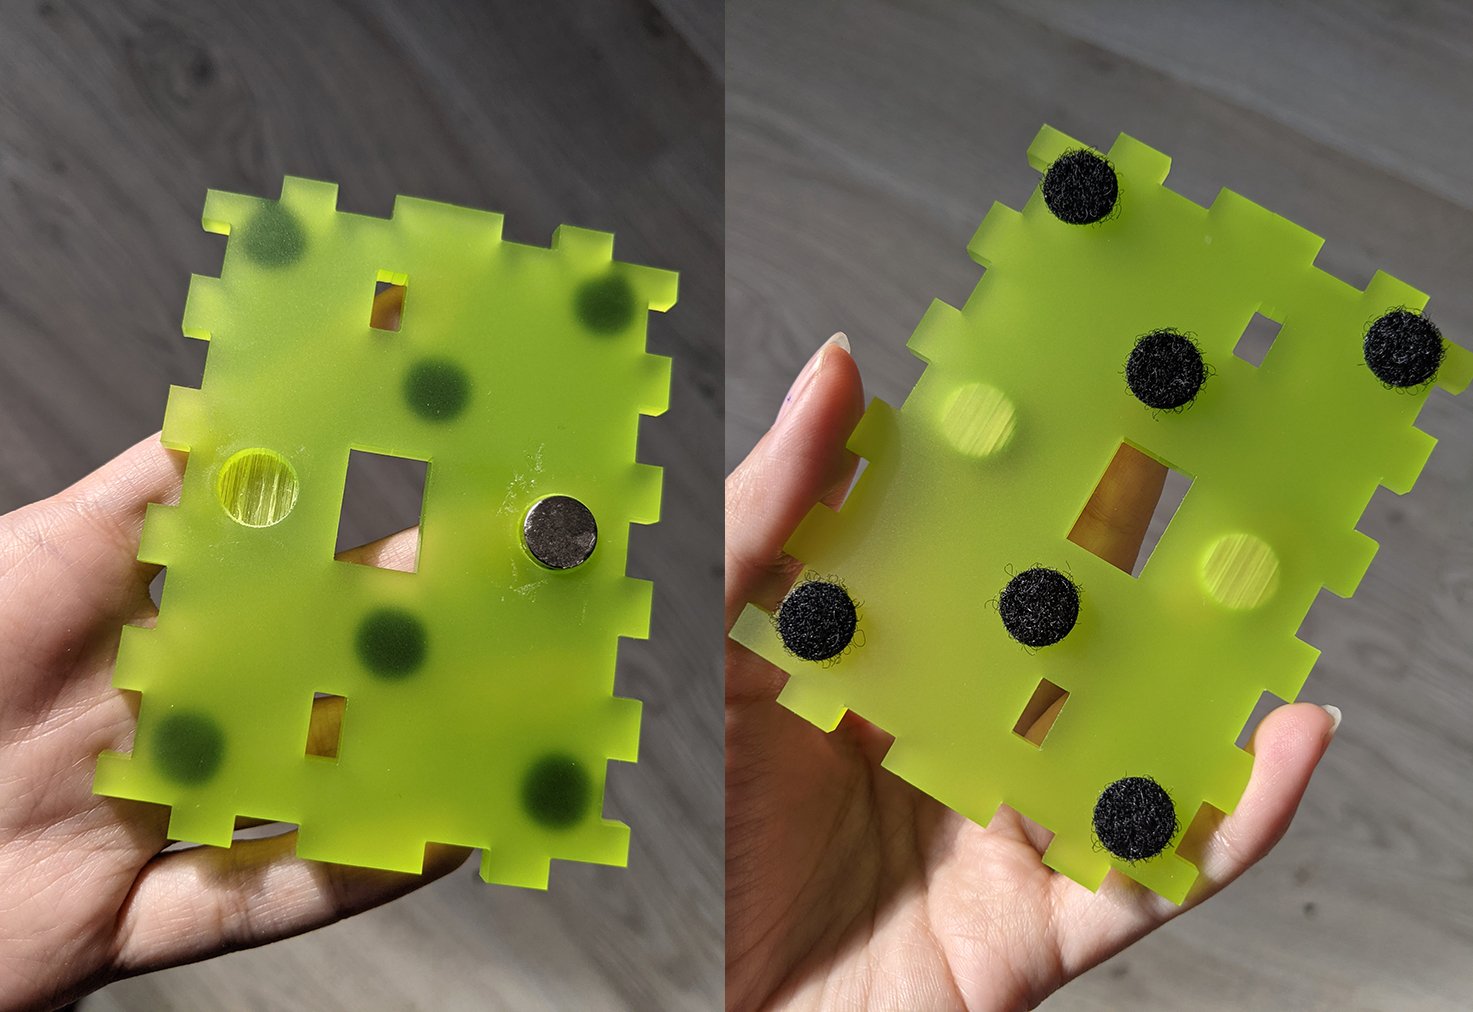
There you go how I connect the blocks (with magnets):
The sensors, the actuators, and the connectors were all fit to the body of the dragon. However, I had several problems with fitting the blocks into the tail of the dragon, or the blocks were too heavy to be held together by the magnets.
After discussing with Josep, we came up with a solution: rasterizing holes to reduce the thickness of the acrylic pieces, thus, the magnets could generate stronger pulling force. I also strengthened the assembly by adding some extra velcro.
Finally, my dragon was able to stand strong!
Embedded programming
Writing the code was comfortable. However, the ESP8266 could not be programmed, and none of our instructors could help me to figure out why. In the end, I had to use a NodeMCU and WiFi communication instead of I2C. The dragon behaved as expected, as we can see in the video on the top of this page.
#include <DHT.h>
#include <NewPing.h>
#include <Adafruit_NeoPixel.h>
#include <WiFi.h>
#include <SPI.h>
#include <stdio.h>
#include <string.h>
/*
* pin variables
*/
#define BUILTIN_LED 13
#define TRIGGER_PIN 32
#define ECHO_PIN 35
#define DHT_PIN 33
#define LDR_PIN 34
#define BUZZ_PIN 14
#define RGB_PIN 26
#define MOTORA_PIN1 4
#define MOTORA_PIN2 16
#define MOTORB_PIN1 17
#define MOTORB_PIN2 5
/*
* useful variables
*/
int ldrValue;
float tempValue;
float humValue;
float distance;
#define DHTTYPE DHT11
NewPing sonar(TRIGGER_PIN, ECHO_PIN, 200);
DHT dht(DHT_PIN, DHTTYPE);
#define LED_COUNT 10
Adafruit_NeoPixel strip(LED_COUNT, RGB_PIN, NEO_GRB + NEO_KHZ800);
/*
* received data from Wifi
*/
String inputId = "";
String outputId = "";
String logicId = "";
String data = "";
/*
* Wifi credentials
*/
const char* ssid = "SSID";
const char* pass = "PASS";
WiFiServer server(80);
/*
* setup
*/
void setup() {
pinMode(BUILTIN_LED, OUTPUT);
pinMode(BUZZ_PIN, OUTPUT);
pinMode(MOTORA_PIN1, OUTPUT);
pinMode(MOTORA_PIN2, OUTPUT);
pinMode(MOTORB_PIN1, OUTPUT);
pinMode(MOTORB_PIN2, OUTPUT);
/*
* serial & Wifi initialization
*/
Serial.begin(115200);
Serial.println();
Serial.print("Connecting to ");
Serial.println(ssid);
WiFi.begin(ssid, pass);
while (WiFi.status() != WL_CONNECTED) {
delay(500);
Serial.print(".");
}
Serial.println("");
Serial.println("WiFi connected.");
Serial.println("IP address: ");
Serial.println(WiFi.localIP());
server.begin();
/*
* DHT11 & LED strip initialization
*/
dht.begin();
strip.begin();
strip.show();
strip.setBrightness(150);
}
/*
* loop
*/
void loop() {
delay(100);
WiFiClient client = server.available();
if (client) {
Serial.println("New Client.");
while (client.connected()) {
while (client.available()) {
char c = client.read();
if (c !='\n') {
data += c;
} else if (c == '\n'){
break;
}
}
}
}
splitIds();
/*
* main logic here
*/
if (logicId == "IF") { // if input then output
if (inputId == "LIGHT") {
if (readLDR() >= 60) {
executeOutput(outputId);
}
} else if (inputId == "DARK") {
if (readLDR() < 60) {
executeOutput(outputId);
}
} else if (inputId == "HOT") {
if (readTemp() >= 30) {
executeOutput(outputId);
}
} else if (inputId == "COLD") {
if (readTemp() <= 15) {
executeOutput(outputId);
}
} else if (inputId == "PROX") {
if (readDistance() <= 8) {
executeOutput(outputId);
}
} else {
Serial.println("Error input!");
blinkLED();
}
}
else if (logicId == "UNTIL") { // until input keep output
if (inputId == "LIGHT") {
while (readLDR() < 60) {
executeOutput(outputId);
}
} else if (inputId == "DARK") {
while (readLDR() > 60) {
executeOutput(outputId);
}
} else if (inputId == "HOT") {
while (readTemp() < 30) {
executeOutput(outputId);
}
} else if (inputId == "COLD") {
while (readTemp() > 15) {
executeOutput(outputId);
}
} else if (inputId == "PROX") {
while (readDistance() > 8) {
executeOutput(outputId);
}
} else {
Serial.println("Error input!");
blinkLED();
}
}
else {
Serial.println("Error logic!");
blinkLED();
}
}
/*
* execute outputs
*/
void executeOutput(String id) {
if (id == "FIRE") {
blinkRed();
} else if (id == "FLASH") {
blinkWhite();
} else if (id == "BUZZ") {
buzz();
} else if (id == "FOR") {
moveForward();
stopDC();
} else if (id == "BACK") {
moveBackward();
stopDC();
} else {
Serial.println("Error output!");
blinkLED();
}
}
/*
* debugging
*/
void blinkLED() {
digitalWrite(BUILTIN_LED, LOW);
delay(500);
digitalWrite(BUILTIN_LED, HIGH);
delay(500);
}
/*
* read sensors
*/
int readLDR() {
delay(500);
ldrValue = analogRead(LDR_PIN);
Serial.print(ldrValue);
Serial.println(" \n");
return ldrValue;
}
int readTemp() {
delay(500);
tempValue = dht.readTemperature();
Serial.print(tempValue);
Serial.print("°C");
Serial.println(" \n");
return tempValue;
}
int readHum() {
delay(500);
humValue = dht.readHumidity();
Serial.print(humValue);
Serial.println(" \n");
return humValue;
}
int readDistance() {
delay(500);
distance = sonar.ping_cm();
Serial.print(distance);
Serial.print("cm");
Serial.println(" \n");
return distance;
}
/*
* control buzzer
*/
void buzz() {
Serial.println("Buzz!");
digitalWrite(BUZZ_PIN, HIGH);
delay(500);
digitalWrite(BUZZ_PIN, LOW);
delay(500);
}
/*
* control LED
*/
void blinkRed() {
Serial.println("Fire!");
colorWipe(strip.Color(255, 0, 0), 500);
}
void blinkWhite() {
Serial.println("Flash!");
colorWipe(strip.Color(255, 255, 255), 500);
}
void colorWipe(uint32_t color, int wait) {
for(int i = 0; i < strip.numPixels(); i++) {
strip.setPixelColor(i, color);
strip.show();
delay(wait);
}
}
/*
* control DC motors
*/
void stopDC() {
Serial.println("Motors stop!");
digitalWrite(MOTORA_PIN1, LOW);
digitalWrite(MOTORA_PIN2, LOW);
digitalWrite(MOTORB_PIN1, LOW);
digitalWrite(MOTORB_PIN2, LOW);
delay(1000);
}
void moveForward() {
Serial.println("Motors move forward!");
digitalWrite(MOTORA_PIN1, LOW);
digitalWrite(MOTORA_PIN2, HIGH);
digitalWrite(MOTORB_PIN1, LOW);
digitalWrite(MOTORB_PIN2, HIGH);
delay(5000);
}
void moveBackward() {
Serial.println("Motors move backward!");
digitalWrite(MOTORA_PIN1, HIGH);
digitalWrite(MOTORA_PIN2, LOW);
digitalWrite(MOTORB_PIN1, HIGH);
digitalWrite(MOTORB_PIN2, LOW);
delay(5000);
}
/*
* split IDs
*/
void splitIds() {
int commaIndex = data.indexOf(',');
int secondCommaIndex = data.indexOf(',', commaIndex + 1);
outputId = data.substring(0, commaIndex);
logicId = data.substring(commaIndex + 1, secondCommaIndex);
inputId = data.substring(secondCommaIndex + 1);
Serial.println(inputId + " - " + logicId + " - " + outputId);
}
                #include <SPI.h>
                #include <ESP8266WiFi.h<
                /*
                 * the single board supposes to have only 1 ID, but I sent 3 IDs here
                 */
                 // const String strId = "DARK";
                 const String strId = "BUZZ,IF,DARK";
                /*
                 * Wifi credentials
                 */
                const char* ssid = "SSID";
                const char* pass = "PASS";
                const char* host = 192.168.224.194";
                /*
                 * setup
                 */
                void setup() {
                    Serial.begin(115200);
                    delay(10);
                    Serial.println();
                    Serial.println();
                    Serial.print("Connecting to ");
                    Serial.println(ssid);
                    WiFi.begin(ssid, pass);
                    while (WiFi.status() != WL_CONNECTED) {
                        delay(500);
                        Serial.print(".");
                    }
                    Serial.println("");
                    Serial.println("WiFi connected");
                    Serial.println("IP address: ");
                    Serial.println(WiFi.localIP());
                }
                /*
                 * loop
                 */
                void loop () {
                    delay(5000);
                    Serial.print("Connecting to ");
                    Serial.println(host);
                    WiFiClient client;
                    const int httpPort = 80;
                    if (!client.connect(host, httpPort)) {
                        Serial.println("Connection failed");
                        return;
                    }
                    client.print(strId);
                    unsigned long timeout = millis();
                    while (client.available() == 0) {
                        if (millis() - timeout > 5000) {
                            Serial.println(">>> Client Timeout !");
                            client.stop();
                            return;
                        }
                    }
                }
Areas of improvement
Some failures I can see and points to be solved in the furture:
- There would be so many things I couldn't finish for my MVP, for example: multiple blocks (I was going to make only 3 blocks and I'd change the IDs to test different scenarios) and multiple ESP8266 boards (since making all the boards was exhausting, I was going to send all the IDs using a single ESP8266 board instead of many-to-one communication)
- My baby dragon is a bit too big in size. The main ESP32 board and its shields could be designed a bit better to make them smaller, and then the blocks' dimensions can be reduced. I also wish that I could have more time to fabricate all boards and blocks separately.
- I had to use a NodeMCU since my ESP8266 board was not working for a mysterious reason. The electrical connections were also no longer stable after being assembled with magnets. Hence, I had to plug the NodeMCU directly into my computer. This is something to be improved in the future.