W17 - Mechanical Design, Machine Design
1. Weekly Assignments ( -> what I did this week )
- Individual assignment:
- Document your individual contribution.
( -> I made Drum machine ( before Global session ), and then, made Kalimba machine. )
- Group assignment
- Design a machine that includes mechanism + actuation + automation
- Build the mechanical parts and operate it manually.
- Document the group project
( -> I tried the “Option1: Photo transistor sensing” as the way of collaboration. )
Have you?
Questions from “Fab Academy 2020 Assignments and Assessment 
Mechanical Design, Machine Design
( -> my answers )
-
Documented the machine building process to the group page ( -> yes )
-
Documented your individual contribution to this project on your own website ( -> yes )
-
Linked to the group page from your individual page as well as from group page to your individual pages ( -> yes )
2. Works, steps and some details
1) Drum machine
At the beginning of distributed machine project, the biggest concerns were ,,,,,
a. delay, MQTT
b. delay, Zoom sytem
c. each music machines
I started to make drum machine so that I could check the above ” a. delay, MQTT “.
After some trial and errors, I used the signal (message) from MQTT every 4 seconds ( ” t4 ” parameter in the code ).
Firstly, I used the signal sent from MQTT every one second to play one hit of bass (or snare) drum. But because the time interval between each signals were not even, the sound was not comfortable.
Then, I tried the 4 second-interval signal to play 1bar ( 4 beats, 60 BPM ). Although, the time intervals were still fracturing a little bit, at least within 4 seconds, the rhythm was fine.
ESP32 uses this signal as a trigger of 1 bar ( 4 beats ), then calculate ( play ) the solenoid ON/OFF.
By the end of one sequence ( 4 seconds ), the above calculation and transaction has to be done, therefore, I put some length of the ” 250msec of resting time ” in the last part of the sequence, so that ESP32 can be ready for the next sequence.
Beat Example 1
Drums 16 beat ( although the interval between each bars ( for example, interval between 4th beat and 5th beat ) are fluctuating, I think this is acceptable. Then, I made simple version (bass & snare drums only) for our group performance.
” mqtt_aws_music_subscriber_v6_drums_20200531_1245.ino “
  // parse Json (retrieve int value from for each track)

  int seq = doc["seq"].as<int>();
  int interval = doc["interval"].as<int>();
  int overhead; // overhead for each beat (returned by pushSolenoids())

  //    int t1 = doc["t1"].as<int>();
  //    int t2 = doc["t2"].as<int>();
  //    int t3 = doc["t3"].as<int>();


  int note = interval / 8; //8分音符のミリ秒数
  int claptime = 20; //「カチ」のミリ秒数
  int rest = note - claptime;


  int t4 = doc["t4"].as<int>();
  if (t4 == 1) {

    digitalWrite(S1, HIGH);
    delay(claptime);
    digitalWrite(S1, LOW);
    delay(rest);

    digitalWrite(S2, HIGH);
    delay(claptime);
    digitalWrite(S2, LOW);
    delay(rest);

    digitalWrite(S3, HIGH);
    delay(claptime);
    digitalWrite(S3, LOW);
    delay(rest);

    digitalWrite(S4, HIGH);
    delay(claptime);
    digitalWrite(S4, LOW);
    delay(rest);

    digitalWrite(S1, HIGH);
    delay(claptime);
    digitalWrite(S1, LOW);
    delay(rest);

    digitalWrite(S2, HIGH);
    delay(claptime);
    digitalWrite(S2, LOW);
    delay(rest);

    digitalWrite(S3, HIGH);
    delay(claptime);
    digitalWrite(S3, LOW);
    delay(rest);

    //  digitalWrite(S4, HIGH);
    //  delay(claptime);
    //  digitalWrite(S4, LOW);
    //  delay(rest);


  } else  {
    digitalWrite(S1, LOW);
    digitalWrite(S2, LOW);
    digitalWrite(S3, LOW);
    digitalWrite(S4, LOW);
  }


 // 5) ----- Write your logic for publishing message from here -----
  // (If you are not pubishing anything, you can delete following code)
  // Publisher publishes folowing element
  // seq: sequence status (start from 1 when start sound)
  // count: count (start from 1 when start publisher process (on Node-RED in RaspPi)
  // t1: melody1 (in MIDI note name)
  // t2: melody2 (ex. harmony, in MIDI note name)
  // t3: code,  (in MIDI note name)
  // t4: rhythm1 (8 beat, front)       1, 0, 1, 0, 1, 0, 1, 0
  // t5: rhythm2 (8 beat, back)        0, 1, 0, 1, 0, 1, 0, 1
  // t6: rhythm3 (8 beat, variation)   1, 1, 0, 1, 0, 1, 1, 0
  // interval: interval in delay
Beat Example 2
16 beat shuffle ( the interval between each bars ( for example, interval between 4th beat and 5th beat ) are not stable enough. )
” mqtt_aws_music_subscriber_v6_drums_20200531_1530.ino “
 // parse Json (retrieve int value from for each track)

  int seq = doc["seq"].as<int>();
  int interval = doc["interval"].as<int>();
  int overhead; // overhead for each beat (returned by pushSolenoids())

  //    int t1 = doc["t1"].as<int>();
  //    int t2 = doc["t2"].as<int>();
  //    int t3 = doc["t3"].as<int>();


  int note = interval / 12; //8分音符のミリ秒数
  int claptime = 20; //「カチ」のミリ秒数
  int rest = note - claptime;


  int t4 = doc["t4"].as<int>();
  if (t4 == 1) {

    // 11
    digitalWrite(S1, HIGH);
    delay(claptime);
    digitalWrite(S1, LOW);
    delay(rest);   // 480-30 =450

    digitalWrite(S1, LOW);
    delay(claptime);
    digitalWrite(S1, LOW);
    delay(rest);

    digitalWrite(S1, LOW);
    delay(claptime);
    digitalWrite(S1, LOW);
    delay(rest);
// 12
    digitalWrite(S2, HIGH);
    delay(claptime);
    digitalWrite(S2, LOW);
    delay(rest);

    digitalWrite(S2, LOW);
    delay(claptime);
    digitalWrite(S2, LOW);
    delay(rest);   // 480-30 =450

    digitalWrite(S1, HIGH);
    delay(claptime);
    digitalWrite(S1, LOW);
    delay(rest);
// 13
    digitalWrite(S3, HIGH);
    delay(claptime);
    digitalWrite(S3, LOW);
    delay(rest);   // 480-30 =450

    digitalWrite(S3, LOW);
    delay(claptime);
    digitalWrite(S3, LOW);
    delay(rest);

    digitalWrite(S2, HIGH);
    delay(claptime);
    digitalWrite(S2, LOW);
    delay(rest);
// 14
    digitalWrite(S4, HIGH);
    delay(claptime);
    digitalWrite(S4, LOW);
    delay(rest);

    digitalWrite(S4, LOW);
    delay(claptime);
    digitalWrite(S4, LOW);
    delay(rest);   // 480-30 =450

    digitalWrite(S1, HIGH);
    delay(claptime);
    digitalWrite(S1, LOW);
    delay(rest);


// 21
    digitalWrite(S1, LOW);
    delay(claptime);
    digitalWrite(S1, LOW);
    delay(rest);   // 480-30 =450

    digitalWrite(S1, LOW);
    delay(claptime);
    digitalWrite(S1, LOW);
    delay(rest);

    digitalWrite(S1, HIGH);
    delay(claptime);
    digitalWrite(S1, LOW);
    delay(rest);
// 22
    digitalWrite(S2, HIGH);
    delay(claptime);
    digitalWrite(S2, LOW);
    delay(rest);

    digitalWrite(S2, LOW);
    delay(claptime);
    digitalWrite(S2, LOW);
    delay(rest);   // 480-30 =450

    digitalWrite(S1, HIGH);
    delay(claptime);
    digitalWrite(S1, LOW);
    delay(rest);
// 23
    digitalWrite(S3, HIGH);
    delay(claptime);
    digitalWrite(S3, LOW);
    delay(rest);   // 480-30 =450

    digitalWrite(S3, LOW);
    delay(claptime);
    digitalWrite(S3, LOW);
    delay(rest);

    digitalWrite(S2, HIGH);
    delay(claptime);
    digitalWrite(S2, LOW);
    delay(rest);
// 24
    digitalWrite(S4, HIGH);
    delay(claptime);
    digitalWrite(S4, LOW);
    delay(rest);

/*
    digitalWrite(S2, HIGH);
    delay(claptime);
    digitalWrite(S2, LOW);
    delay(rest);   // 480-30 =450

    digitalWrite(S4, HIGH);
    delay(claptime);
    digitalWrite(S4, LOW);
    delay(rest);

*/


  } else  {
    digitalWrite(S1, LOW);
    digitalWrite(S2, LOW);
    digitalWrite(S3, LOW);
    digitalWrite(S4, LOW);
  }
2) PhotoTransistor sensing
As one of the options to share the musical information and collaborate with several musical machines, I tested the Photo Transistor to read the streamed score image by video conference system ( Zoom, etc. ).
Firstly, I tried PhotoResistor, although it worked fine, I moved to PhotoTransistor because of its fast response.
Also, I tried the sensor below, but it didn’t work on the LED screen on PC, because it was Infrared sensor.
PhotoReflector ( LBR-127HLD, Cut-off Wavelength = 840nm )
The sensors I used were ,,,,,
PhotoTransistor ( NJL7502L, visible light sensor ; Peak Wavelength = 560nm )
I made sensor box which has 4 sensors in it, and attached it on the LED of my MacBook Pro.
( in the test below, only one set of sensor/solenoid was used. )
Test example 1
I programed ESP32 to hit the drum solenoid 5 times/second ( on-time ; 20 msec) when the light sensor detected the black colored area. By scrolling the Black and White spreadsheet, I checked the response of the system.
The sensor position was set to detect the wide black colored band, solenoid was controlled almost fine.
( Although, the scrolling speed was not controlled precisely, the time period of back colored area is about 0.7 second. )
Test example 2
This time, the sensor position was set to detect the narrow black colored band, the number of solenoid ON was not stable ( twice, once, zero ). I think this was caused by the timing of the solenoid control ( programing ).
As a conclusion, this system “Photo Transistor to read the streamed score image by video conference system ( Zoom, etc. )” will work fine, if we can prepare the “Photo Transistor sensor boxes” for each machine and the “Music score image”. But considering the time limitation and to explore the networking technology ( MQTT ), I put this plan on hold.
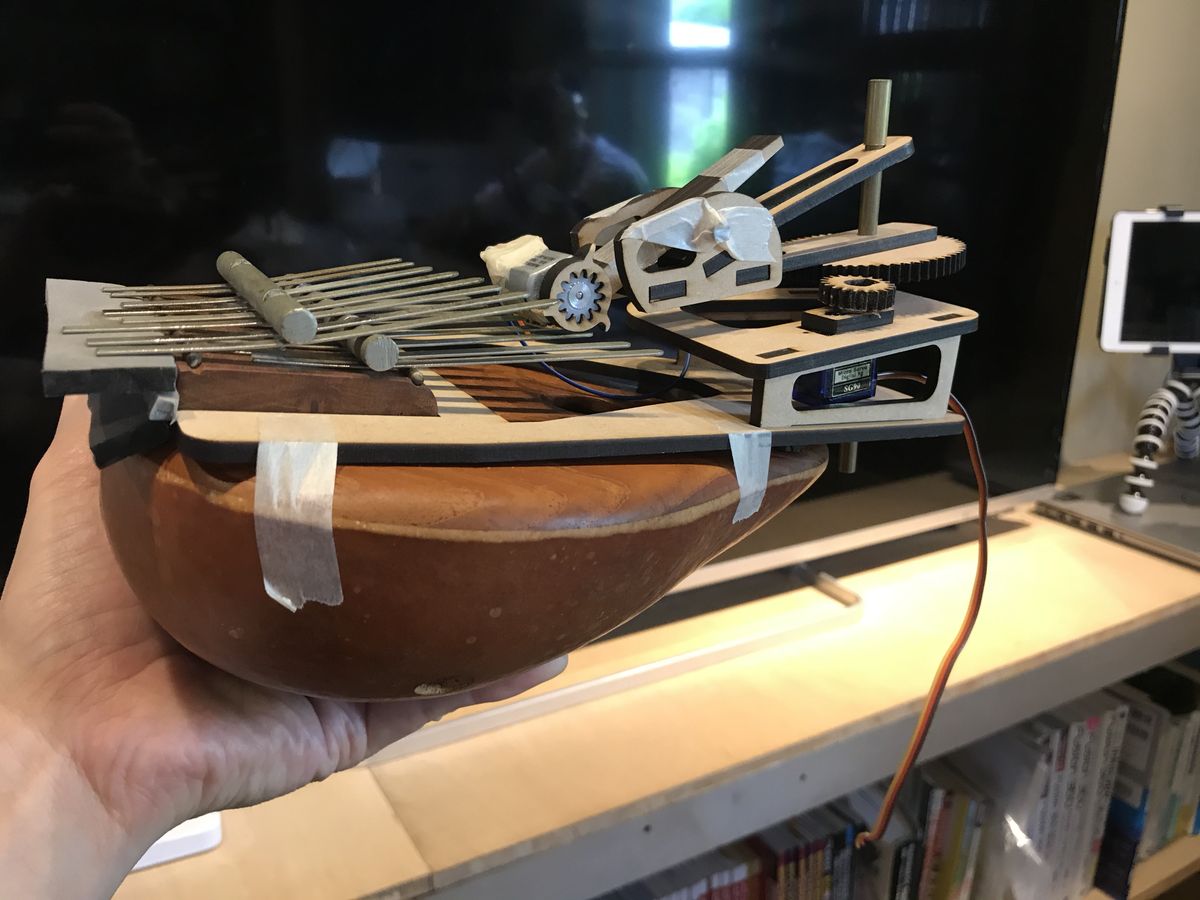
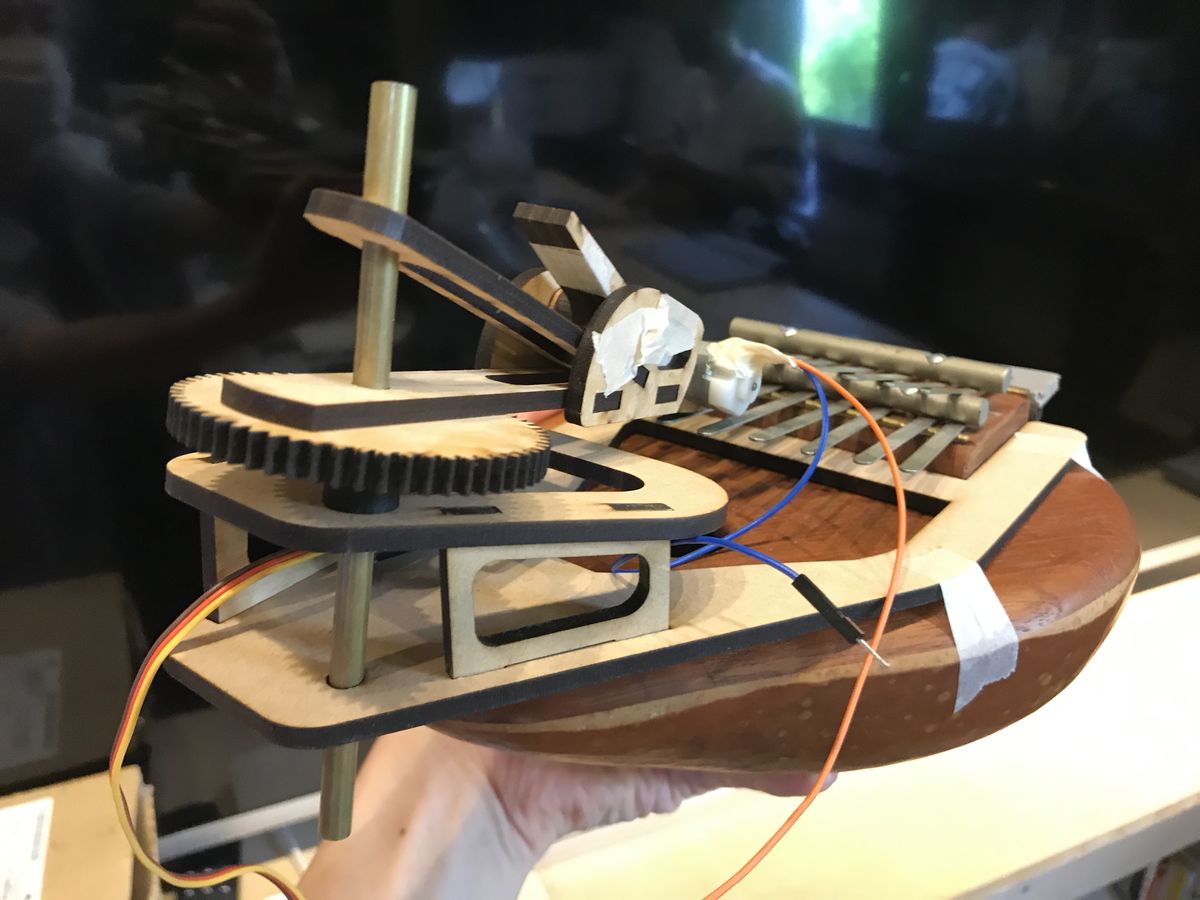
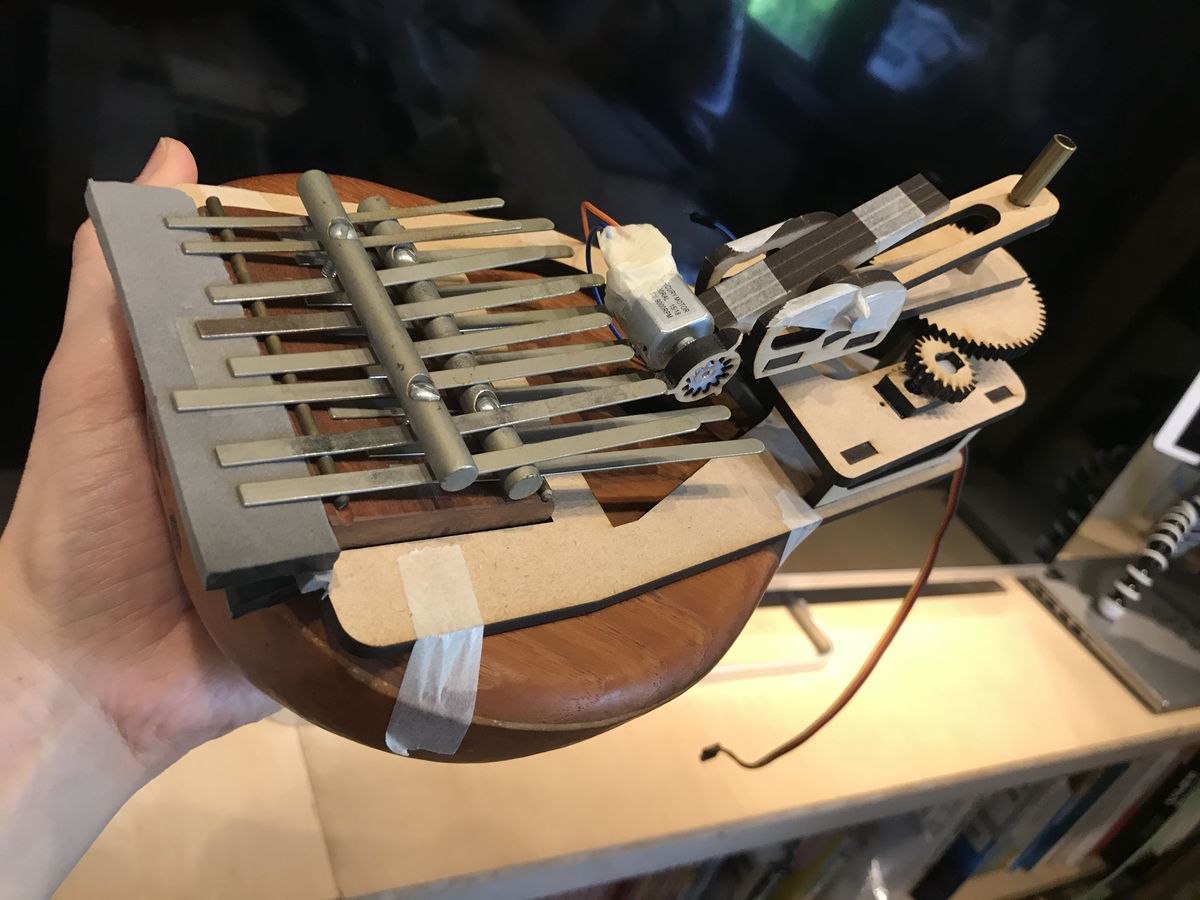
3) Kalimba machine
Kalimba, playing with small vibration motor ( used for “manner-mode” of smartphone ) and servo motor.
unfortunately, ESP32 for this machine had a problem. ( programs cannot be uploaded from Arduino IDE )
So, I decided to concentrate on the above drum machine for the group performance this week (2020/05/31).
Here is the photo type using LEGO components.
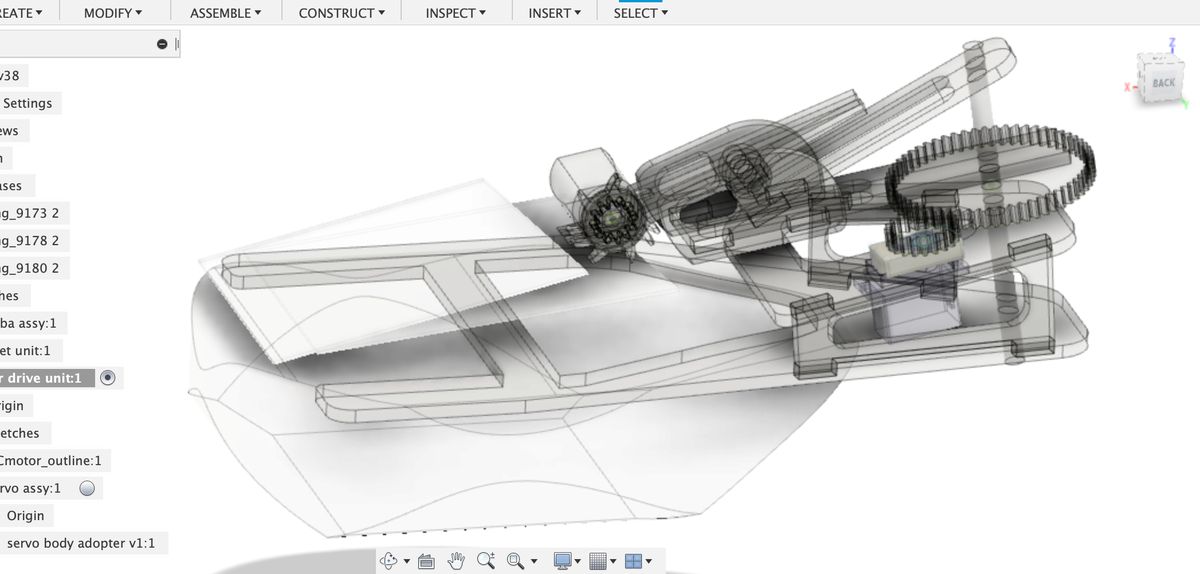
I made the laser cut version (on 2020/07/25).
| taking photo of Kalimba ,,, | paste the photos as Canvases |
|---|---|
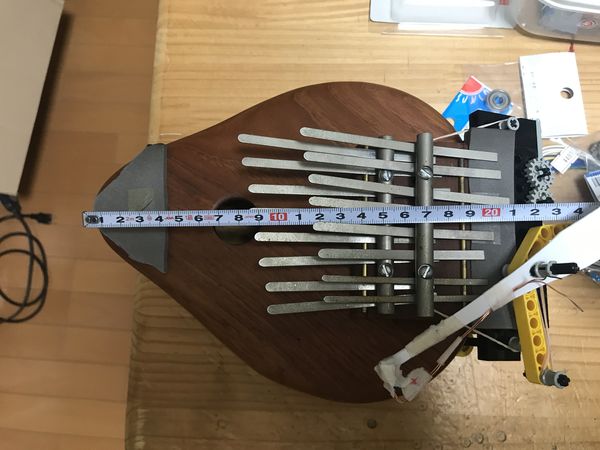 |
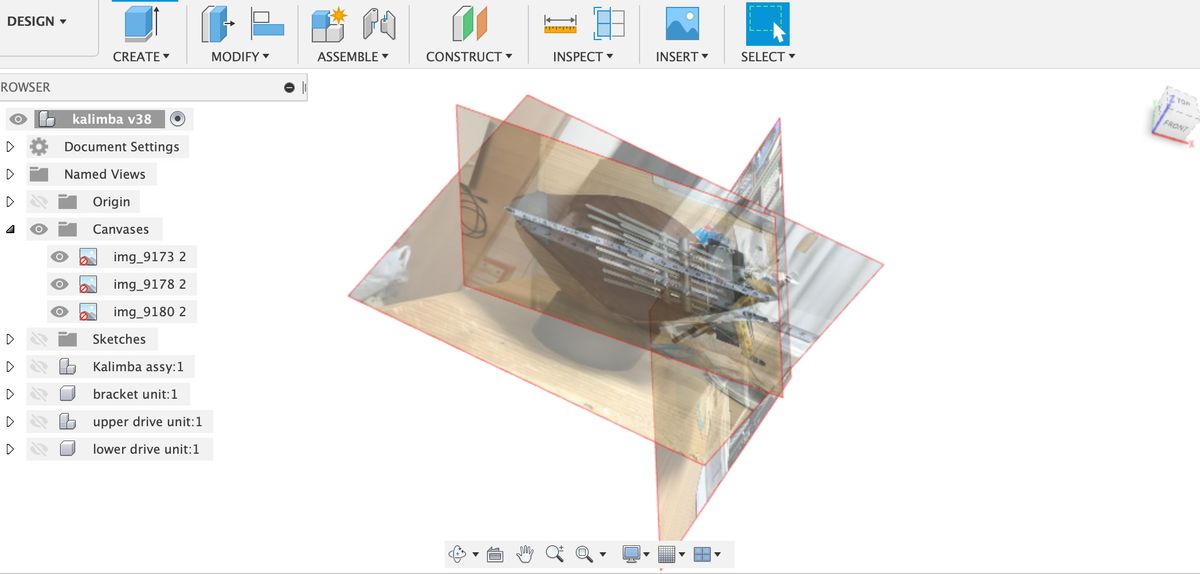 |
| making the shape of Kalimba | “SpurGear” Add-in for making some gears |
|---|---|
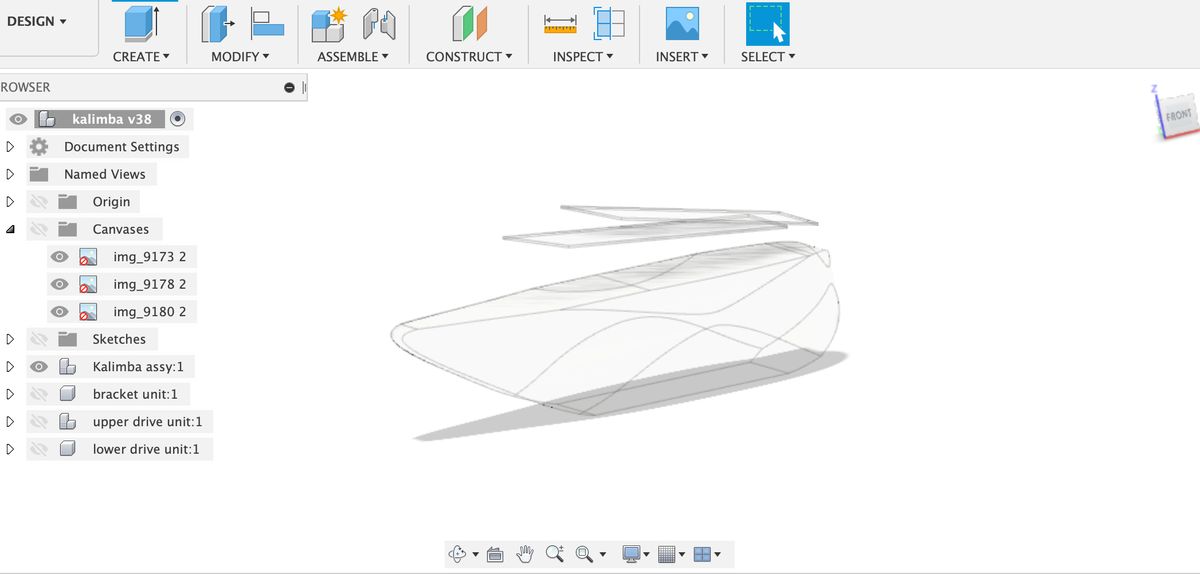 |
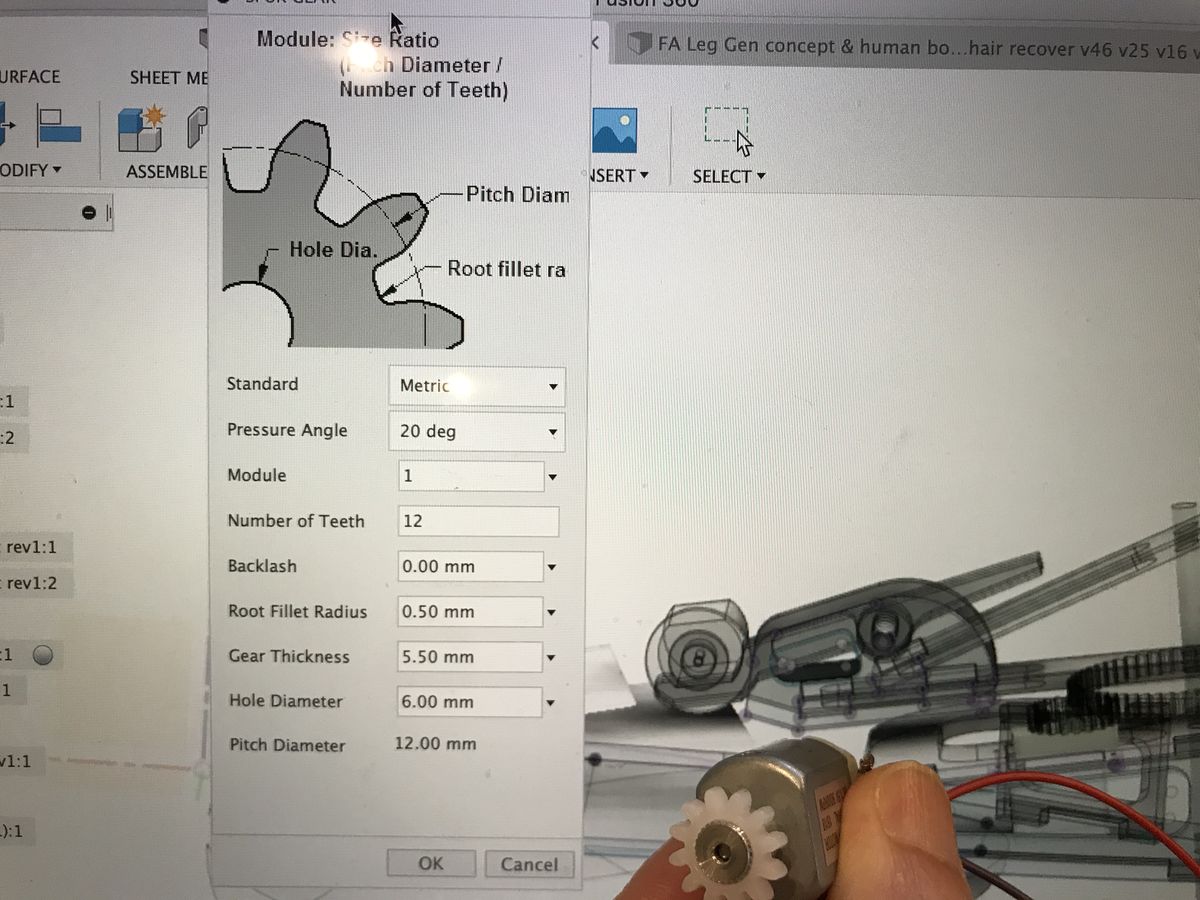 |
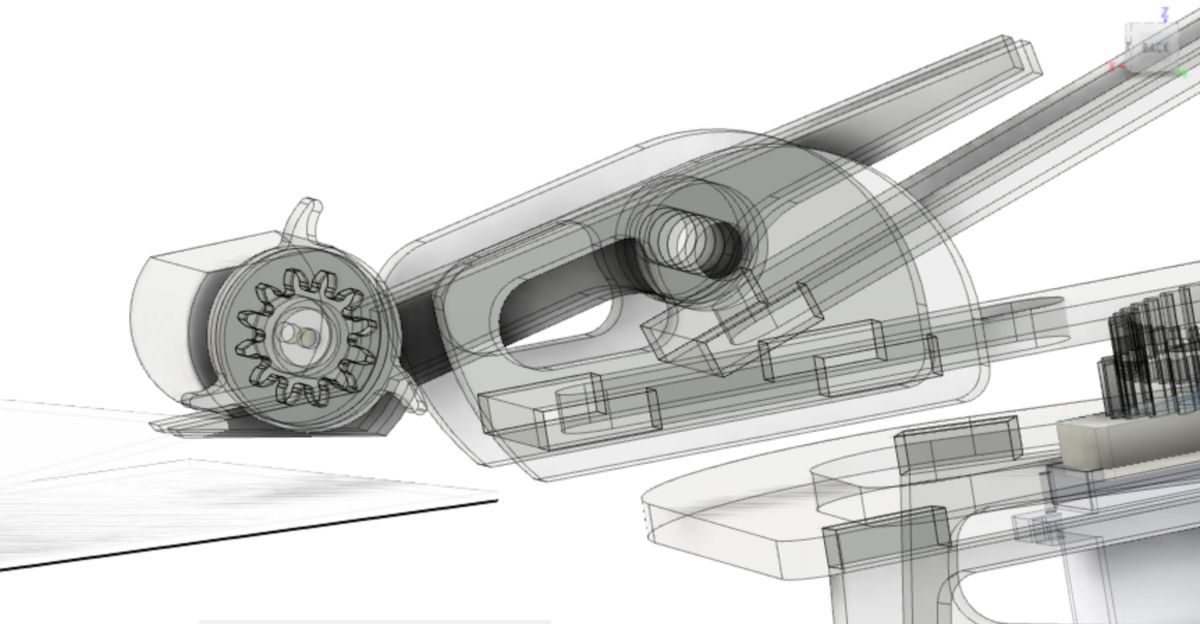
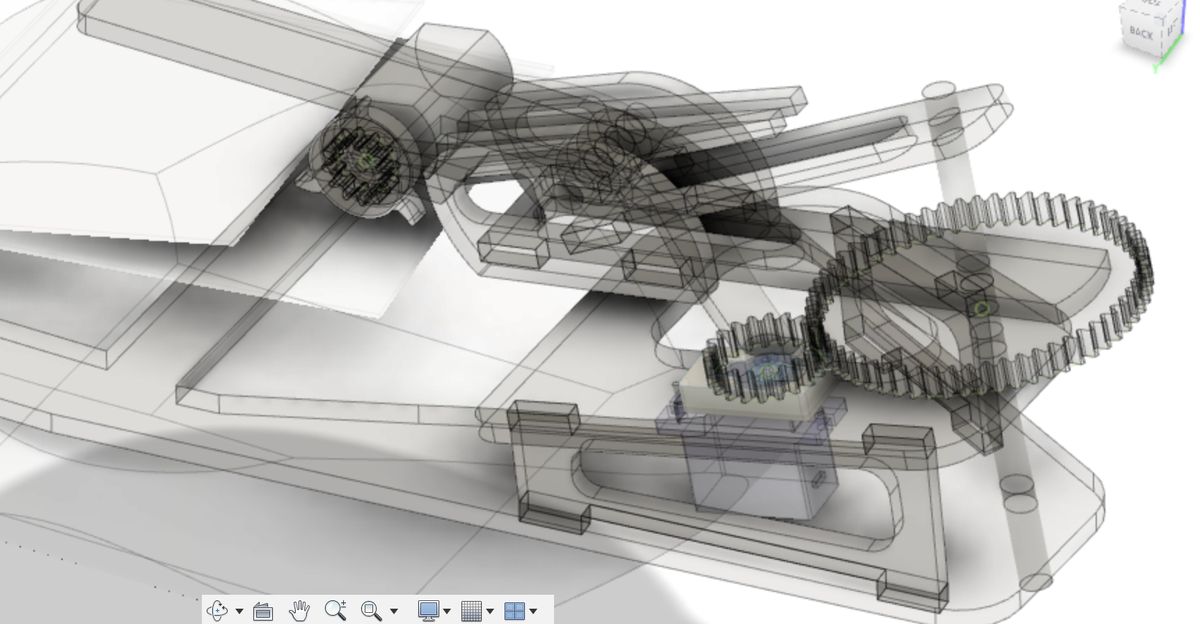
This machine has three degrees of freedom.
(1) Rotor unit (3 claws on DC motor )
(2) Swing arm to support Rotor unit, to control the clearance from the instrument to Rotor.
(3) Servo motor + gears, to move Rotor unit and select the pitch
| Rotor unit on swing arm, for hitting or picking the instruments | servo motor + gears, for moving the Rotor unit |
|---|---|
 |
 |
 |
 |
 |
4. Important Learning Outcome
1) Music machine session is possible by utilizing MQTT and Zoom system.
But there are some limitations like below.
a. delay, MQTT
b. delay, Zoom sytem
simple rhythm section would be better.
5. Links to Files and Code
Drum machine, Arduino programs
“mqtt_aws_music_subscriber_v6_drums_20200531_1245_wo_cert_key.ino”
“mqtt_aws_music_subscriber_v6_drums_20200531_1530_wo_cert_key.ino”
Kalimba machine, fusion360 model
“kalimba_w/o_canvas” ( Canvas data was deleted to avoid confusion. )