Capacitive Slider with SAMD21E
Marcello, Quentin and Miriam tested out capacitive slider with SAMD21e dev board made by Quentin. We should test it with a Xiao board next so that it can be developed into one of the new updated modular-things board.
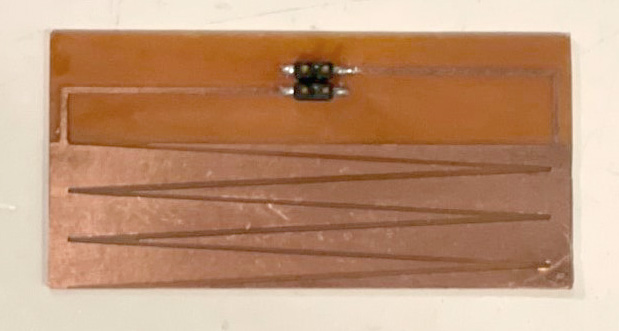
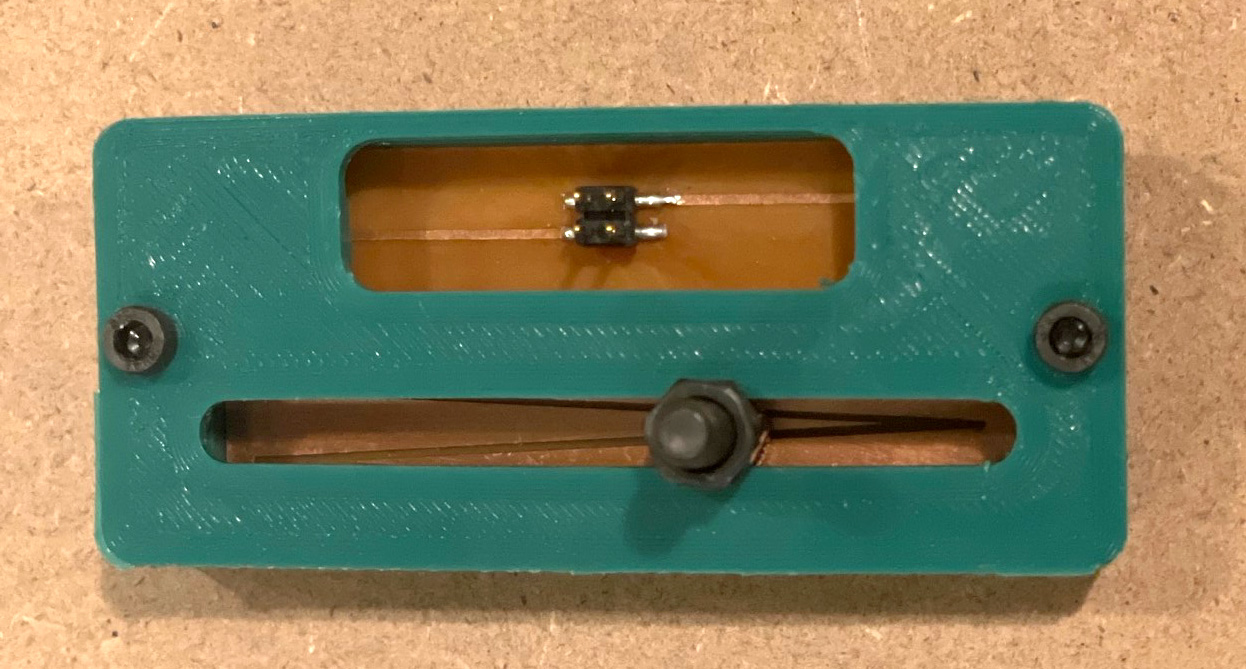
We are also thinking of trying different interpolation style to see which one gets the best reading. this one was finicky.
https://fabacademy.org/2020/labs/ulb/students/quentin-bolsee/projects/samd21e_devkit/
Explaining what this is… (I feel like we tested this as more like slide potentiometer…) https://learn.sparkfun.com/tutorials/capacitive-touch-slider-cap1203-hookup-guide/all
Result
Code
Arduino Setup
here are couple of things that you will need to have set up in your Arduino to use the board. The Fab SAM Core and Adafruit Freetouch.
//test code we used to read the values.

#include "Adafruit_FreeTouch.h"

#define PIN_QTOUCH1 2
#define PIN_QTOUCH2 3

Adafruit_FreeTouch qt1(PIN_QTOUCH1, OVERSAMPLE_64, RESISTOR_50K, FREQ_MODE_NONE);
Adafruit_FreeTouch qt2(PIN_QTOUCH2, OVERSAMPLE_64, RESISTOR_50K, FREQ_MODE_NONE);

void setup() {
  Serial.begin(0);
  qt1.begin();
  qt2.begin();
}

void loop() {
  int val1 = qt1.measure();
  int val2 = qt2.measure();
  Serial.println(val2-val1);
  delay(50);
Code for potentiometer mapping
//value read adjusted to visualize the readings

#include "Adafruit_FreeTouch.h"

#define PIN_QTOUCH1 2
#define PIN_QTOUCH2 3

Adafruit_FreeTouch qt1(PIN_QTOUCH1, OVERSAMPLE_64, RESISTOR_50K, FREQ_MODE_NONE);
Adafruit_FreeTouch qt2(PIN_QTOUCH2, OVERSAMPLE_64, RESISTOR_50K, FREQ_MODE_NONE);

void setup() {
  Serial.begin(0);
  qt1.begin();
  qt2.begin();
}

void loop() {
  int val1 = qt1.measure();
  int val2 = qt2.measure();
  int difVal = (val2-val1);
  difVal = map(difVal, -100, -160, 0, 1024);// put the value in to map your reading.
  Serial.println(difVal);
  delay(50);
  /*
  int qt_value = 0;

  for (int i = 0; i < 1; i++) {
    qt_value += qt.measure();
  }

  Serial.println(qt_value < 21550L);

  delay(50);
  */
}
Python Code for bar visual
# -*- coding: utf-8 -*-
#
# hello.button.py
#
# button sensor detector hello-world
#
# Neil Gershenfeld 11/16/15
# (c) Massachusetts Institute of Technology 2015
#
# Modified: Marcello Tania
#
# This work may be reproduced, modified, distributed,
# performed, and displayed for any purpose. Copyright is
# retained and must be preserved. The work is provided
# as is; no warranty is provided, and users accept all
# liability.
#

from tkinter import *
import serial

WINDOW = 600 # window size

def idle(parent,canvas):
    #
    # idle routine
    #
    char = ser.readline()
    char = str(char).replace("b", "").replace("\\r", "").replace("\\n", "").replace("'", "")
    print("arduino:{}".format(char))

    canvas.itemconfigure("text",text="%s"%char)
    x = int(.2*WINDOW + (.9-.2)*WINDOW*int(char)/1024)
    canvas.coords('rect1',.2*WINDOW,.05*WINDOW,x,.2*WINDOW)
    canvas.coords('rect2',x,.05*WINDOW,.9*WINDOW,.2*WINDOW)


    canvas.update()
    parent.after_idle(idle,parent,canvas)


#
# open serial port
#

ser = serial.Serial('/dev/cu.usbmodem144201',9600) #Serial port
ser.setDTR()
ser.flush()
#
# set up GUI
#
root = Tk()
root.title('Analog Sensor')
root.bind('q','exit')
canvas = Canvas(root, width=WINDOW, height=.25*WINDOW, background='white')
canvas.create_text(.1*WINDOW,.125*WINDOW,text="0",font=("Helvetica", 24),tags="text",fill="#0000b0")
canvas.create_rectangle(.2*WINDOW,.05*WINDOW,.3*WINDOW,.2*WINDOW, tags='rect1', fill='#b00000')
canvas.create_rectangle(.3*WINDOW,.05*WINDOW,.9*WINDOW,.2*WINDOW, tags='rect2', fill='#0000b0')
canvas.pack()
#
# start idle loop
#
root.after(100,idle,root,canvas)
root.mainloop()