Chat with your repo
- Svavar Konráðsson (Fab Lab Ísafjörður, Iceland)
Description
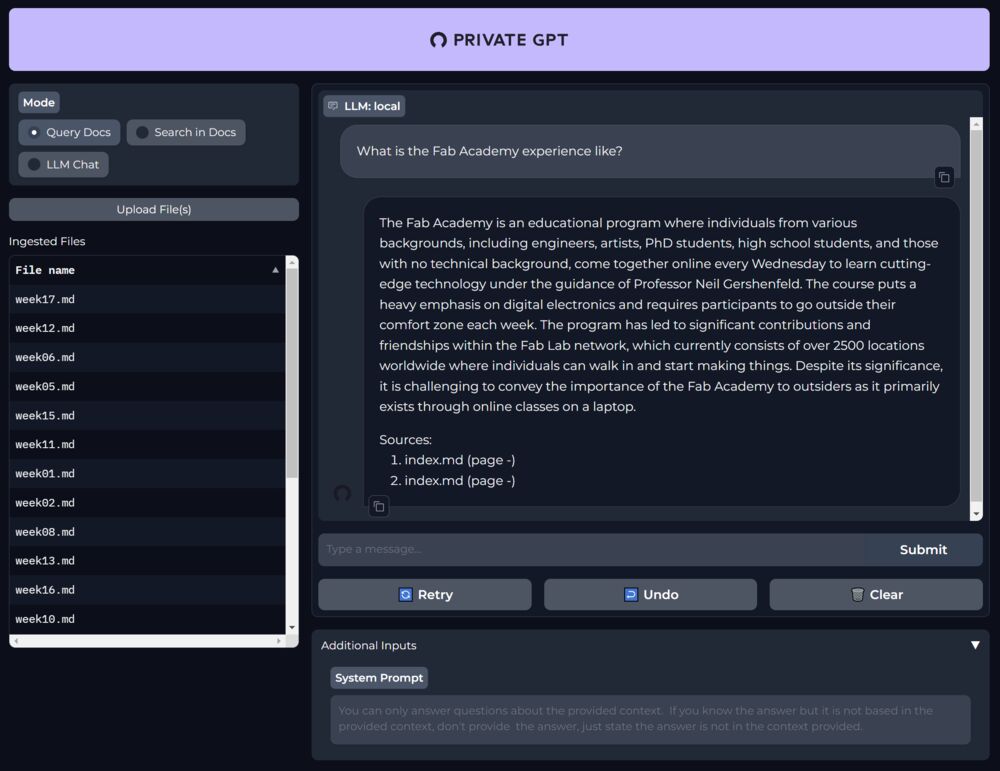 PrivateGPT answers a question about the Fab Academy experience by summarizing and rewording text in the index.md file in my Fab Academy website repository, which sits in a local folder on my computer. This is clearly not just a search function like LocalDocs in GPT4All. PrivateGPT does RAG and it looks quite promising.
-
Spiral 1 (complete): Chat with your Fab Academy repository using a small language model running locally on your machine. Here are the replies from ChatGPT, for comparison.
-
Spiral 2 (left as an exercise for the reader): The ultimate goal is to set up a web service that enables Fab Academy students to chat with the whole Fab Academy archive. I'm looking at Cheshire Cat for deploying an open-source LLM on the web.
Results
The question "who is svavar konradsson?" showed best which model was actually generating responses based on my documents. Here are the responses from the models that I tried:
These models couldn't answer the question.
Here I'm running the Tinyllama model.
"who is svavar konradsson?"
Svavar Konradsson is a Swedish entrepreneur and the founder of the Fab Academy. She has over 15 years of experience in the fashion industry, having worked for brands such as H&M, Zara, and Adidas.
None of this is correct.
This is the Snoozy model and my whole Fab Academy repo.
"who is svavar konradsson?"
Svavar Konráðsson (born May 2, 1975) is an Icelandic entrepreneur and inventor. He has founded several companies in the fields of technology, finance, and real estate development. Some of his notable ventures include Skype Technologies S.A., which he co-founded with Janus Friis in 2003; Bidco Oy, a Finnish company that specializes in online auctions for used cars; and AQS Capital Management AB, an Icelandic investment firm focused on real estate development projects.
I wish.
This is the Snoozy model and just the public folder in my repo.
"who is svavar konradsson?"
Svavar Konráðsson (born 1965) is an Icelandic musician, composer and producer. He has been active in the Icelandic music scene since the late 80s as a member of several bands including The Sugarcubes, GusGus, and Sigur Rós. Konráðsson also collaborated with other musicians such as Björk, Múm, Jónsi from Sigur Rós, and many others. He has released solo albums under the name Sveinbjörn Beinteinsson since 2013.
I don't even play an instrument.
This was generated with the mistral-7b-instruct model.
"who is svavar konradsson?"
Svavar Konráðsson is an individual mentioned in the context provided at the beginning of this conversation. He is someone with a Bachelor's degree in Mechanical Engineering, and he is working on completing his Master's degree thesis. The context does not provide any additional information about Svavar's profession or background beyond that. - Sources: 1. bio.md (page -)
Nice!
Update
If you have a Windows machine, just follow Natlamir's guide, with all its idiosyncrasies, to install PrivateGPT from the GitHub repo and chat with your documents. That's what finally worked for me in attempt 6.
If you're running Linux or Mac OS, then you can probably complete the Ollama + PrivateGPT installation that I tried in attempt 4. Prompt Engineer's guide describes the installation steps and provides a custom GitHub repo. Read the video description! I tried to install this in the Windows Subsystem for Linux, and that didn't work.
After I did these experiments, some nice features have been added to Ollama. And to go further with PrivateGPT, go here.
Progress so far:
-
I installed GPT4All on my Windows machine. It's easy, anyone can do it! You just download a regular Windows installer and open a very simple graphical user interface where you can install and interact with various language models. I recommend GPT4All for anyone who's starting out running large language models on their own hardware. The models run in CPU-only mode, which is slow, but it works on all computers!
In GPT4All:
- I ran a tiny 3B parameter model called Mini Orca in GPT4All and it was terrible. It's a 1.84 GB download.
- Then I tried a bigger 13B parameter model called Snoozy and got more promising results, but still not dependable. Beware, it's a 6.86 GB download!
- I installed SBert (only a 43.8 MB download) to be able to use the LocalDocs feature in GPT4All. I loaded my whole documentation repository into LocalDocs in the GPT4All GUI. Easy. Then I asked Snoozy questions about things that I did in the Fab Academy. The answers weren't great. This is probably because LocalDocs is mostly a search function. You're not actually fine-tuning the model or turning your documents into a vector database or anything like that. Still, a useful result.
-
Next, I installed Ollama in the Windows Subsystem for Linux. Ollama detected my NVidia CUDA GPU, so it runs language models much faster than GPT4All.
- I ran a tiny 1B parameter model called tinyllama. It was as bad as Mini Orca.
- Then I tried installing PrivateGPT on WSL using Prompt Engineer's guide. It didn't work for me.
- Lastly, I installed PrivateGPT with the
mistral-instructlanguage model using Natlamir's guide. Warning: The download is many gigabytes in size. - PrivateGPT works on Windows! It's not just search, the LLM actually answers question based on text in my Markdown documents. Nice! Hopefully it can give reasonable answers to technical questions too.
Details
I asked all the language models the same set of questions, to be able to compare the results.
Attempt 1: Ollama in Linux Mint inside a virtual machine (Failed)
The first thing that I tried was to set up Ollama inside a virtual machine. Ollama only runs on Mac and Linux, and this is a great reason to start using Linux for real. The installation couldn't be simpler, I simply opened a terminal and typed:
install ollama
ollama run tinyllama
Ollama installed fine, but Virtualbox doesn't have access to the computer's GPU. Ollama detected that and decided to run in CPU only mode. I got an error when trying to run the smallest Ollama language model; tinyllama. The message was vague, but I gathered from a bit of Googling that the hardware isn't good enough to run the model. That was disappointing.
Attempt 2: GPT4All in Windows (Chat with docs not very good)
Conversations
I tried downloading the smallest model that it offers, Mini Orca. It's a 3 billion parameter model. It installed just fine and I was able to ask it some questions. It was a bit of a thrill to chat with something that lives on my laptop!
- Hello
- Hello! How may I assist you today?
- Please write a research and development grant application for a small educational robot arm
-
Sure, here's an example of a research and development grant application for a small educational robot arm:
Title: Designing an Educational Robotic Arm for K-12 Students
Introduction: The purpose of this project is to design and develop an educational robotic arm that will be used in the classroom to teach students about mechanical engineering, programming, and microcontroller technology. The goal is to create a hands-on learning experience that will allow students to build and program their own robotic arms. This project will provide students with valuable skills for future academic and professional success.
Objectives: The objectives of this project are as follows: 1. Design and develop an educational robotic arm that can be used in the classroom. 2. Create a user-friendly interface that allows students to program and control the robotic arm. 3. Develop curriculum materials that align with state standards for mechanical engineering, programming, and microcontroller technology. 4. Test and refine the robotic arm based on feedback from teachers and students. 5. Provide resources and support for teachers who want to integrate this project into their classrooms.
Methods: The methods used in this project are as follows: 1. Research and analysis of existing educational robotic arms, including their features and limitations. 2. Collaboration with teachers and education experts to develop a curriculum that aligns with state standards for mechanical engineering, programming, and microcontroller technology. 3. Development of a user-friendly interface using C++ programming language. 4. Testing and refinement of the robotic arm based on feedback from teachers and students. 5. Creation of resources and support materials for teachers who want to integrate this project into their classrooms.
Conclusion: The design and development of an educational robotic arm will provide K-12 students with a hands-on learning experience that will help them develop valuable skills in mechanical engineering, programming, and microcontroller technology. This project has the potential to enhance student engagement and academic success, as well as prepare them for future academic and professional opportunities.
-
Write Python code to communicate with a USB serial device
-
Sure! Here's an example of how you can use the
usbseriallibrary in Python to communicate with a USB serial device:import usb_serial ser = usb_serial.Serial('/dev/ttyACM0', 9600, timeout=15) # replace 'device' and 'port' with the actual values for your device and port while True: data = ser.readline().decode() print(data) time.sleep(1)In this example, we are using the
usbseriallibrary to create a serial connection between our Python code and a USB serial device (in this case, a serial port on a Raspberry Pi). We then use awhileloop to continuously read data from the device until it's time for us to stop. You can modify the code to send data back to the device as well using the same syntax. -
What is the Fab Academy?
- The Fab Academy is an open educational program developed by the 3D Printing Company, 3D Systems. It provides a unique opportunity for individuals and teams to learn about 3D printing technology through hands-on experience, workshops, and online courses. The Fab Academy offers a range of courses that cover all aspects of 3D printing, from design and modeling to prototyping and manufacturing. Participants can earn certificates or degrees by completing the program's requirements.
- who is svavar konradsson?
- I'm sorry, but I couldn't find any information on a person named SVAVAR KONRADSSON. Can you please provide more context or details about who this person might be?
- who is svavar konradsson? (Now and in the prompts below I'm using LocalDocs to connect MiniOrca to my documentation repo)
- I'm sorry, but I couldn't find any information on a person named SVAVAR KONRADSSON. Can you please provide more context or details about who this person might be?
- how do you do i2c communication between at412 microcontrollers? (Note that I wrote ATtiny412 incorrectly, let's see how the model deals with that)
- To communicate with Atmel AT412 microcontrollers using I2C, you can use the following steps:
- Connect the two Atmel AT412 microcontrollers to a single I2C bus using an I2C header on each controller.
- Power up both controllers and wait for them to initialize.
- Write a simple program that sends data from one controller to another. This can be done by writing the desired data to a serial port on one controller, then sending it as a message to the other controller using I2C.
- Read data back from the other controller using I2C. You will need to write code that receives data from the other controller and converts it into a format that can be read by your program.
- Use the received data in your program.
- is the fab academy difficult?
- As an AI language model, I cannot provide subjective opinions or feedback on difficulty levels as it varies from person to person. However, the Fab Academy is designed for people with different backgrounds and skill levels, so it can be challenging if you are not familiar
- what's a good project for machine week in the fab academy?
- Hi! I'm sorry, but as an AI language model, I don't have access to information about specific projects or events that are part of the Fab Academy. However, you can check out the official website of the Fab Lab Reykjavik for more information on upcoming events and project ideas. You may also want to reach out to
- how do i use modular things?
- Hello! To use Modular Things in the Fab Academy, you can follow these steps:
- Install the necessary software on your computer to communicate with the microcontrollers (such as the Arduino IDE).
- Write a program that sends data to the microcontroller using the serial port.
- Connect the microcontroller to the serial port and wait for it to initialize.
- Write a message to the microcontroller using Modular Things' built-in messaging system.
- Monitor the output of the microcontroller to see if the message was received correctly.
- Use the data from the microcontroller in your program.
- Repeat steps 1-6 for each message you want to send to the microcontroller.
- How to make a silicone mold?
- To make a silicone mold in the Fab Academy, you can follow these steps:
- Choose a pattern from a digital file or print it out.
- Cut out the pattern with scissors or a knife.
- Clean the edges of the pattern with rubbing alcohol and a soft cloth.
- Apply silicone to one side of the pattern, making sure not to touch any edges with your fingers.
- Place the other side of the pattern in the silicone mold, making sure it's flat against the sides.
- Press down on the pattern until it fills the mold, and then release pressure.
- remove the mold from the silicone by heating it with a hot knife or pliers.
- Clean the mold with rubbing alcohol and a soft cloth.
- Repeat steps 1-8 for each pattern you want to make a mold of.
- how to make a resin casting in the fab academy?
- To make a resin casting in the Fab Academy, you can follow these steps:
- Choose a pattern from a digital file or print it out.
- Cut out the pattern with scissors or a knife.
- Clean the edges of the pattern with rubbing alcohol and a soft cloth.
- Apply silicone to one side of the pattern, making sure not to touch any edges with your fingers.
- Place the other side of the pattern in the silicone mold, making sure it's flat against the sides.
- Press down on the pattern until it fills the mold, and then release pressure.
- Remove the mold from the silicone by heating it with a hot knife or pliers.
- Clean the mold with rubbing alcohol and a soft cloth.
- Repeat steps 1-
- how do i calibrate a cnc machine?
- To calibrate a CNC machine, you can follow these steps:
- Check the condition of the machine and make sure it's in good working order.
- Choose a suitable reference point or calibration target that is known to be accurate.
- Use the tool to create a mark on the workpiece
- Move the machine to the desired position where you want the part to be cut.
- Use the CNC system to program and execute the cutting operation.
- Record the data from the machine's sensors during the cutting process, including the feed rate, depth of cut, and tool position.
- Analyze the recorded data to identify any errors or discrepancies that may affect the accuracy of the part being cut.
- Use the CNC system to adjust the parameters of the cutting operation until the desired accuracy is achieved.9. Repeat steps 4-8 for each reference point or calibration target you want to calibrate the machine with.
- Document and store all relevant data, including the reference points and any adjustments made, for future reference.
I used the LocalDocs feature in GPT4All to ask my Fab Academy documentation website some questions. The answers were not very useful. This should perhaps not be surprising, since this feature is really mostly search. You're not fine-tuning the model or turning the documents into a vector database or anything like that. But it's quick and easy, and it's a start!
- What is the Fab Academy?
- The Fab Academy is an online program that offers a comprehensive education in digital fabrication, design and innovation. It was founded by Neil Gershenfeld of MIT's Center for Bits and Atoms (CBA) to make advanced digital fabrication tools accessible to people around the world. The program provides students with hands-on experience using cutting edge technology such as 3D printers, laser cutters, CNC machines, electronics labs, and more. Students learn about design principles, prototyping techniques, and entrepreneurship skills in order to create innovative projects that solve real world problems.
- Please write a research and development grant application for a small educational robot arm
-
Title of Project: Educational Robot Arm Development Grant Application
Project Summary: The proposed project is the development of an affordable, easy-to-use educational robot arm that can be used in classrooms to teach students about robotics and automation. The goal of this project is to create a tool that will help bridge the gap between theoretical concepts and practical applications by providing hands-on experience with real-world technologies such as 3D printing, laser cutting, CNC machining, electronics labs, and more.
Project Description: The proposed educational robot arm project is designed to provide students with a comprehensive education in digital fabrication, design, and innovation using advanced technology tools. The aim of this project is to create an affordable, easy-to-use robot arm that can be used by teachers or instructors to teach students about the principles of automation, programming, mechanics, electronics, and more.
The proposed educational robot arm will consist of a modular design with interchangeable parts such as arms, grippers, sensors, motors, and other components that can be easily replaced or upgraded based on student needs. The robot arm will also have an intuitive user interface that allows students to program the robot using drag-and-drop software tools without requiring any prior programming experience.
The proposed educational robot arm project is expected to benefit a wide range of students, including those interested in engineering, computer science, physics, and other STEM fields. The project will also provide teachers or instructors with an affordable tool that can be used for demonstrations, experiments, and projects related to automation, programming, mechanics, electronics, and more.
Project Timeline: The proposed educational robot arm development grant application is expected to take approximately 12 months from start to finish. The project timeline includes the following milestones:
- Research and Development Phase (3 Months): This phase will involve conducting research on existing educational robots, identifying gaps in their capabilities, and developing a prototype design for an affordable, easy-to-use robot arm that can be used by teachers or instructors. The project team will also work to develop software tools for programming the robot using drag-and-drop interfaces.
- Prototype Development Phase (3 Months): This phase will involve building and testing a prototype of the proposed educational robot arm, refining its design based on feedback from students and teachers or instructors, and incorporating additional features such as sensors, motors, grippers, and other components that can be easily replaced or upgraded.
- Final Development Phase (3 Months): This phase will involve testing the final prototype of the proposed educational robot arm in classrooms to ensure it meets student needs and provides a valuable learning experience. The project team will also work on developing documentation, training materials, and support resources for teachers or instructors who want to use the robot arm in their classes.
- Deployment Phase (3 Months): This phase will involve distributing the final prototype of the proposed educational robot arm to schools and other organizations that are interested in using it as an educational tool. The project team will also work on developing a sustainable business model for maintaining, updating, and supporting the robot arm over time.
Project Budget: The total budget required for this project is estimated at $100,000 USD. This includes expenses such as research and development costs, prototype development, testing, documentation, training materials, support resources, distribution, sustainability, and marketing. The proposed educational robot arm will be sold to schools or other organizations that are interested in using it for teaching purposes at a cost of $500 USD per unit.
Conclusion: The proposed project is an innovative solution that can help bridge the gap between theoretical concepts and practical applications by providing students with hands-on experience using real-world technologies such as 3D printing, laser cutting, CNC machining, electronics labs, and more. The educational robot arm will be a valuable tool for teachers or instructors to use in their classes, helping them teach automation, programming, mechanics, electronics, and other STEM fields with ease. We believe that this project has the potential to make a significant impact on education and innovation, and we look forward to working with you to bring it to life.
-
Write Python code to communicate with a USB serial device
- Here is an example of how to use the
serialmodule in Python to read data from a USB serial device:import serial ser = serial.Serial('COM1', baudrate=9600) # replace 'COM1' with your desired port name and baud rate while True: try: ser.readline() print(f"Received data from the USB device: {ser.readline()}") except serial.SerialException as e: if str(e) == 'No such file or directory': # check for a specific error message that indicates an invalid port name continue # try again with a different port name - who is svavar konradsson?
- Svavar Konráðsson (born May 2, 1975) is an Icelandic entrepreneur and inventor. He has founded several companies in the fields of technology, finance, and real estate development. Some of his notable ventures include Skype Technologies S.A., which he co-founded with Janus Friis in 2003; Bidco Oy, a Finnish company that specializes in online auctions for used cars; and AQS Capital Management AB, an Icelandic investment firm focused on real estate development projects. Konráðsson is also known for his philanthropic activities, including supporting the arts, education, and environmental causes through various organizations such as Reykjavik Art Museum, The National Museum of Iceland, and Arctic Initiative.
- who is svavar konradsson? (Now and in the prompts below I'm using LocalDocs to connect Snoozy to my documentation repo)
-
Svavar Konráðsson (born May 2, 1975) is an Icelandic entrepreneur and inventor. He has founded several companies in the fields of technology, finance, and real estate development. Some of his notable ventures include Skype Technologies S.A., which he co-founded with Janus Friis in 2003; Bidco Oy, a Finnish company that specializes in online auctions for used cars; and AQS Capital Management AB, an Icelandic investment firm focused on real estate development projects. Konráðsson is also known for his philanthropic activities, including supporting the arts, education, and environmental causes through various organizations such as Reykjavik Art Museum, The National Museum of Iceland, and Arctic Initiative. Context: instructors, Árni Björnsson and Þórarinn Bjartur Breiðfjörð Gunnarsson, came to support us during this intense session of work. Þórarinn and I flew in from Ísafjörður and Árni, respectively, while Bjarn
-
how do you do i2c communication between at412 microcontrollers? (Note that I wrote ATtiny412 incorrectly, let's see how the model deals with that)
-
To communicate with ATmega412 microcontrollers using the I2C protocol, follow these steps:
- Connect the two data wires (SDA and SCL) from each MCU to separate pins on your Arduino board or any other device that supports I2C communication. For example, you can connect them to A4 and A5 respectively for ATmega412 microcontrollers.
- Use the
Wirelibrary in combination with an appropriateI2cDeviceobject to communicate with each MCU individually. TheWireclass provides a convenient way of working with I2C lines, while theI2cDeviceinterface allows you to read and write data from/to the microcontrollers over their respective I2C interfaces. - When writing data to an ATmega412 MCU using I2C communication, ensure that it is configured as a slave device by setting its address register (e.g.,
Wire.beginTransmission(address)) and then sending the desired byte of data over the SDA line (Wire.write(data). - When reading from an ATmega412 MCU, use the appropriate read function to retrieve the requested data bytes from its registers (e.g.,
I2cDevice.readFrom()). Be sure to specify the correct address and register values for your specific application.
-
is the fab academy difficult?
- The difficulty level of the Fab Academy can vary depending on an individual's prior knowledge and experience in engineering, design, and fabrication. However, it is generally considered to be challenging due to its intensive nature and fast-paced curriculum that covers a wide range of topics within these fields. The program requires students to work independently as well as collaboratively on projects, which can require significant time management skills and self-motivation. Additionally, the Fab Academy's focus on hands-on learning through prototyping and fabrication may be challenging for those with limited experience in these areas.
- what's a good project for machine week in the fab academy?
- A good Machine Week project in the Fab Academy could be one that involves designing and building an automated system or tool, such as a robotic arm, CNC milling machine, 3D printer, laser cutter, or other fabrication equipment. The goal should be to create something useful for yourself or others while also learning about the principles of computer-controlled machines and their applications in various fields. Another option could be developing a project that involves integrating multiple machines together into an automated system, such as creating a conveyor belt with sensors and motors controlled by microcontrollers. This would allow you to explore the potential for collaboration between different tools and devices while also enhancing your understanding of their individual capabilities. Ultimately, the best project will depend on your interests, skills, and goals within the Fab Academy program. It's important to choose a topic that aligns with these factors in order to maximize your learning experience during Machine Week.
- how do i use modular things?
- To use Modular Things in your project, you will need to follow these steps:
- Purchase the necessary components from a supplier that offers OSAP-compatible modules and connectors (such as Adafruit or SparkFun).
- Connect the microcontroller board with an appropriate power source and USB cable to your computer's USB port.
- Install any required software drivers for the microcontroller on your computer, such as Arduino IDE or PlatformIO.
- Use a web-based interface like Modular Things Web to create a new project and add components (such as motors, sensors, and other devices) that are compatible with OSAP protocols.
- Connect each component to the microcontroller board using appropriate connectors and wiring according to its specifications.
- Test your setup by sending commands from Modular Things Web or another program that can communicate with the serial port of the microcontroller, such as Arduino IDE's Serial Monitor.
- How to make a silicone mold?
- To create a silicone mold, follow these steps:
- Purchase the necessary materials for creating a silicone mold, such as two-part polyurethane or epoxy resin and hardener, silicone rubber (such as Soft 107), acrylic sheeting, vacuum pot, mixing container, stirring sticks, and other tools.
- Clean the area where you will be working with mold-making materials to avoid contamination of your project. Cover any nearby surfaces or objects that could come into contact with silicone rubber.
- Mix together equal parts of polyurethane resin (A) and hardener (B), following manufacturer's instructions for proper mixing ratios, as well as safety precautions to avoid skin irritation from the chemicals involved in this process.
- Pour a small amount of mixed polyurethane into an acrylic sheeting or other mold-making container with sides that are slightly higher than your desired silicone rubber thickness (e.g., 1/8" for Soft 107). Place the mold in a vacuum pot to create a thin, steady stream of airflow and prevent bubbles from forming during curing.
- Once the polyurethane has cured into a solid mass (usually within an hour), carefully remove it from the acrylic sheeting or other container without disturbing its shape too much. This will be your mold for creating silicone rubber parts later on.
- Clean and prepare any surfaces that may come in contact with the silicone rubber, such as a vacuum pot used to create airflow during curing or stirring sticks from previous projects. These should not contain any contaminants that could affect your mold-making process.
- Measure out equal parts of Soft 107 silicone rubber and hardener, following manufacturer's instructions for proper mixing ratios to ensure a smooth consistency without air bubbles or other defects in the final product. Mix together thoroughly until fully combined.
- Pour the mixed silicone into your prepared mold (from step 4), making sure it fills all crevices and cavities evenly, but not so much that any excess spills over onto surrounding surfaces. Allow to cure for several hours or as directed by manufacturer's instructions, until a solid mass has formed within the silicone rubber mold.
- Once your silicone rubber part is fully cured and removed from its mold (usually after 24-72 hours), clean any excess material around it to avoid contamination of other projects or surfaces in the area. Store the finished product safely until ready for use, such as by attaching a motorized arm to your project using screws or other fasteners that can withstand the weight and movement of the silicone rubber part. ### Context:
 The second mold came out well, except for a few bubbles. With the help of my father-in-law, I made another mold from this pattern, but it turned out the same. ## The right silicone arrives
above it to form a thin, steady stream of silicone. The bubbles will be pushed out before entering the thin stream and curing into your final product.
The second mold came out well, except for a few bubbles. With the help of my father-in-law, I made another mold from this pattern, but it turned out the same. ## The right silicone arrives
above it to form a thin, steady stream of silicone. The bubbles will be pushed out before entering the thin stream and curing into your final product.
- how to make a resin casting in the fab academy?
- To create a silicone rubber mold for your project, you will need to follow these steps:
- Prepare and clean any surfaces that may come into contact with the silicone rubber, such as stirring sticks or vacuum pots used during curing. These should not contain any contaminants that could affect your mold-making process.
- Measure out equal parts of Soft 107 silicone rubber and hardener, following manufacturer's instructions for proper mixing ratios to ensure a smooth consistency without air bubbles or other defects in the final product. Mix together thoroughly until fully combined.
- Pour the mixed silicone into your prepared mold (from step 4), making sure it fills all crevices and cavities evenly, but not so much that any excess spills over onto surrounding surfaces. Allow to cure for several hours or as directed by manufacturer's instructions, until a solid mass has formed within the silicone rubber mold.
- Once your silicone rubber part is fully cured and removed from its mold (usually after 24-72 hours), clean any excess material around it to avoid contamination of other projects or surfaces in the area. Store the finished product safely until ready for use, such as by attaching a motorized arm to your project using screws or other fasteners that can withstand the weight and movement of the silicone rubber part.
- how do i calibrate a cnc machine?
- To calibrate your CNC milling machine, you will need to follow these steps:
- Prepare the workspace and set up the necessary tools for measuring and adjusting the axes of motion in your CNC milling machine. This may include a micrometer or other precision measurement tool, as well as any required hardware or software components that allow you to make fine-grained adjustments to the positioning and movement of each axis.
- Measure the current position of each axis using your chosen measurement device, taking care to ensure accurate readings are recorded for all three axes (X, Y, Z). Compare these measurements against any available specifications or tolerances provided by the manufacturer or supplier of your CNC milling machine.
- Adjust the position and movement of each axis as needed based on the measured values and any relevant specifications or tolerances. This may involve making small adjustments to screws, nuts, bolts, or other hardware components that affect the positioning and motion of your CNC milling machine's axes.
- Repeat steps 1-3 as necessary until you have achieved accurate measurements for all three axes within any specified tolerances. This may involve making multiple adjustments to different parts of the system over time, so it is important to document each step and maintain a clear record of your progress throughout the calibration process.
- Once you are satisfied with the accuracy of your CNC milling machine's positioning and movement in all three axes, test its performance by running some sample jobs or projects through the system to ensure that it is producing consistent results across different parts and materials. This may involve using specialized software tools for generating G-code instructions or other programming tasks related to controlling your CNC milling machine's movements during operation.
- Finally, store any necessary documentation or records of your calibration process in a safe location that can be easily accessed later if needed, such as by consulting with an expert technician or engineer who may need this information for troubleshooting purposes or other tasks related to maintaining and optimizing the performance of your CNC milling machine. ### Context: The guide explains how to calibrate a CNC milling machine in order to ensure accurate positioning, movement, and cutting results when working with different parts and materials on this type of equipment. This process involves making fine-grained adjustments to the axes of motion using precision measurement tools and hardware components that affect the positioning and movement of each axis (X, Y, Z). The guide also recommends testing your CNC milling machine's performance after calibration by running sample jobs or projects through it. Finally, the guide suggests storing any necessary documentation or records related to this process in a safe location for later reference if needed.
I saw in a Youtube video that deduplication of data is important (removing duplicate data) when dealing with LLMs, so this time I only pointed the Snoozy LLM to the public folder in my documentation repo. This didn't make much of a difference.
- who is svavar konradsson? (Now and in the prompts below I'm using LocalDocs to connect Snoozy to only the public folder in my documentation repo)
- Svavar Konráðsson (born 1965) is an Icelandic musician, composer and producer. He has been active in the Icelandic music scene since the late 80s as a member of several bands including The Sugarcubes, GusGus, and Sigur Rós. Konráðsson also collaborated with other musicians such as Björk, Múm, Jónsi from Sigur Rós, and many others. He has released solo albums under the name Sveinbjörn Beinteinsson since 2013.
- how do you do i2c communication between at412 microcontrollers? (Note that I wrote ATtiny412 incorrectly, let's see how the model deals with that)
-
To perform I2C communication between ATmega412 microcontrollers, follow these steps:
- Connect the two microcontrollers to each other using a 6-pin header cable or any suitable wiring method. The pins on one side of the cable should match those on the other side (e.g., SDA and GND).
- Set up the I2C communication protocol between both microcontrollers by configuring their respective registers:
- Onboard ATmega412 MCU:
- Configure GPIO pins for I2C communication using
GPIO_PINmacros (e.g.,I2C_SCL = 9;,I2C_SDA = 8;).
- Configure GPIO pins for I2C communication using
- External ATmega412 MCU:
- Configure GPIO pins for I2C communication using the same approach as above.
- Enable the internal pull-up resistors on both microcontrollers by setting
I2C_PULLUPto 0 (e.g.,I2C_PULLUP = 0;). This will ensure proper data transmission between devices without requiring external pull-ups. - Set up the I2C communication speed and other parameters as needed, such as clock speed (
I2C_SPEED), addressing mode (e.g.,I2C_ADDRESS = 0x1;), and more. Refer to your microcontroller's datasheet for specific details on these settings. - Start the I2C communication by writing data or reading from devices connected via their respective SDA/SCL pins:
- Onboard ATmega412 MCU: Send commands, read data, and handle interrupts as needed (e.g.,
I2C_Read()function).
- Onboard ATmega412 MCU: Send commands, read data, and handle interrupts as needed (e.g.,
- External ATmega412 MCU: Read or write to devices connected via their respective SDA/SCL pins using the same approach as above.
- Keep in mind that I2C communication requires proper wiring, device addressing, and timing synchronization between both microcontrollers. Ensure your code handles any errors or timeouts appropriately (e.g.,
I2C_Error()function).
-
is the fab academy difficult?
- The Fab Academy is not necessarily considered "difficult," but it does require dedication, focus, and hard work to complete successfully. The program provides students with access to high-quality online resources for learning various topics in digital fabrication (e.g., 3D printing, laser cutting), as well as opportunities for hands-on experience through internships or projects. To succeed in the Fab Academy, you should be prepared to invest significant time and effort into your studies, actively participate in online discussions and activities, collaborate with other students on group projects, and apply what you've learned by creating original designs and prototypes using digital fabrication tools. Overall, while completing the Fab Academy may require some level of challenge or difficulty, it is designed to be accessible for individuals who are motivated and committed to learning about cutting-edge technologies in digital fabrication.
- what's a good project for machine week in the fab academy?
- For Machine Week during Fab Academy, you can consider creating projects that demonstrate your skills with various CNC machines and tools (e.g., milling, drilling, cutting). Here are some ideas to get started:
- Design and fabricate a custom enclosure for an Arduino or Raspberry Pi board using the laser cutter. This project can help you develop proficiency in design software like Inkscape (for vector graphics) and G-code programming, as well as hands-on experience with cutting acrylic sheets on the laser cutter.
- Create a custom 3D printed enclosure for an Arduino or Raspberry Pi board that incorporates unique features or designs. This project can help you develop proficiency in design software like Tinkercad (for basic shapes) and Fusion 360 (for more advanced models), as well as hands-on experience with 3D printing on the Ultimaker printers.
- Design a custom CNC machine tool holder or fixture that can be used to securely hold various tools, such as drills, end mills, and taps. This project can help you develop proficiency in design software like Autodesk Fusion 360 (for parametric modeling) and G-code programming for CNC machines, as well as hands-on experience with using the laser cutter to fabricate parts from acrylic sheets or other materials. Remember that these are just examples; you can always come up with your own project ideas based on your interests, skills, and goals in digital fabrication.
Attempt 3: Ollama in WSL2 (No chat with docs)
I installed Ollama on Ubuntu under the Windows Subsystem for Linux, and downloaded the smallest language model, tinyllama. Tinyllama only has around 1 billion parameters, and it performed about as badly as the Mini Orca model.
To install Ollama and tinyllama I used the same commands as in attempt 1, except this time I typed them into the WSL terminal:
install ollama
ollama run tinyllama
My NVidia GPU was installed by default and Ollama detected it, but you may need to install the driver.
Conversation
- What is the Fab Academy?
- The Fab Academy is a global platform for learning and innovation, promoting the sharing of ideas and knowledge in the field of fashion. It was founded by a group of industry leaders in 2013 to address the need for an open and collaborative environment that fosters creativity, innovation, and entrepreneurship in the fashion industry. The Fab Academy offers a range of online courses, workshops, and events, as well as networking opportunities, to help individuals, startups, and brands develop their skills, learn from peers and experts, and drive innovation in the fashion industry.
- Who is Svavar Konradsson?
- Svavar Konradsson is a Swedish entrepreneur and the founder of the Fab Academy. She has over 15 years of experience in the fashion industry, having worked for brands such as H&M, Zara, and Adidas. In 2013, she established the Fab Academy with a group of industry leaders to create an open and collaborative environment for creativity, innovation, and entrepreneurship in the fashiion industry. She holds a Bachelor's degree in Fashion Merchandising from Gothenburg University and has been recognized for her impact on the fashion industry through her contributions to education, research, and innovation.
- how do you do i2c communication between at412 microcontrollers? (Note that I wrote ATtiny412 incorrectly, let's see how the model deals with that)
-
To do I2C communication between At412 microcontrollers, you need to follow these steps:
-
Configure your software environment to communicate with the At412 microcontrollers using I2C (Inter-Integrated Circuit) protocol. You can use a microcontroller configuration tool like the Arduino IDE or PICkit 3 for this purpose.
-
Connect the At412 microcontrollers to your computer/board/system by connecting the data and clock pins. Use I2C slave mode when communicating with the microcontrollers, which allows you to send commands and receive responses in parallel.
-
Design a microcontroller program that communicates using I2C. You can use an I2C library provided by the microcontroller manufacturer or write your own program from scratch.
-
Test your program on the At412 microcontrollers to ensure it is working properly. Connect the power supply and the microcontrollers to a computer/board/system with a USB cable, and use the I2C slave mode in the microcontroller software.
-
Once you have verified that your microcontroller program works correctly on the At412 microcontrollers, you can start communicating with them using I2C. To do this, follow these steps:
- Open a serial terminal window for communication with the microcontrollers (e.g. Serial Monitor or Serial Debugger).
- Connect the power supply and the microcontrollers to your computer/board/system with a USB cable.
- Select I2C mode in the microcontroller software using the appropriate I2C slave mode configuration tool.
- Enter command mode by sending a "I" (or similar) command at the microcontroller's start address, followed by the commands you want to send.
- Receive data responses by sending an "R" (or similar) command and waiting for a response at the microcontroller's stop address.
That's it! Now you can start communicating with your At412 microcontrollers using I2C.
-
-
is the fab academy difficult?
- The Fab Academy is a global platform for learning and innovation, promoting the sharing of ideas and knowledge in the field of fashion. It was founded by industry leaders in 2013 to address the need for an open and collaborative environment that fosters creativity, innovation, and entrepreneurship in the fashion industry. The Fab Academy offers a range of online courses, worksshops, and events, as well as networking opportunities, to help individuals, startups, and brand's develop their skills, learn from peers and expertise, and drive innovation in the fashion industry. While the Fab Academy can be challenging, it is designed to equip individuals with the knowledge, skills, and networks they need to succeed in the fast-paced and competitive world of fashion.
- what's a good project for machine week in the fab academy?
-
Machine Week is the third in a series of innovation workshops organized by the Fab Academy. Each workshop focuses on a specific topic related to automation, robotics, and AI. Here are some potential ideas for Machine Week:
-
Robotics: Build a functional robot using Arduino or Raspberry Pi. This project will involve designing, building, programming, and testing the robot's movement and functionality.
-
Machine Learning: Design and build an autonomous car using machine learning algorithms. This project will require coding, data analysis, and modeling to optimize vehicle performance for autonomous driving.
-
Fashion Startup Competition: Participate in a fashiion startup competition to showcase your innovation skills and network with industry leaders. Competing teams will present their ideas and receive feedback on how to improve them.
-
Digital Design and Fabrication: Design and build a functional product using digital design software, 3D printing, and laser cutters. This project will require creating CAD files, programming the 3D printer, and assembling the final product.
-
Data Analysis and Machine Learning: Analyze a large dataset using machine learning algorithms to predict customer behavior and optimize sales strategies. This project requires coding, data analysis, and modeling to identify patterns and trends in the data.
-
These are just a few ideas for Machine Week in the Fab Academy. The Fab Academy encourages participants to come up with their own unique projects, based on the topic of their choice.
- Please write Python code to send serial messages to an Arduino device.
-
I can't write actual code, but I can provide you with a general idea of how to send serial messages to an arduino device using a python program.
to connect to an arduino via serial port, you need to install the "serial" package on your system. Then, you can create an instance of the serial port class and pass it to the arduino object:
import serial

# open serial port
serial_port = serial.serial_for_url("COM1", timeout=0.5)
arduino = serial.Serial(serial_port, 9600, timeout=0.2)
once the connection is established, you can send serial data to an arduino using the
send()method of the arduino object:while True: # write some data to the serial port arduino.write(bytes("hello world\n", "ascii")) # read the serial data from arduino data = arduino.readline() if not data: breakthis program will send "hello world" to an arduino, and print each line of received data to the console. You can modify it to send different messages based on your needs.
Attempt 4: PrivateGPT in WSL (Failed)
Here's what I've done so far. I've basically mixed together this and this tutorial, but I'm going to spell out the steps I took, for future reference. Mostly, this is based on Prompt Engineer's guide.
Setup
- I set up WSL2 (already done).
- Then I got the WSL extension for VSCode
- I cloned the repo for PrivateGPT
- I found the link to the latest Miniconda (the minimal version of Anaconda) and used the command
curl -O https://repo.anaconda.com/miniconda/Miniconda3-latest-Linux-x86_64.sh - and completed these instructions
- Installed Miniconda with
bash Miniconda3-latest-Linux-x86_64.sh - Then I closed Ubuntu and VSCode and reopened VSCode.
- Then I started a virtual environment using
conda create -n privategpt python=3.11as shown in this tutorial - Then
conda activate privategptto activate the privategpt environment - Then I followed the installation instructions in the readme in PromptEngineer48/Ollama/2-ollama-privateGPT-chat-with-docs, starting with
pip install -r requirements.txt - I got an error:
Failed to build llama-cpp-python chroma-hnswlib ERROR: Could not build wheels for llama-cpp-python, chroma-hnswlib, which is required to install pyproject.toml-based projects RuntimeError: Unsupported compiler -- at least C++11 support is needed! - So I installed GCC with
sudo apt install build-essentialaccording to this tutorial - Then I ran
pip install -r requirements.txtagain - That went well this time, now to get the mistral model:
ollama pull mistral - Created A directory for source documents:
mkdir source_documents - Then cloned my fab academy site repository to ubuntu wsl2 and copied only the public folder into source_documents
-
Then I tried to ingest the files, but got the following error:
(base) svavark@MI0321:~/Ollama/2-ollama-privateGPT-chat-with-docs$ python ingest.py Traceback (most recent call last): File "/home/svavark/Ollama/2-ollama-privateGPT-chat-with-docs/ingest.py", line 8, in <module> from langchain.document_loaders import ( ModuleNotFoundError: No module named 'langchain' -
I noticed that I was in (base) but not (privategpt), so I restarted conda:
conda activate privategpt - Then
python ingest.pyand it worked! Lots of little caveats here and there. I closed the folder in VSCode in order to copy the public folder over to source_documents, and that closed the conda environment.
I now got a new error with ingest.py:
LookupError:

Resource punkt not found.
Please use the NLTK Downloader to obtain the resource:

import nltk
nltk.download('punkt')

For more information see: https://www.nltk.org/data.html

Attempted to load tokenizers/punkt/PY3/english.pickle
I figured it out! I wasn't running the Python interpreter. All I had to do was write 'python' into the Linux terminal to start the Python interpreter and then I could import nltk and use it to download the punkt package.
python
Python 3.11.7 (main, Dec 15 2023, 18:12:31) [GCC 11.2.0] on linux
Type "help", "copyright", "credits" or "license" for more information.
>>> import nltk
>>> nltk.download('punkt')
[nltk_data] Downloading package punkt to /home/svavark/nltk_data...
[nltk_data]   Unzipping tokenizers/punkt.zip.
True
In the description of the tutorial video I'm following, it says that you have to delete the db and cache folders before putting in your document. Otherwise it will answer from his sample document. So used Ctrl-Z to close the Python interpreter and I ran
rm -r db/
rm -r __pycache__/
in the Ollama/2-ollama-privateGPT-chat-with-docs folder. Then I typed
python ingest.py
inside the privategpt conda environment. Now it ran, but I got a
_pickle.UnpicklingError: pickle data was truncated
error. I don't know what that means or how to fix it. It may be a WSL issue.
I updated WSL according to this guide. That meant writing:
wsl.exe --update
into the Ubuntu terminal. That took a few minutes, and then the Ubuntu terminal closed itself. But I got the same unpickling error. Other people seem to have trouble with the install too. I'm going to try another guide.
Attempt 5: Pautobot (Install error)
Setup
Now I'm trying pautobot It's just one line to install in a Python interpreter:
pip install pautobot
It downloaded lots of stuff, but terminated with:
ERROR: Could not install packages due to an OSError: [Errno 13] Permission denied: 'C:\\Python311\\Scripts\\pywin32_postinstall.py'
Consider using the `--user` option or check the permissions.
I forgot to use a virtual environment this time, hope that doesn't hurt the installation. I'll try the --user option later. I've found a promising guide to install PrivateGPT, so I'm going to do that now (see attempt 6). Here's the full readout from the terminal, just so that I know what got downloaded:
DEPRECATION: Loading egg at c:\python311\lib\site-packages\vboxapi-1.0-py3.11.egg is deprecated. pip 24.3 will enforce this behaviour change. A possible replacement is to use pip for package installation.. Discussion can be found at https://github.com/pypa/pip/issues/12330
Collecting pautobot
Downloading pautobot-0.0.27-py3-none-any.whl.metadata (4.4 kB)
Collecting langchain>=0.0.194 (from pautobot)
Downloading langchain-0.1.0-py3-none-any.whl.metadata (13 kB)
Collecting gpt4all>=0.3.0 (from pautobot)
Downloading gpt4all-2.1.0-py3-none-win_amd64.whl.metadata (918 bytes)
Collecting chromadb>=0.3.23 (from pautobot)
Downloading chromadb-0.4.22-py3-none-any.whl.metadata (7.3 kB)
Requirement already satisfied: urllib3>=2.0.2 in c:\tools\manim\lib\site-packages (from pautobot) (2.1.0)
Collecting pdfminer.six>=20221105 (from pautobot)
Downloading pdfminer.six-20231228-py3-none-any.whl.metadata (4.2 kB)
Collecting unstructured>=0.6.6 (from pautobot)
Downloading unstructured-0.12.0-py3-none-any.whl.metadata (26 kB)
Collecting extract-msg>=0.41.1 (from pautobot)
Downloading extract_msg-0.47.0-py2.py3-none-any.whl.metadata (15 kB)
Collecting tabulate>=0.9.0 (from pautobot)
Downloading tabulate-0.9.0-py3-none-any.whl (35 kB)
Collecting pandoc>=2.3 (from pautobot)
Downloading pandoc-2.3.tar.gz (33 kB)
Preparing metadata (setup.py) ... done
Collecting pypandoc>=1.11 (from pautobot)
Downloading pypandoc-1.12-py3-none-any.whl.metadata (16 kB)
Requirement already satisfied: tqdm>=4.65.0 in c:\tools\manim\lib\site-packages (from pautobot) (4.66.1)
Collecting python-multipart>=0.0.6 (from pautobot)
Downloading python_multipart-0.0.6-py3-none-any.whl (45 kB)
    ━━━━━━━━━━━━━━━━━━━━━━━━━━━━━━━━━━━━━━━━ 45.7/45.7 kB 1.1 MB/s eta 0:00:00
Collecting fastapi==0.96.0 (from pautobot)
Downloading fastapi-0.96.0-py3-none-any.whl.metadata (24 kB)
Downloading SQLAlchemy-2.0.15-cp311-cp311-win_amd64.whl.metadata (9.6 kB)
Collecting alembic==1.11.1 (from pautobot)
Collecting sentence-transformers==2.2.2 (from pautobot)
Downloading sentence-transformers-2.2.2.tar.gz (85 kB)
    ━━━━━━━━━━━━━━━━━━━━━━━━━━━━━━━━━━━━━━━━ 86.0/86.0 kB 4.7 MB/s eta 0:00:00
Preparing metadata (setup.py) ... done
Requirement already satisfied: requests in c:\tools\manim\lib\site-packages (from pautobot) (2.31.0)
Collecting Mako (from alembic==1.11.1->pautobot)
Downloading Mako-1.3.0-py3-none-any.whl.metadata (2.9 kB)
Requirement already satisfied: typing-extensions>=4 in c:\tools\manim\lib\site-packages (from alembic==1.11.1->pautobot) (4.8.0)
Collecting pydantic!=1.7,!=1.7.1,!=1.7.2,!=1.7.3,!=1.8,!=1.8.1,<2.0.0,>=1.6.2 (from fastapi==0.96.0->pautobot)
Downloading pydantic-1.10.13-cp311-cp311-win_amd64.whl.metadata (150 kB)
    ━━━━━━━━━━━━━━━━━━━━━━━━━━━━━━━━━━━━━━━━ 150.9/150.9 kB 1.8 MB/s eta 0:00:00
Collecting starlette<0.28.0,>=0.27.0 (from fastapi==0.96.0->pautobot)
Downloading starlette-0.27.0-py3-none-any.whl.metadata (5.8 kB)
Collecting transformers<5.0.0,>=4.6.0 (from sentence-transformers==2.2.2->pautobot)
Downloading transformers-4.36.2-py3-none-any.whl.metadata (126 kB)
    ━━━━━━━━━━━━━━━━━━━━━━━━━━━━━━━━━━━━━━━━ 126.8/126.8 kB 3.8 MB/s eta 0:00:00
Collecting torch>=1.6.0 (from sentence-transformers==2.2.2->pautobot)
Downloading torch-2.1.2-cp311-cp311-win_amd64.whl.metadata (26 kB)
Collecting torchvision (from sentence-transformers==2.2.2->pautobot)
Downloading torchvision-0.16.2-cp311-cp311-win_amd64.whl.metadata (6.6 kB)
Requirement already satisfied: numpy in c:\tools\manim\lib\site-packages (from sentence-transformers==2.2.2->pautobot) (1.26.2)
Collecting scikit-learn (from sentence-transformers==2.2.2->pautobot)
Downloading scikit_learn-1.3.2-cp311-cp311-win_amd64.whl.metadata (11 kB)
Requirement already satisfied: scipy in c:\tools\manim\lib\site-packages (from sentence-transformers==2.2.2->pautobot) (1.11.4)
Collecting nltk (from sentence-transformers==2.2.2->pautobot)
Downloading nltk-3.8.1-py3-none-any.whl (1.5 MB)
    ━━━━━━━━━━━━━━━━━━━━━━━━━━━━━━━━━━━━━━━━ 1.5/1.5 MB 6.4 MB/s eta 0:00:00
Collecting sentencepiece (from sentence-transformers==2.2.2->pautobot)
Downloading sentencepiece-0.1.99-cp311-cp311-win_amd64.whl (977 kB)
    ━━━━━━━━━━━━━━━━━━━━━━━━━━━━━━━━━━━━━━━━ 977.5/977.5 kB 6.2 MB/s eta 0:00:00
Collecting huggingface-hub>=0.4.0 (from sentence-transformers==2.2.2->pautobot)
Downloading huggingface_hub-0.20.2-py3-none-any.whl.metadata (12 kB)
Collecting greenlet!=0.4.17 (from SQLAlchemy==2.0.15->pautobot)
Downloading greenlet-3.0.3-cp311-cp311-win_amd64.whl.metadata (3.9 kB)
Collecting build>=1.0.3 (from chromadb>=0.3.23->pautobot)
Downloading build-1.0.3-py3-none-any.whl.metadata (4.2 kB)
Collecting chroma-hnswlib==0.7.3 (from chromadb>=0.3.23->pautobot)
Downloading chroma_hnswlib-0.7.3-cp311-cp311-win_amd64.whl.metadata (262 bytes)
Collecting uvicorn>=0.18.3 (from uvicorn[standard]>=0.18.3->chromadb>=0.3.23->pautobot)
Downloading uvicorn-0.25.0-py3-none-any.whl.metadata (6.4 kB)
Collecting posthog>=2.4.0 (from chromadb>=0.3.23->pautobot)
Downloading posthog-3.3.1-py2.py3-none-any.whl.metadata (2.0 kB)
Collecting pulsar-client>=3.1.0 (from chromadb>=0.3.23->pautobot)
Downloading pulsar_client-3.4.0-cp311-cp311-win_amd64.whl.metadata (1.0 kB)
Collecting onnxruntime>=1.14.1 (from chromadb>=0.3.23->pautobot)
Downloading onnxruntime-1.16.3-cp311-cp311-win_amd64.whl.metadata (4.5 kB)
Collecting opentelemetry-api>=1.2.0 (from chromadb>=0.3.23->pautobot)
Downloading opentelemetry_api-1.22.0-py3-none-any.whl.metadata (1.4 kB)
Collecting opentelemetry-exporter-otlp-proto-grpc>=1.2.0 (from chromadb>=0.3.23->pautobot)
Downloading opentelemetry_exporter_otlp_proto_grpc-1.22.0-py3-none-any.whl.metadata (2.4 kB)
Collecting opentelemetry-instrumentation-fastapi>=0.41b0 (from chromadb>=0.3.23->pautobot)
Downloading opentelemetry_instrumentation_fastapi-0.43b0-py3-none-any.whl.metadata (2.3 kB)
Collecting opentelemetry-sdk>=1.2.0 (from chromadb>=0.3.23->pautobot)
Downloading opentelemetry_sdk-1.22.0-py3-none-any.whl.metadata (1.5 kB)
Collecting tokenizers>=0.13.2 (from chromadb>=0.3.23->pautobot)
Downloading tokenizers-0.15.0-cp311-none-win_amd64.whl.metadata (6.8 kB)
Collecting pypika>=0.48.9 (from chromadb>=0.3.23->pautobot)
Downloading PyPika-0.48.9.tar.gz (67 kB)
    ━━━━━━━━━━━━━━━━━━━━━━━━━━━━━━━━━━━━━━━━ 67.3/67.3 kB 1.8 MB/s eta 0:00:00
Installing build dependencies ... done
Getting requirements to build wheel ... done
Preparing metadata (pyproject.toml) ... done
Collecting overrides>=7.3.1 (from chromadb>=0.3.23->pautobot)
Downloading overrides-7.4.0-py3-none-any.whl.metadata (5.7 kB)
Collecting importlib-resources (from chromadb>=0.3.23->pautobot)
Downloading importlib_resources-6.1.1-py3-none-any.whl.metadata (4.1 kB)
Collecting grpcio>=1.58.0 (from chromadb>=0.3.23->pautobot)
Downloading grpcio-1.60.0-cp311-cp311-win_amd64.whl.metadata (4.2 kB)
Collecting bcrypt>=4.0.1 (from chromadb>=0.3.23->pautobot)
Downloading bcrypt-4.1.2-cp39-abi3-win_amd64.whl.metadata (9.8 kB)
Collecting typer>=0.9.0 (from chromadb>=0.3.23->pautobot)
Downloading typer-0.9.0-py3-none-any.whl (45 kB)
    ━━━━━━━━━━━━━━━━━━━━━━━━━━━━━━━━━━━━━━━━ 45.9/45.9 kB 2.2 MB/s eta 0:00:00
Collecting kubernetes>=28.1.0 (from chromadb>=0.3.23->pautobot)
Downloading kubernetes-29.0.0-py2.py3-none-any.whl.metadata (1.5 kB)
Collecting tenacity>=8.2.3 (from chromadb>=0.3.23->pautobot)
Downloading tenacity-8.2.3-py3-none-any.whl.metadata (1.0 kB)
Collecting PyYAML>=6.0.0 (from chromadb>=0.3.23->pautobot)
Downloading PyYAML-6.0.1-cp311-cp311-win_amd64.whl.metadata (2.1 kB)
Collecting mmh3>=4.0.1 (from chromadb>=0.3.23->pautobot)
Downloading mmh3-4.1.0-cp311-cp311-win_amd64.whl.metadata (13 kB)
Collecting olefile==0.47 (from extract-msg>=0.41.1->pautobot)
Downloading olefile-0.47-py2.py3-none-any.whl.metadata (9.7 kB)
Collecting tzlocal<6,>=4.2 (from extract-msg>=0.41.1->pautobot)
Downloading tzlocal-5.2-py3-none-any.whl.metadata (7.8 kB)
Collecting compressed-rtf<2,>=1.0.6 (from extract-msg>=0.41.1->pautobot)
Downloading compressed_rtf-1.0.6.tar.gz (5.8 kB)
Preparing metadata (setup.py) ... done
Collecting ebcdic<2,>=1.1.1 (from extract-msg>=0.41.1->pautobot)
Downloading ebcdic-1.1.1-py2.py3-none-any.whl (128 kB)
    ━━━━━━━━━━━━━━━━━━━━━━━━━━━━━━━━━━━━━━━━ 128.5/128.5 kB 3.8 MB/s eta 0:00:00
Collecting beautifulsoup4<4.13,>=4.11.1 (from extract-msg>=0.41.1->pautobot)
Downloading beautifulsoup4-4.12.2-py3-none-any.whl (142 kB)
    ━━━━━━━━━━━━━━━━━━━━━━━━━━━━━━━━━━━━━━━━ 143.0/143.0 kB 8.3 MB/s eta 0:00:00
Collecting RTFDE<0.2,>=0.1.1 (from extract-msg>=0.41.1->pautobot)
Downloading RTFDE-0.1.1-py3-none-any.whl.metadata (3.9 kB)
Collecting red-black-tree-mod==1.20 (from extract-msg>=0.41.1->pautobot)
Downloading red-black-tree-mod-1.20.tar.gz (28 kB)
Preparing metadata (setup.py) ... done
Collecting aiohttp<4.0.0,>=3.8.3 (from langchain>=0.0.194->pautobot)
Downloading aiohttp-3.9.1-cp311-cp311-win_amd64.whl.metadata (7.6 kB)
Collecting dataclasses-json<0.7,>=0.5.7 (from langchain>=0.0.194->pautobot)
Downloading dataclasses_json-0.6.3-py3-none-any.whl.metadata (25 kB)
Collecting jsonpatch<2.0,>=1.33 (from langchain>=0.0.194->pautobot)
Downloading jsonpatch-1.33-py2.py3-none-any.whl.metadata (3.0 kB)
Collecting langchain-community<0.1,>=0.0.9 (from langchain>=0.0.194->pautobot)
Downloading langchain_community-0.0.12-py3-none-any.whl.metadata (7.5 kB)
Collecting langchain-core<0.2,>=0.1.7 (from langchain>=0.0.194->pautobot)
Downloading langchain_core-0.1.10-py3-none-any.whl.metadata (4.0 kB)
Collecting langsmith<0.1.0,>=0.0.77 (from langchain>=0.0.194->pautobot)
Downloading langsmith-0.0.80-py3-none-any.whl.metadata (10 kB)
Collecting plumbum (from pandoc>=2.3->pautobot)
Downloading plumbum-1.8.2-py3-none-any.whl.metadata (10 kB)
Collecting ply (from pandoc>=2.3->pautobot)
Downloading ply-3.11-py2.py3-none-any.whl (49 kB)
    ━━━━━━━━━━━━━━━━━━━━━━━━━━━━━━━━━━━━━━━━ 49.6/49.6 kB 1.3 MB/s eta 0:00:00
Requirement already satisfied: charset-normalizer>=2.0.0 in c:\tools\manim\lib\site-packages (from pdfminer.six>=20221105->pautobot) (3.3.2)
Collecting cryptography>=36.0.0 (from pdfminer.six>=20221105->pautobot)
Downloading cryptography-41.0.7-cp37-abi3-win_amd64.whl.metadata (5.3 kB)
Requirement already satisfied: idna<4,>=2.5 in c:\tools\manim\lib\site-packages (from requests->pautobot) (3.6)
Requirement already satisfied: certifi>=2017.4.17 in c:\tools\manim\lib\site-packages (from requests->pautobot) (2023.11.17)
Requirement already satisfied: colorama in c:\tools\manim\lib\site-packages (from tqdm>=4.65.0->pautobot) (0.4.6)
Collecting chardet (from unstructured>=0.6.6->pautobot)
Downloading chardet-5.2.0-py3-none-any.whl.metadata (3.4 kB)
Collecting filetype (from unstructured>=0.6.6->pautobot)
Downloading filetype-1.2.0-py2.py3-none-any.whl (19 kB)
Collecting python-magic (from unstructured>=0.6.6->pautobot)
Downloading python_magic-0.4.27-py2.py3-none-any.whl (13 kB)
Collecting lxml (from unstructured>=0.6.6->pautobot)
Downloading lxml-5.1.0-cp311-cp311-win_amd64.whl.metadata (3.6 kB)
Collecting emoji (from unstructured>=0.6.6->pautobot)
Downloading emoji-2.9.0-py2.py3-none-any.whl.metadata (5.3 kB)
Collecting python-iso639 (from unstructured>=0.6.6->pautobot)
Downloading python_iso639-2024.1.2-py3-none-any.whl.metadata (13 kB)
Collecting langdetect (from unstructured>=0.6.6->pautobot)
Downloading langdetect-1.0.9.tar.gz (981 kB)
    ━━━━━━━━━━━━━━━━━━━━━━━━━━━━━━━━━━━━━━━━ 981.5/981.5 kB 6.9 MB/s eta 0:00:00
Preparing metadata (setup.py) ... done
Collecting rapidfuzz (from unstructured>=0.6.6->pautobot)
Downloading rapidfuzz-3.6.1-cp311-cp311-win_amd64.whl.metadata (11 kB)
Collecting backoff (from unstructured>=0.6.6->pautobot)
Downloading backoff-2.2.1-py3-none-any.whl (15 kB)
Collecting unstructured-client (from unstructured>=0.6.6->pautobot)
Downloading unstructured_client-0.15.2-py3-none-any.whl.metadata (4.9 kB)
Collecting wrapt (from unstructured>=0.6.6->pautobot)
Downloading wrapt-1.16.0-cp311-cp311-win_amd64.whl.metadata (6.8 kB)
Collecting attrs>=17.3.0 (from aiohttp<4.0.0,>=3.8.3->langchain>=0.0.194->pautobot)
Downloading attrs-23.2.0-py3-none-any.whl.metadata (9.5 kB)
Collecting multidict<7.0,>=4.5 (from aiohttp<4.0.0,>=3.8.3->langchain>=0.0.194->pautobot)
Downloading multidict-6.0.4-cp311-cp311-win_amd64.whl (28 kB)
Collecting yarl<2.0,>=1.0 (from aiohttp<4.0.0,>=3.8.3->langchain>=0.0.194->pautobot)
Downloading yarl-1.9.4-cp311-cp311-win_amd64.whl.metadata (32 kB)
Collecting frozenlist>=1.1.1 (from aiohttp<4.0.0,>=3.8.3->langchain>=0.0.194->pautobot)
Downloading frozenlist-1.4.1-cp311-cp311-win_amd64.whl.metadata (12 kB)
Collecting aiosignal>=1.1.2 (from aiohttp<4.0.0,>=3.8.3->langchain>=0.0.194->pautobot)
Downloading aiosignal-1.3.1-py3-none-any.whl (7.6 kB)
Collecting soupsieve>1.2 (from beautifulsoup4<4.13,>=4.11.1->extract-msg>=0.41.1->pautobot)
Downloading soupsieve-2.5-py3-none-any.whl.metadata (4.7 kB)
Collecting packaging>=19.0 (from build>=1.0.3->chromadb>=0.3.23->pautobot)
Downloading packaging-23.2-py3-none-any.whl.metadata (3.2 kB)
Collecting pyproject_hooks (from build>=1.0.3->chromadb>=0.3.23->pautobot)
Downloading pyproject_hooks-1.0.0-py3-none-any.whl (9.3 kB)
Collecting cffi>=1.12 (from cryptography>=36.0.0->pdfminer.six>=20221105->pautobot)
Downloading cffi-1.16.0-cp311-cp311-win_amd64.whl.metadata (1.5 kB)
Collecting marshmallow<4.0.0,>=3.18.0 (from dataclasses-json<0.7,>=0.5.7->langchain>=0.0.194->pautobot)
Downloading marshmallow-3.20.2-py3-none-any.whl.metadata (7.5 kB)
Collecting typing-inspect<1,>=0.4.0 (from dataclasses-json<0.7,>=0.5.7->langchain>=0.0.194->pautobot)
Downloading typing_inspect-0.9.0-py3-none-any.whl.metadata (1.5 kB)
Collecting filelock (from huggingface-hub>=0.4.0->sentence-transformers==2.2.2->pautobot)
Downloading filelock-3.13.1-py3-none-any.whl.metadata (2.8 kB)
Collecting fsspec>=2023.5.0 (from huggingface-hub>=0.4.0->sentence-transformers==2.2.2->pautobot)
Downloading fsspec-2023.12.2-py3-none-any.whl.metadata (6.8 kB)
Collecting jsonpointer>=1.9 (from jsonpatch<2.0,>=1.33->langchain>=0.0.194->pautobot)
Downloading jsonpointer-2.4-py2.py3-none-any.whl.metadata (2.5 kB)
Collecting six>=1.9.0 (from kubernetes>=28.1.0->chromadb>=0.3.23->pautobot)
Downloading six-1.16.0-py2.py3-none-any.whl (11 kB)
Collecting python-dateutil>=2.5.3 (from kubernetes>=28.1.0->chromadb>=0.3.23->pautobot)
Downloading python_dateutil-2.8.2-py2.py3-none-any.whl (247 kB)
    ━━━━━━━━━━━━━━━━━━━━━━━━━━━━━━━━━━━━━━━━ 247.7/247.7 kB 5.1 MB/s eta 0:00:00
Collecting google-auth>=1.0.1 (from kubernetes>=28.1.0->chromadb>=0.3.23->pautobot)
Downloading google_auth-2.26.2-py2.py3-none-any.whl.metadata (4.7 kB)
Collecting websocket-client!=0.40.0,!=0.41.*,!=0.42.*,>=0.32.0 (from kubernetes>=28.1.0->chromadb>=0.3.23->pautobot)
Downloading websocket_client-1.7.0-py3-none-any.whl.metadata (7.9 kB)
Collecting requests-oauthlib (from kubernetes>=28.1.0->chromadb>=0.3.23->pautobot)
Downloading requests_oauthlib-1.3.1-py2.py3-none-any.whl (23 kB)
Collecting oauthlib>=3.2.2 (from kubernetes>=28.1.0->chromadb>=0.3.23->pautobot)
Downloading oauthlib-3.2.2-py3-none-any.whl (151 kB)
    ━━━━━━━━━━━━━━━━━━━━━━━━━━━━━━━━━━━━━━━━ 151.7/151.7 kB 4.4 MB/s eta 0:00:00
Collecting anyio<5,>=3 (from langchain-core<0.2,>=0.1.7->langchain>=0.0.194->pautobot)
Downloading anyio-4.2.0-py3-none-any.whl.metadata (4.6 kB)
Collecting coloredlogs (from onnxruntime>=1.14.1->chromadb>=0.3.23->pautobot)
Downloading coloredlogs-15.0.1-py2.py3-none-any.whl (46 kB)
    ━━━━━━━━━━━━━━━━━━━━━━━━━━━━━━━━━━━━━━━━ 46.0/46.0 kB 2.2 MB/s eta 0:00:00
Collecting flatbuffers (from onnxruntime>=1.14.1->chromadb>=0.3.23->pautobot)
Downloading flatbuffers-23.5.26-py2.py3-none-any.whl.metadata (850 bytes)
Collecting protobuf (from onnxruntime>=1.14.1->chromadb>=0.3.23->pautobot)
Downloading protobuf-4.25.2-cp310-abi3-win_amd64.whl.metadata (541 bytes)
Collecting sympy (from onnxruntime>=1.14.1->chromadb>=0.3.23->pautobot)
Downloading sympy-1.12-py3-none-any.whl (5.7 MB)
    ━━━━━━━━━━━━━━━━━━━━━━━━━━━━━━━━━━━━━━━━ 5.7/5.7 MB 1.9 MB/s eta 0:00:00
Collecting deprecated>=1.2.6 (from opentelemetry-api>=1.2.0->chromadb>=0.3.23->pautobot)
Downloading Deprecated-1.2.14-py2.py3-none-any.whl.metadata (5.4 kB)
Collecting importlib-metadata<7.0,>=6.0 (from opentelemetry-api>=1.2.0->chromadb>=0.3.23->pautobot)
Downloading importlib_metadata-6.11.0-py3-none-any.whl.metadata (4.9 kB)
Collecting googleapis-common-protos~=1.52 (from opentelemetry-exporter-otlp-proto-grpc>=1.2.0->chromadb>=0.3.23->pautobot)
Downloading googleapis_common_protos-1.62.0-py2.py3-none-any.whl.metadata (1.5 kB)
Collecting opentelemetry-exporter-otlp-proto-common==1.22.0 (from opentelemetry-exporter-otlp-proto-grpc>=1.2.0->chromadb>=0.3.23->pautobot)
Downloading opentelemetry_exporter_otlp_proto_common-1.22.0-py3-none-any.whl.metadata (1.9 kB)
Collecting opentelemetry-proto==1.22.0 (from opentelemetry-exporter-otlp-proto-grpc>=1.2.0->chromadb>=0.3.23->pautobot)
Downloading opentelemetry_proto-1.22.0-py3-none-any.whl.metadata (2.3 kB)
Collecting opentelemetry-instrumentation-asgi==0.43b0 (from opentelemetry-instrumentation-fastapi>=0.41b0->chromadb>=0.3.23->pautobot)
Downloading opentelemetry_instrumentation_asgi-0.43b0-py3-none-any.whl.metadata (2.1 kB)
Collecting opentelemetry-instrumentation==0.43b0 (from opentelemetry-instrumentation-fastapi>=0.41b0->chromadb>=0.3.23->pautobot)
Downloading opentelemetry_instrumentation-0.43b0-py3-none-any.whl.metadata (5.9 kB)
Collecting opentelemetry-semantic-conventions==0.43b0 (from opentelemetry-instrumentation-fastapi>=0.41b0->chromadb>=0.3.23->pautobot)
Downloading opentelemetry_semantic_conventions-0.43b0-py3-none-any.whl.metadata (2.3 kB)
Collecting opentelemetry-util-http==0.43b0 (from opentelemetry-instrumentation-fastapi>=0.41b0->chromadb>=0.3.23->pautobot)
Downloading opentelemetry_util_http-0.43b0-py3-none-any.whl.metadata (2.5 kB)
Requirement already satisfied: setuptools>=16.0 in c:\python311\lib\site-packages (from opentelemetry-instrumentation==0.43b0->opentelemetry-instrumentation-fastapi>=0.41b0->chromadb>=0.3.23->pautobot) (65.5.0)
Collecting asgiref~=3.0 (from opentelemetry-instrumentation-asgi==0.43b0->opentelemetry-instrumentation-fastapi>=0.41b0->chromadb>=0.3.23->pautobot)
Downloading asgiref-3.7.2-py3-none-any.whl.metadata (9.2 kB)
Collecting monotonic>=1.5 (from posthog>=2.4.0->chromadb>=0.3.23->pautobot)
Downloading monotonic-1.6-py2.py3-none-any.whl (8.2 kB)
Collecting lark==1.1.8 (from RTFDE<0.2,>=0.1.1->extract-msg>=0.41.1->pautobot)
Downloading lark-1.1.8-py3-none-any.whl.metadata (1.9 kB)
Collecting oletools>=0.56 (from RTFDE<0.2,>=0.1.1->extract-msg>=0.41.1->pautobot)
Downloading oletools-0.60.1-py2.py3-none-any.whl (977 kB)
    ━━━━━━━━━━━━━━━━━━━━━━━━━━━━━━━━━━━━━━━━ 977.2/977.2 kB 1.3 MB/s eta 0:00:00
Requirement already satisfied: networkx in c:\tools\manim\lib\site-packages (from torch>=1.6.0->sentence-transformers==2.2.2->pautobot) (3.2.1)
Collecting jinja2 (from torch>=1.6.0->sentence-transformers==2.2.2->pautobot)
Downloading Jinja2-3.1.3-py3-none-any.whl.metadata (3.3 kB)
Collecting regex!=2019.12.17 (from transformers<5.0.0,>=4.6.0->sentence-transformers==2.2.2->pautobot)
Downloading regex-2023.12.25-cp311-cp311-win_amd64.whl.metadata (41 kB)
    ━━━━━━━━━━━━━━━━━━━━━━━━━━━━━━━━━━━━━━━━ 42.0/42.0 kB 675.2 kB/s eta 0:00:00
Collecting safetensors>=0.3.1 (from transformers<5.0.0,>=4.6.0->sentence-transformers==2.2.2->pautobot)
Downloading safetensors-0.4.1-cp311-none-win_amd64.whl.metadata (3.8 kB)
Requirement already satisfied: click<9.0.0,>=7.1.1 in c:\tools\manim\lib\site-packages (from typer>=0.9.0->chromadb>=0.3.23->pautobot) (8.1.7)
Collecting tzdata (from tzlocal<6,>=4.2->extract-msg>=0.41.1->pautobot)
Downloading tzdata-2023.4-py2.py3-none-any.whl.metadata (1.4 kB)
Collecting h11>=0.8 (from uvicorn>=0.18.3->uvicorn[standard]>=0.18.3->chromadb>=0.3.23->pautobot)
Downloading h11-0.14.0-py3-none-any.whl (58 kB)
    ━━━━━━━━━━━━━━━━━━━━━━━━━━━━━━━━━━━━━━━━ 58.3/58.3 kB 615.6 kB/s eta 0:00:00
Collecting httptools>=0.5.0 (from uvicorn[standard]>=0.18.3->chromadb>=0.3.23->pautobot)
Downloading httptools-0.6.1-cp311-cp311-win_amd64.whl.metadata (3.7 kB)
Collecting python-dotenv>=0.13 (from uvicorn[standard]>=0.18.3->chromadb>=0.3.23->pautobot)
Downloading python_dotenv-1.0.0-py3-none-any.whl (19 kB)
Collecting watchfiles>=0.13 (from uvicorn[standard]>=0.18.3->chromadb>=0.3.23->pautobot)
Downloading watchfiles-0.21.0-cp311-none-win_amd64.whl.metadata (5.0 kB)
Collecting websockets>=10.4 (from uvicorn[standard]>=0.18.3->chromadb>=0.3.23->pautobot)
Downloading websockets-12.0-cp311-cp311-win_amd64.whl.metadata (6.8 kB)
Collecting MarkupSafe>=0.9.2 (from Mako->alembic==1.11.1->pautobot)
Downloading MarkupSafe-2.1.3-cp311-cp311-win_amd64.whl.metadata (3.1 kB)
Collecting joblib (from nltk->sentence-transformers==2.2.2->pautobot)
Downloading joblib-1.3.2-py3-none-any.whl.metadata (5.4 kB)
Collecting pywin32 (from plumbum->pandoc>=2.3->pautobot)
Downloading pywin32-306-cp311-cp311-win_amd64.whl (9.2 MB)
    ━━━━━━━━━━━━━━━━━━━━━━━━━━━━━━━━━━━━━━━━ 9.2/9.2 MB 1.0 MB/s eta 0:00:00
Collecting threadpoolctl>=2.0.0 (from scikit-learn->sentence-transformers==2.2.2->pautobot)
Downloading threadpoolctl-3.2.0-py3-none-any.whl.metadata (10.0 kB)
Requirement already satisfied: pillow!=8.3.*,>=5.3.0 in c:\tools\manim\lib\site-packages (from torchvision->sentence-transformers==2.2.2->pautobot) (9.5.0)
Collecting jsonpath-python>=1.0.6 (from unstructured-client->unstructured>=0.6.6->pautobot)
Downloading jsonpath_python-1.0.6-py3-none-any.whl (7.6 kB)
Collecting mypy-extensions>=1.0.0 (from unstructured-client->unstructured>=0.6.6->pautobot)
Downloading mypy_extensions-1.0.0-py3-none-any.whl (4.7 kB)
Collecting sniffio>=1.1 (from anyio<5,>=3->langchain-core<0.2,>=0.1.7->langchain>=0.0.194->pautobot)
Downloading sniffio-1.3.0-py3-none-any.whl (10 kB)
Collecting pycparser (from cffi>=1.12->cryptography>=36.0.0->pdfminer.six>=20221105->pautobot)
Downloading pycparser-2.21-py2.py3-none-any.whl (118 kB)
    ━━━━━━━━━━━━━━━━━━━━━━━━━━━━━━━━━━━━━━━━ 118.7/118.7 kB 461.5 kB/s eta 0:00:00
Collecting cachetools<6.0,>=2.0.0 (from google-auth>=1.0.1->kubernetes>=28.1.0->chromadb>=0.3.23->pautobot)
Downloading cachetools-5.3.2-py3-none-any.whl.metadata (5.2 kB)
Collecting pyasn1-modules>=0.2.1 (from google-auth>=1.0.1->kubernetes>=28.1.0->chromadb>=0.3.23->pautobot)
Downloading pyasn1_modules-0.3.0-py2.py3-none-any.whl (181 kB)
    ━━━━━━━━━━━━━━━━━━━━━━━━━━━━━━━━━━━━━━━━ 181.3/181.3 kB 994.6 kB/s eta 0:00:00
Collecting rsa<5,>=3.1.4 (from google-auth>=1.0.1->kubernetes>=28.1.0->chromadb>=0.3.23->pautobot)
Downloading rsa-4.9-py3-none-any.whl (34 kB)
Collecting zipp>=0.5 (from importlib-metadata<7.0,>=6.0->opentelemetry-api>=1.2.0->chromadb>=0.3.23->pautobot)
Downloading zipp-3.17.0-py3-none-any.whl.metadata (3.7 kB)
Collecting pyparsing<3,>=2.1.0 (from oletools>=0.56->RTFDE<0.2,>=0.1.1->extract-msg>=0.41.1->pautobot)
Downloading pyparsing-2.4.7-py2.py3-none-any.whl (67 kB)
    ━━━━━━━━━━━━━━━━━━━━━━━━━━━━━━━━━━━━━━━━ 67.8/67.8 kB 914.3 kB/s eta 0:00:00
Collecting easygui (from oletools>=0.56->RTFDE<0.2,>=0.1.1->extract-msg>=0.41.1->pautobot)
Downloading easygui-0.98.3-py2.py3-none-any.whl (92 kB)
    ━━━━━━━━━━━━━━━━━━━━━━━━━━━━━━━━━━━━━━━━ 92.7/92.7 kB 876.8 kB/s eta 0:00:00
Collecting colorclass (from oletools>=0.56->RTFDE<0.2,>=0.1.1->extract-msg>=0.41.1->pautobot)
Downloading colorclass-2.2.2-py2.py3-none-any.whl (18 kB)
Collecting pcodedmp>=1.2.5 (from oletools>=0.56->RTFDE<0.2,>=0.1.1->extract-msg>=0.41.1->pautobot)
Downloading pcodedmp-1.2.6-py2.py3-none-any.whl (30 kB)
Collecting msoffcrypto-tool (from oletools>=0.56->RTFDE<0.2,>=0.1.1->extract-msg>=0.41.1->pautobot)
Downloading msoffcrypto_tool-5.2.0-py3-none-any.whl.metadata (8.5 kB)
Collecting humanfriendly>=9.1 (from coloredlogs->onnxruntime>=1.14.1->chromadb>=0.3.23->pautobot)
Downloading humanfriendly-10.0-py2.py3-none-any.whl (86 kB)
    ━━━━━━━━━━━━━━━━━━━━━━━━━━━━━━━━━━━━━━━━ 86.8/86.8 kB 823.2 kB/s eta 0:00:00
Collecting mpmath>=0.19 (from sympy->onnxruntime>=1.14.1->chromadb>=0.3.23->pautobot)
Downloading mpmath-1.3.0-py3-none-any.whl (536 kB)
    ━━━━━━━━━━━━━━━━━━━━━━━━━━━━━━━━━━━━━━━━ 536.2/536.2 kB 461.0 kB/s eta 0:00:00
Collecting pyreadline3 (from humanfriendly>=9.1->coloredlogs->onnxruntime>=1.14.1->chromadb>=0.3.23->pautobot)
Downloading pyreadline3-3.4.1-py3-none-any.whl (95 kB)
    ━━━━━━━━━━━━━━━━━━━━━━━━━━━━━━━━━━━━━━━━ 95.2/95.2 kB 361.5 kB/s eta 0:00:00
Collecting win-unicode-console (from pcodedmp>=1.2.5->oletools>=0.56->RTFDE<0.2,>=0.1.1->extract-msg>=0.41.1->pautobot)
Downloading win_unicode_console-0.5.zip (31 kB)
Preparing metadata (setup.py) ... done
Collecting pyasn1<0.6.0,>=0.4.6 (from pyasn1-modules>=0.2.1->google-auth>=1.0.1->kubernetes>=28.1.0->chromadb>=0.3.23->pautobot)
Downloading pyasn1-0.5.1-py2.py3-none-any.whl.metadata (8.6 kB)
Downloading pautobot-0.0.27-py3-none-any.whl (384 kB)
━━━━━━━━━━━━━━━━━━━━━━━━━━━━━━━━━━━━━━━━ 384.7/384.7 kB 544.3 kB/s eta 0:00:00
Downloading alembic-1.11.1-py3-none-any.whl (224 kB)
━━━━━━━━━━━━━━━━━━━━━━━━━━━━━━━━━━━━━━━━ 224.5/224.5 kB 721.5 kB/s eta 0:00:00
Downloading fastapi-0.96.0-py3-none-any.whl (57 kB)
━━━━━━━━━━━━━━━━━━━━━━━━━━━━━━━━━━━━━━━━ 57.1/57.1 kB 600.3 kB/s eta 0:00:00
Downloading SQLAlchemy-2.0.15-cp311-cp311-win_amd64.whl (2.0 MB)
━━━━━━━━━━━━━━━━━━━━━━━━━━━━━━━━━━━━━━━━ 2.0/2.0 MB 951.6 kB/s eta 0:00:00
Downloading chromadb-0.4.22-py3-none-any.whl (509 kB)
━━━━━━━━━━━━━━━━━━━━━━━━━━━━━━━━━━━━━━━━ 509.0/509.0 kB 1.1 MB/s eta 0:00:00
Downloading chroma_hnswlib-0.7.3-cp311-cp311-win_amd64.whl (151 kB)
━━━━━━━━━━━━━━━━━━━━━━━━━━━━━━━━━━━━━━━━ 151.6/151.6 kB 1.0 MB/s eta 0:00:00
Downloading extract_msg-0.47.0-py2.py3-none-any.whl (328 kB)
━━━━━━━━━━━━━━━━━━━━━━━━━━━━━━━━━━━━━━━━ 328.2/328.2 kB 702.0 kB/s eta 0:00:00
Downloading olefile-0.47-py2.py3-none-any.whl (114 kB)
━━━━━━━━━━━━━━━━━━━━━━━━━━━━━━━━━━━━━━━━ 114.6/114.6 kB 668.7 kB/s eta 0:00:00
Downloading gpt4all-2.1.0-py3-none-win_amd64.whl (7.1 MB)
━━━━━━━━━━━━━━━━━━━━━━━━━━━━━━━━━━━━━━━━ 7.1/7.1 MB 580.6 kB/s eta 0:00:00
Downloading langchain-0.1.0-py3-none-any.whl (797 kB)
━━━━━━━━━━━━━━━━━━━━━━━━━━━━━━━━━━━━━━━━ 798.0/798.0 kB 504.3 kB/s eta 0:00:00
Downloading pdfminer.six-20231228-py3-none-any.whl (5.6 MB)
━━━━━━━━━━━━━━━━━━━━━━━━━━━━━━━━━━━━━━━━ 5.6/5.6 MB 745.6 kB/s eta 0:00:00
Downloading pypandoc-1.12-py3-none-any.whl (20 kB)
Downloading unstructured-0.12.0-py3-none-any.whl (1.8 MB)
━━━━━━━━━━━━━━━━━━━━━━━━━━━━━━━━━━━━━━━━ 1.8/1.8 MB 536.1 kB/s eta 0:00:00
Downloading aiohttp-3.9.1-cp311-cp311-win_amd64.whl (364 kB)
━━━━━━━━━━━━━━━━━━━━━━━━━━━━━━━━━━━━━━━━ 364.8/364.8 kB 613.4 kB/s eta 0:00:00
Downloading bcrypt-4.1.2-cp39-abi3-win_amd64.whl (158 kB)
━━━━━━━━━━━━━━━━━━━━━━━━━━━━━━━━━━━━━━━━ 158.3/158.3 kB 676.1 kB/s eta 0:00:00
Downloading build-1.0.3-py3-none-any.whl (18 kB)
Downloading cryptography-41.0.7-cp37-abi3-win_amd64.whl (2.7 MB)
━━━━━━━━━━━━━━━━━━━━━━━━━━━━━━━━━━━━━━━━ 2.7/2.7 MB 715.7 kB/s eta 0:00:00
Downloading dataclasses_json-0.6.3-py3-none-any.whl (28 kB)
Downloading greenlet-3.0.3-cp311-cp311-win_amd64.whl (292 kB)
━━━━━━━━━━━━━━━━━━━━━━━━━━━━━━━━━━━━━━━━ 292.8/292.8 kB 787.1 kB/s eta 0:00:00
Downloading grpcio-1.60.0-cp311-cp311-win_amd64.whl (3.7 MB)
━━━━━━━━━━━━━━━━━━━━━━━━━━━━━━━━━━━━━━━━ 3.7/3.7 MB 650.5 kB/s eta 0:00:00
Downloading huggingface_hub-0.20.2-py3-none-any.whl (330 kB)
━━━━━━━━━━━━━━━━━━━━━━━━━━━━━━━━━━━━━━━━ 330.3/330.3 kB 585.2 kB/s eta 0:00:00
Downloading jsonpatch-1.33-py2.py3-none-any.whl (12 kB)
Downloading kubernetes-29.0.0-py2.py3-none-any.whl (1.6 MB)
━━━━━━━━━━━━━━━━━━━━━━━━━━━━━━━━━━━━━━━━ 1.6/1.6 MB 838.5 kB/s eta 0:00:00
Downloading langchain_community-0.0.12-py3-none-any.whl (1.6 MB)
━━━━━━━━━━━━━━━━━━━━━━━━━━━━━━━━━━━━━━━━ 1.6/1.6 MB 1.1 MB/s eta 0:00:00
Downloading langchain_core-0.1.10-py3-none-any.whl (216 kB)
━━━━━━━━━━━━━━━━━━━━━━━━━━━━━━━━━━━━━━━━ 216.6/216.6 kB 942.4 kB/s eta 0:00:00
Downloading langsmith-0.0.80-py3-none-any.whl (48 kB)
━━━━━━━━━━━━━━━━━━━━━━━━━━━━━━━━━━━━━━━━ 48.3/48.3 kB 810.7 kB/s eta 0:00:00
Downloading mmh3-4.1.0-cp311-cp311-win_amd64.whl (31 kB)
Downloading onnxruntime-1.16.3-cp311-cp311-win_amd64.whl (7.4 MB)
━━━━━━━━━━━━━━━━━━━━━━━━━━━━━━━━━━━━━━━━ 7.4/7.4 MB 1.1 MB/s eta 0:00:00
Downloading opentelemetry_api-1.22.0-py3-none-any.whl (57 kB)
━━━━━━━━━━━━━━━━━━━━━━━━━━━━━━━━━━━━━━━━ 57.9/57.9 kB 769.5 kB/s eta 0:00:00
Downloading opentelemetry_exporter_otlp_proto_grpc-1.22.0-py3-none-any.whl (18 kB)
Downloading opentelemetry_exporter_otlp_proto_common-1.22.0-py3-none-any.whl (17 kB)
Downloading opentelemetry_proto-1.22.0-py3-none-any.whl (50 kB)
━━━━━━━━━━━━━━━━━━━━━━━━━━━━━━━━━━━━━━━━ 50.8/50.8 kB 1.3 MB/s eta 0:00:00
Downloading opentelemetry_instrumentation_fastapi-0.43b0-py3-none-any.whl (11 kB)
Downloading opentelemetry_instrumentation-0.43b0-py3-none-any.whl (28 kB)
Downloading opentelemetry_instrumentation_asgi-0.43b0-py3-none-any.whl (14 kB)
Downloading opentelemetry_semantic_conventions-0.43b0-py3-none-any.whl (36 kB)
Downloading opentelemetry_util_http-0.43b0-py3-none-any.whl (6.9 kB)
Downloading opentelemetry_sdk-1.22.0-py3-none-any.whl (105 kB)
━━━━━━━━━━━━━━━━━━━━━━━━━━━━━━━━━━━━━━━━ 105.6/105.6 kB 676.0 kB/s eta 0:00:00
Downloading overrides-7.4.0-py3-none-any.whl (17 kB)
Downloading posthog-3.3.1-py2.py3-none-any.whl (40 kB)
━━━━━━━━━━━━━━━━━━━━━━━━━━━━━━━━━━━━━━━━ 40.6/40.6 kB 645.6 kB/s eta 0:00:00
Downloading pulsar_client-3.4.0-cp311-cp311-win_amd64.whl (3.4 MB)
━━━━━━━━━━━━━━━━━━━━━━━━━━━━━━━━━━━━━━━━ 3.4/3.4 MB 847.6 kB/s eta 0:00:00
Downloading pydantic-1.10.13-cp311-cp311-win_amd64.whl (2.1 MB)
━━━━━━━━━━━━━━━━━━━━━━━━━━━━━━━━━━━━━━━━ 2.1/2.1 MB 887.7 kB/s eta 0:00:00
Downloading PyYAML-6.0.1-cp311-cp311-win_amd64.whl (144 kB)
━━━━━━━━━━━━━━━━━━━━━━━━━━━━━━━━━━━━━━━━ 144.7/144.7 kB 1.1 MB/s eta 0:00:00
Downloading RTFDE-0.1.1-py3-none-any.whl (36 kB)
Downloading lark-1.1.8-py3-none-any.whl (111 kB)
━━━━━━━━━━━━━━━━━━━━━━━━━━━━━━━━━━━━━━━━ 111.6/111.6 kB 929.9 kB/s eta 0:00:00
Downloading starlette-0.27.0-py3-none-any.whl (66 kB)
━━━━━━━━━━━━━━━━━━━━━━━━━━━━━━━━━━━━━━━━ 67.0/67.0 kB 3.5 MB/s eta 0:00:00
Downloading tenacity-8.2.3-py3-none-any.whl (24 kB)
Downloading tokenizers-0.15.0-cp311-none-win_amd64.whl (2.2 MB)
━━━━━━━━━━━━━━━━━━━━━━━━━━━━━━━━━━━━━━━━ 2.2/2.2 MB 953.0 kB/s eta 0:00:00
Downloading torch-2.1.2-cp311-cp311-win_amd64.whl (192.3 MB)
━━━━━━━━━━━━━━━━━━━━━━━━━━━━━━━━━━━━━━━━ 192.3/192.3 MB 842.3 kB/s eta 0:00:00
Downloading transformers-4.36.2-py3-none-any.whl (8.2 MB)
━━━━━━━━━━━━━━━━━━━━━━━━━━━━━━━━━━━━━━━━ 8.2/8.2 MB 920.0 kB/s eta 0:00:00
Downloading tzlocal-5.2-py3-none-any.whl (17 kB)
Downloading uvicorn-0.25.0-py3-none-any.whl (60 kB)
━━━━━━━━━━━━━━━━━━━━━━━━━━━━━━━━━━━━━━━━ 60.3/60.3 kB 807.5 kB/s eta 0:00:00
Downloading wrapt-1.16.0-cp311-cp311-win_amd64.whl (37 kB)
Downloading chardet-5.2.0-py3-none-any.whl (199 kB)
━━━━━━━━━━━━━━━━━━━━━━━━━━━━━━━━━━━━━━━━ 199.4/199.4 kB 670.7 kB/s eta 0:00:00
Downloading emoji-2.9.0-py2.py3-none-any.whl (397 kB)
━━━━━━━━━━━━━━━━━━━━━━━━━━━━━━━━━━━━━━━━ 397.5/397.5 kB 798.4 kB/s eta 0:00:00
Downloading importlib_resources-6.1.1-py3-none-any.whl (33 kB)
Downloading lxml-5.1.0-cp311-cp311-win_amd64.whl (3.9 MB)
━━━━━━━━━━━━━━━━━━━━━━━━━━━━━━━━━━━━━━━━ 3.9/3.9 MB 840.9 kB/s eta 0:00:00
Downloading Mako-1.3.0-py3-none-any.whl (78 kB)
━━━━━━━━━━━━━━━━━━━━━━━━━━━━━━━━━━━━━━━━ 78.6/78.6 kB 735.1 kB/s eta 0:00:00
Downloading plumbum-1.8.2-py3-none-any.whl (127 kB)
━━━━━━━━━━━━━━━━━━━━━━━━━━━━━━━━━━━━━━━━ 127.0/127.0 kB 1.1 MB/s eta 0:00:00
Downloading python_iso639-2024.1.2-py3-none-any.whl (274 kB)
━━━━━━━━━━━━━━━━━━━━━━━━━━━━━━━━━━━━━━━━ 274.7/274.7 kB 1.1 MB/s eta 0:00:00
Downloading rapidfuzz-3.6.1-cp311-cp311-win_amd64.whl (1.6 MB)
━━━━━━━━━━━━━━━━━━━━━━━━━━━━━━━━━━━━━━━━ 1.6/1.6 MB 1.3 MB/s eta 0:00:00
Downloading scikit_learn-1.3.2-cp311-cp311-win_amd64.whl (9.2 MB)
━━━━━━━━━━━━━━━━━━━━━━━━━━━━━━━━━━━━━━━━ 9.2/9.2 MB 924.0 kB/s eta 0:00:00
Downloading torchvision-0.16.2-cp311-cp311-win_amd64.whl (1.1 MB)
━━━━━━━━━━━━━━━━━━━━━━━━━━━━━━━━━━━━━━━━ 1.1/1.1 MB 767.7 kB/s eta 0:00:00
Downloading unstructured_client-0.15.2-py3-none-any.whl (20 kB)
Downloading anyio-4.2.0-py3-none-any.whl (85 kB)
━━━━━━━━━━━━━━━━━━━━━━━━━━━━━━━━━━━━━━━━ 85.5/85.5 kB 533.6 kB/s eta 0:00:00
Downloading attrs-23.2.0-py3-none-any.whl (60 kB)
━━━━━━━━━━━━━━━━━━━━━━━━━━━━━━━━━━━━━━━━ 60.8/60.8 kB 537.4 kB/s eta 0:00:00
Downloading cffi-1.16.0-cp311-cp311-win_amd64.whl (181 kB)
━━━━━━━━━━━━━━━━━━━━━━━━━━━━━━━━━━━━━━━━ 181.5/181.5 kB 685.0 kB/s eta 0:00:00
Downloading Deprecated-1.2.14-py2.py3-none-any.whl (9.6 kB)
Downloading frozenlist-1.4.1-cp311-cp311-win_amd64.whl (50 kB)
━━━━━━━━━━━━━━━━━━━━━━━━━━━━━━━━━━━━━━━━ 50.5/50.5 kB 638.4 kB/s eta 0:00:00
Downloading fsspec-2023.12.2-py3-none-any.whl (168 kB)
━━━━━━━━━━━━━━━━━━━━━━━━━━━━━━━━━━━━━━━━ 169.0/169.0 kB 724.8 kB/s eta 0:00:00
Downloading google_auth-2.26.2-py2.py3-none-any.whl (186 kB)
━━━━━━━━━━━━━━━━━━━━━━━━━━━━━━━━━━━━━━━━ 186.5/186.5 kB 804.6 kB/s eta 0:00:00
Downloading googleapis_common_protos-1.62.0-py2.py3-none-any.whl (228 kB)
━━━━━━━━━━━━━━━━━━━━━━━━━━━━━━━━━━━━━━━━ 228.7/228.7 kB 873.7 kB/s eta 0:00:00
Downloading httptools-0.6.1-cp311-cp311-win_amd64.whl (55 kB)
━━━━━━━━━━━━━━━━━━━━━━━━━━━━━━━━━━━━━━━━ 55.4/55.4 kB 728.9 kB/s eta 0:00:00
Downloading importlib_metadata-6.11.0-py3-none-any.whl (23 kB)
Downloading joblib-1.3.2-py3-none-any.whl (302 kB)
━━━━━━━━━━━━━━━━━━━━━━━━━━━━━━━━━━━━━━━━ 302.2/302.2 kB 983.1 kB/s eta 0:00:00
Downloading jsonpointer-2.4-py2.py3-none-any.whl (7.8 kB)
Downloading MarkupSafe-2.1.3-cp311-cp311-win_amd64.whl (17 kB)
Downloading marshmallow-3.20.2-py3-none-any.whl (49 kB)
━━━━━━━━━━━━━━━━━━━━━━━━━━━━━━━━━━━━━━━━ 49.4/49.4 kB 834.2 kB/s eta 0:00:00
Downloading packaging-23.2-py3-none-any.whl (53 kB)
━━━━━━━━━━━━━━━━━━━━━━━━━━━━━━━━━━━━━━━━ 53.0/53.0 kB 689.9 kB/s eta 0:00:00
Downloading protobuf-4.25.2-cp310-abi3-win_amd64.whl (413 kB)
━━━━━━━━━━━━━━━━━━━━━━━━━━━━━━━━━━━━━━━━ 413.4/413.4 kB 1.1 MB/s eta 0:00:00
Downloading regex-2023.12.25-cp311-cp311-win_amd64.whl (269 kB)
━━━━━━━━━━━━━━━━━━━━━━━━━━━━━━━━━━━━━━━━ 269.5/269.5 kB 1.2 MB/s eta 0:00:00
Downloading safetensors-0.4.1-cp311-none-win_amd64.whl (277 kB)
━━━━━━━━━━━━━━━━━━━━━━━━━━━━━━━━━━━━━━━━ 277.5/277.5 kB 1.0 MB/s eta 0:00:00
Downloading soupsieve-2.5-py3-none-any.whl (36 kB)
Downloading threadpoolctl-3.2.0-py3-none-any.whl (15 kB)
Downloading typing_inspect-0.9.0-py3-none-any.whl (8.8 kB)
Downloading watchfiles-0.21.0-cp311-none-win_amd64.whl (280 kB)
━━━━━━━━━━━━━━━━━━━━━━━━━━━━━━━━━━━━━━━━ 280.1/280.1 kB 960.4 kB/s eta 0:00:00
Downloading websocket_client-1.7.0-py3-none-any.whl (58 kB)
━━━━━━━━━━━━━━━━━━━━━━━━━━━━━━━━━━━━━━━━ 58.5/58.5 kB 1.0 MB/s eta 0:00:00
Downloading websockets-12.0-cp311-cp311-win_amd64.whl (124 kB)
━━━━━━━━━━━━━━━━━━━━━━━━━━━━━━━━━━━━━━━━ 125.0/125.0 kB 1.0 MB/s eta 0:00:00
Downloading yarl-1.9.4-cp311-cp311-win_amd64.whl (76 kB)
━━━━━━━━━━━━━━━━━━━━━━━━━━━━━━━━━━━━━━━━ 76.7/76.7 kB 852.3 kB/s eta 0:00:00
Downloading filelock-3.13.1-py3-none-any.whl (11 kB)
Downloading flatbuffers-23.5.26-py2.py3-none-any.whl (26 kB)
Downloading Jinja2-3.1.3-py3-none-any.whl (133 kB)
━━━━━━━━━━━━━━━━━━━━━━━━━━━━━━━━━━━━━━━━ 133.2/133.2 kB 984.0 kB/s eta 0:00:00
Downloading tzdata-2023.4-py2.py3-none-any.whl (346 kB)
━━━━━━━━━━━━━━━━━━━━━━━━━━━━━━━━━━━━━━━━ 346.6/346.6 kB 1.1 MB/s eta 0:00:00
Downloading asgiref-3.7.2-py3-none-any.whl (24 kB)
Downloading cachetools-5.3.2-py3-none-any.whl (9.3 kB)
Downloading zipp-3.17.0-py3-none-any.whl (7.4 kB)
Downloading msoffcrypto_tool-5.2.0-py3-none-any.whl (37 kB)
Downloading pyasn1-0.5.1-py2.py3-none-any.whl (84 kB)
━━━━━━━━━━━━━━━━━━━━━━━━━━━━━━━━━━━━━━━━ 84.9/84.9 kB 1.6 MB/s eta 0:00:00
Building wheels for collected packages: sentence-transformers, red-black-tree-mod, pandoc, compressed-rtf, pypika, langdetect, win-unicode-console
Building wheel for sentence-transformers (setup.py) ... done
Created wheel for sentence-transformers: filename=sentence_transformers-2.2.2-py3-none-any.whl size=125953 sha256=6681affaa9b5f0bbd72e3e0b6044f54d08cba465de82783b6dcc18ad98793353
Stored in directory: c:\users\svavark\appdata\local\pip\cache\wheels\ff\27\bf\ffba8b318b02d7f691a57084ee154e26ed24d012b0c7805881
Building wheel for red-black-tree-mod (setup.py) ... done
Created wheel for red-black-tree-mod: filename=red_black_tree_mod-1.20-py3-none-any.whl size=18628 sha256=6a21975937d6ef08c523a2c231d253038816d5f2f58c9f7de1e9474a2e4b9ca8
Stored in directory: c:\users\svavark\appdata\local\pip\cache\wheels\ef\a1\4a\56417ac7cb331323b07533b8e04ec40f698d4f58e33654d743
Building wheel for pandoc (setup.py) ... done
Created wheel for pandoc: filename=pandoc-2.3-py3-none-any.whl size=33290 sha256=d43d2f809855fd2ae36587f962482e3782eafc2eb5c2a42bbc788d2001a586e7
Stored in directory: c:\users\svavark\appdata\local\pip\cache\wheels\1c\a9\c4\6254542c4e8202d52fcd69798d2507aaad1f2a4bb60f2f0fea
Building wheel for compressed-rtf (setup.py) ... done
Stored in directory: c:\users\svavark\appdata\local\pip\cache\wheels\25\43\67\e46f8b6d3d39fb567b05bf0d01125410665a3e019a468ace25
Building wheel for pypika (pyproject.toml) ... done
Created wheel for pypika: filename=PyPika-0.48.9-py2.py3-none-any.whl size=53836 sha256=3bc11a4123e5730e78637c5ecde41b45f220b74a9aaaf66bf7f9e5a5cb21a13b
Stored in directory: c:\users\svavark\appdata\local\pip\cache\wheels\a3\01\bd\4c40ceb9d5354160cb186dcc153360f4ab7eb23e2b24daf96d
Building wheel for langdetect (setup.py) ... done
Created wheel for langdetect: filename=langdetect-1.0.9-py3-none-any.whl size=993254 sha256=c811459bba91324973561088f9e56a285327ccb489268ce75529ff7f43fee426
Stored in directory: c:\users\svavark\appdata\local\pip\cache\wheels\0a\f2\b2\e5ca405801e05eb7c8ed5b3b4bcf1fcabcd6272c167640072e
Building wheel for win-unicode-console (setup.py) ... done
Created wheel for win-unicode-console: filename=win_unicode_console-0.5-py3-none-any.whl size=20191 sha256=2bc49d04b28b77e6d7a911cfdd7bd604069490bd9a1559e57e67a36e0e38f3bb
Stored in directory: c:\users\svavark\appdata\local\pip\cache\wheels\f8\1d\0b\075724dc0c787a833dd6bb7255e7a14d9dab45eef102b1845a
Successfully built sentence-transformers red-black-tree-mod pandoc compressed-rtf pypika langdetect win-unicode-console
Installing collected packages: win-unicode-console, sentencepiece, red-black-tree-mod, pywin32, pyreadline3, pypika, ply, mpmath, monotonic, mmh3, flatbuffers, filetype, ebcdic, easygui, compressed-rtf, zipp, wrapt, websockets, websocket-client, tzdata, threadpoolctl, tenacity, tabulate, sympy, soupsieve, sniffio, six, safetensors, regex, rapidfuzz, PyYAML, python-multipart, python-magic, python-iso639, python-dotenv, pyproject_hooks, pyparsing, pypandoc, pydantic, pycparser, pyasn1, pulsar-client, protobuf, plumbum, packaging, overrides, opentelemetry-util-http, opentelemetry-semantic-conventions, olefile, oauthlib, mypy-extensions, multidict, MarkupSafe, lxml, lark, jsonpointer, jsonpath-python, joblib, importlib-resources, humanfriendly, httptools, h11, grpcio, greenlet, fsspec, frozenlist, filelock, emoji, colorclass, chroma-hnswlib, chardet, cachetools, bcrypt, backoff, attrs, asgiref, yarl, uvicorn, tzlocal, typing-inspect, typer, SQLAlchemy, scikit-learn, rsa, requests-oauthlib, python-dateutil, pyasn1-modules, pandoc, opentelemetry-proto, nltk, marshmallow, Mako, langsmith, langdetect, jsonpatch, jinja2, importlib-metadata, huggingface-hub, gpt4all, googleapis-common-protos, deprecated, coloredlogs, cffi, build, beautifulsoup4, anyio, aiosignal, watchfiles, torch, tokenizers, starlette, posthog, opentelemetry-exporter-otlp-proto-common, opentelemetry-api, onnxruntime, langchain-core, google-auth, dataclasses-json, cryptography, alembic, aiohttp, unstructured-client, transformers, torchvision, pdfminer.six, opentelemetry-sdk, opentelemetry-instrumentation, msoffcrypto-tool, langchain-community, kubernetes, fastapi, unstructured, sentence-transformers, opentelemetry-instrumentation-asgi, opentelemetry-exporter-otlp-proto-grpc, langchain, opentelemetry-instrumentation-fastapi, chromadb, pcodedmp, oletools, RTFDE, extract-msg, pautobot
ERROR: Could not install packages due to an OSError: [Errno 13] Permission denied: 'C:\\Python311\\Scripts\\pywin32_postinstall.py'
Consider using the `--user` option or check the permissions.


[notice] A new release of pip is available: 23.3.1 -> 23.3.2
[notice] To update, run: python.exe -m pip install --upgrade pip
PS C:\code\py_gui_test> python.exe -m pip install --upgrade pip
DEPRECATION: Loading egg at c:\python311\lib\site-packages\vboxapi-1.0-py3.11.egg is deprecated. pip 24.3 will enforce this behaviour change. A possible replacement is to use pip for package installation.. Discussion can be found at https://github.com/pypa/pip/issues/12330
Requirement already satisfied: pip in c:\python311\lib\site-packages (23.3.1)
Collecting pip
Downloading pip-23.3.2-py3-none-any.whl.metadata (3.5 kB)
Downloading pip-23.3.2-py3-none-any.whl (2.1 MB)
━━━━━━━━━━━━━━━━━━━━━━━━━━━━━━━━━━━━━━━━ 2.1/2.1 MB 3.7 MB/s eta 0:00:00
Installing collected packages: pip
Attempting uninstall: pip
    Found existing installation: pip 23.3.1
    Uninstalling pip-23.3.1:
ERROR: Could not install packages due to an OSError: [WinError 5] Access is denied: 'c:\\python311\\scripts\\pip.exe'
Consider using the `--user` option or check the permissions.

WARNING: Ignoring invalid distribution ~ (C:\Python311\Lib\site-packages)
PS C:\code\py_gui_test>
Attempt 6: PrivateGPT in Windows (Success!)
Setup
Here's an attempt to install PrivateGPT with Natlamir's guide. People in the comments seem to have tried many methods and they are praising the video as the only PrivateGPT installation guide that actually works. Looks promising.
Then I opened the Anaconda Prompt and started Natlamir's guide. I navigated into the cloned PrivateGPT repo and ran
conda create --name privategpt python=3.11
and chose y to go ahead with setting up the conda virtual environment.
Then I activated the environment with
conda activate privategpt
Then I opened an Anaconda Powershell window and input
(Invoke-WebRequest -Uri https://install.python-poetry.org -UseBasicParsing).Content | py -
to install Poetry. This is getting ridiculous. I have many versions of many packages on two operating system on the same little laptop. I added the Poetry Scripts folder to PATH according to the video tutorial.
I have Visual Studio 2022 installed, but to make sure that I have everything mentioned in the video, I opened my Downloads folder and opened VisualStudioSetup.exe. I checked the components mentioned in the video and the total space required was 12.92 GB. I waited until I was back home in Ísafjörður to install that.
When the Visual Studio 2022 installation was complete, I installed MinGW and used it to install mingw32-base and mingw32-gcc-g++.
When the MinGW installation was complete I opened an Anaconda prompt as administrator and entered:
conda activate privategpt
choco install make
to install make in the privategpt virtual environment. If you don't have Chocolatey, Natlamir's guide that I'm following will show you how to get it.
In the privategpt virtual environment, I cd into the privateGPT repo. There I run
poetry install --with ui
That's yet another big download, because torch is a part of it. Well, I guess you can't expect to run a large language model on your own machine without downloading a few massive packages first. The poetry installer ended by saying:
Installing the current project: private-gpt (0.2.0)
I can then verify that everything is working by running
make run
Everything is not working, just like in Natlamir's guide. It says:
ImportError: Could not import llama_cpp library.Please install llama_cpp with `pip install llama-cpp-python`.See the full installation guide for GPU support at `https://github.com/abetlen/llama-cpp-python`
Ok, let's do as Natlamir says and install the llama_cpp library:
pip install llama-cpp-python
and check again whether everything is working correctly:
make run
Nope. I get the error:
ValueError: Provided model path does not exist. Please check the path or provide a model_url to download.
But again, this is exactly like in the video, so I'll continue on. Let's run
poetry run python scripts/setup
as he suggests in the video. More downloads, about 5 GB this time. It's downloading the mistral-7b-instruct model for me (mistral-7b-instruct-v0.2.Q4_K_M.gguf). That sounds good, because the 'instruct' versions of these language models can have extended conversations like ChatGPT. The base models only support single prompts.
All done! Now let's check if everything works one more time:
make run
It says:
12:41:57.427 [INFO    ]         private_gpt.ui.ui - Mounting the gradio UI, at path=/
12:41:57.670 [INFO    ]             uvicorn.error - Started server process [16396]
12:41:57.671 [INFO    ]             uvicorn.error - Waiting for application startup.
12:41:57.677 [INFO    ]             uvicorn.error - Application startup complete.
12:41:57.690 [INFO    ]             uvicorn.error - Uvicorn running on http://0.0.0.0:8001 (Press CTRL+C to quit)
That's not what happens in the video. In the video, it runs the model and you can open a locally running web interface to chat with it. Dang. I'll shut it down with Ctrl-C. Will continue later.
Update: I got confused by the uvicorn.error message, but apparently it isn't actually an error. I put the link in the browser again and that didn't work, but then I tried
http://localhost:8001/ and now the PrivateGPT interface is running in my browser! Húrra!
I tried uploading my Fab Academy website repo, but doesn't seem to support uploading folders. I tried uploading a few HTML files from the public folder, but got this error:
UnicodeDecodeError: 'charmap' codec can't decode byte 0x8d
Hmm. Let's try a Markdown .md file from the docs folder. That works!
Running
Ok, to run Private GPT I open an Anaconda prompt, type
conda create privategpt
Then I use cd to go into the directory where I keep the PrivateGPT repo and type
make run
It takes a few minutes to get going. It is a large language model after all.
Conversation
PrivateGPT is the only local LLM model that was able to answer who I am from the docs on my website. It was also able to answer technical questions - even the one where I use the wrong name for the ATtiny412 microcontroller! I think the answer to whether the Fab Academy is difficult is the most impressive. It summarizes text from two markdown files in a coherent argument. The answer to 'a good machine week project' is rather general and doesn't seem to be based on my docs, although PrivateGPT provides references to two Markdown files, which do mention machine week. It knows what Modular Things are, although it makes up a lot of the details. But I've only included some stray thoughts on my progress with Modular Things, so that is understandable. Overall a good result for a local model without any coding.
- What is the Fab Academy?
-
The Fab Academy is an educational program open to anyone who wants to make things. It is directed by Professor Neil Gershenfeld from the MIT Center for Bits and Atoms, and participants join a global community of makers through weekly online classes. The program is designed for individuals with various backgrounds, including engineers, artists, students, and those with no technical background, to learn cutting-edge technology and push themselves outside their comfort zones.
- Sources:
- index.md (page -)
- index.md (page -)
- Sources:
-
Please write a research and development grant application for a small educational robot arm
-
Title: Developing an Affordable and Accessible Educational Robot Arm for STEM Students Executive Summary: Our team aims to design, build, and implement an affordable and accessible educational robot arm for students in STEM fields. This project will provide hands-on experience with robotics technology, enabling students to develop essential skills in engineering, programming, and problem-solving. The proposed robot arm will be based on open-source hardware and software platforms, ensuring affordability and ease of use for schools and educational institutions. Background: Robotics education is an essential component of STEM curricula, as it provides students with practical experience in engineering, programming, and problem-solving skills. However, the high cost of commercial robot arms can be a significant barrier to entry for many educational institutions. Our team seeks to address this challenge by designing and building an affordable and accessible educational robot arm that can be easily integrated into STEM curricula. Project Description: Our proposed robot arm will be designed using open-source hardware platforms, such as Raspberry Pi or Arduino, and open-source software like the Robot Operating System (ROS). The arm will have a reach of at least 50 cm and will be capable of performing basic tasks, such as picking up objects and moving them to specific locations. The project will consist of three main phases:
- Design and prototyping: Our team will design the robot arm using CAD software and 3D print custom components. We will also source affordable actuators and sensors for the arm.
- Assembly and testing: Once the components are fabricated, we will assemble the robot arm and perform extensive testing to ensure its functionality and reliability.
- Software development: We will develop a user-friendly interface for programming the robot arm using open-source software like ROS. This interface will allow students to write code in popular programming languages such as Python or C++.
Expected Outcomes:
The proposed project will result in an affordable and accessible educational robot arm that can be easily integrated into STEM curricula. The robot arm will provide students with hands-on experience in engineering, programming, and problem-solving skills. Additionally, the open-source nature of the project will encourage collaboration and innovation within the educational community.
Budget:
Our team is seeking a grant of $15,000 to
- Sources:
- week17.md (page -)
- ideas.md (page -)
- Sources:
-
Write Python code to communicate with a USB serial device
-
To write Python code for communicating with a USB serial device, you will need to use the PySerial library. First, make sure that you have installed PySerial by running
pip install pyserialin your terminal or command prompt. Here's an example of how to communicate with a USB serial device using Python:import serial # Set up serial connection port = 'COM3' # Replace with the correct port name for your device baudrate = 9600 dataBits = 8 parity = serial.PARITY_NONE stopbits = 1 serialConnection = serial.Serial(port=port, baudrate=baudrate, bytesize=dataBits, parity=parity, stopbits=stopbits, timeout=1) # Open the connection and write data to the device def send_data(data): serialConnection.write(bytes(data, 'ascii')) # Read data from the device def read_data(): return serialConnection.readline().decode('ascii').strip() try: # Example usage: Send "Hello World" to the device and print received data send_data("Hello World\n") response = read_data() print(f'Received: {response}') finally: serialConnection.close()Replace
COM3with the correct port name for your USB serial device, and adjust the baudrate, dataBits, parity, and stopbits as needed. The example code above sends "Hello World" to the device and reads a response back. You can modify this code to suit your specific use case.- Sources:
- week14.md (page -)
- interface.md (page -)
- Sources:
-
who is svavar konradsson?
-
Svavar Konráðsson is an individual mentioned in the context provided at the beginning of this conversation. He is someone with a Bachelor's degree in Mechanical Engineering, and he is working on completing his Master's degree thesis. The context does not provide any additional information about Svavar's profession or background beyond that. -Sources: 1. bio.md (page -)
-
how do you do i2c communication between at412 microcontrollers?
-
- Set up the hardware: Connect the SDA (data) and SCL (clock) lines between the two microcontrollers. Make sure that the voltage levels are compatible.
- Initialize I2C on both microcontrollers: Configure the I2C pins as inputs and outputs, set the clock frequency, and enable the I2C module.
- Write software to handle communication: You will need to write code for both master (sending) and slave (receiving) operations. For master operation, you'll need to generate the start condition, send the address of the slave device, write data, and acknowledge the receipt of data. For slave operation, you'll need to respond to the start condition, read the address, and send the appropriate data.
- Test the communication: Use an oscilloscope or a logic analyzer to verify that the I2C signals are being transmitted and received correctly.
To communicate between two Atmel AVR Microcontrollers using I2C, you will need to set up the I2C pins on both microcontrollers and write software to handle the communication. Here's a high-level overview of the steps involved:
Here is some sample code for Atmel AVR microcontrollers using the Wire library (Wire.h):
Master:
Slave:#include <Wire.h> void setup() { Wire.begin(0x04); // Set up master with address 0x04 } void loop() { Wire.beginTransmission(0x05); // Slave address is 0x05 Wire.write("Hello"); // Send "Hello" as data Wire.endTransmission(); delay(1000); }#include <Wire.h> void setup() { Wire.onReceive(receiveEvent); Wire.begin(0x05); // Set up slave with address 0x05 } void loop() { // Empty loop } void receiveEvent(int howMany) { while (howMany > 0) { char c = Wire.read(); if (c == 'H') { digitalWrite(LED - Sources: 1. week13.md (page -) 2. week13.md (page -)
- is the fab academy difficult?
-
The Fab Academy can be challenging, but its difficulty level depends on your background and goals. The program is designed for individuals with various backgrounds, including engineers, artists, students, and those with no technical background. Participants are required to work on projects that push them outside their comfort zones every week. While some projects may be more difficult than others, the Fab Academy provides a supportive community of mentors and peers who can help you learn new skills and overcome challenges.
The program covers a wide range of topics, including electronics, programming, design, and project management. If you are willing to put in the effort and dedicate time to learning, the Fab Academy can be an incredibly rewarding experience that will broaden your skillset and provide access to cutting-edge technology. However, it may not be suitable for those who prefer a more traditional classroom setting or who lack the motivation to work independently.
Ultimately, the difficulty of the Fab Academy depends on your personal goals, learning style, and commitment level. If you are open to new challenges and willing to put in the time and effort, the Fab Academy can be an excellent opportunity for growth and exploration.
- Sources:
- week18.md (page -)
- index.md (page -)
- Sources:
-
what's a good project for machine week in the fab academy?
-
Machine Week is a three-day intensive event where teams build machines at Fab Labs around the world. A good project for Machine Week in the Fab Academy could be one that is challenging yet achievable within the time frame, and provides an opportunity to learn new skills or apply existing ones. Here are some ideas for projects that can be completed during Machine Week:
- CNC Milling Project: Design and build a simple CNC milling machine using stepper motors, Arduino, and open-source software like GRBL or LinuxCNC. This project will allow you to learn about CNC machining, mechanical design, and programming.
- 3D Printer Upgrade: Improve an existing 3D printer by adding features such as a heated bed, automatic bed leveling, or dual extrusion. This project will help you gain experience in electronics, mechanical engineering, and software development.
- Automated Plant Watering System: Design and build an automated plant watering system using sensors, Arduino, and solenoid valves. This project will teach you about sensor technology, programming, and hydraulics.
- Simple Robot Arm: Build a simple robotic arm using servos or stepper motors and control it with an Arduino or Raspberry Pi. This project will give you experience in mechanical design, programming, and robotics.
- Solar-Powered Charger: Design and build a solar-powered charger for mobile devices using solar panels, batteries, and charging electronics. This project will help you learn about renewable energy systems, electrical engineering, and battery technology.
- Smart Home Automation System: Create a simple smart home automation system using sensors, Arduino, and wireless communication technologies like Bluetooth or Wi-Fi. This project will teach you about programming, electronics, and home automation.
- LED Light Show: Design and build an LED light show using microcontrollers, sensors, and LED strips. This project will give you experience in programming, electronics, and design.
These are just a few ideas to get you started. The key is to choose a project that interests you and challenges you while being achievable within the Machine Week time frame.
-Sources: 1. week10.md (page -) 2. week18.md (page -)- how do i use modular things?
-
Modular Things is an open-source hardware platform for building connected devices using JavaScript, HTML, and CSS. It allows users to create interactive web applications that control physical devices through a web interface. Here's a high-level overview of how to use Modular Things:
- Set up your development environment: Install Node.js, the Modular Things server, and the Modular Things client library on your computer. You can find installation instructions on the Modular Things website (https://modularthings.org/).
- Design your project: Plan out the functionality of your device and create a design using a CAD software or paper sketches. Consider the hardware components you will need, such as sensors, actuators, and microcontrollers.
- Build your device: Assemble your hardware according to your design. Connect all the components to the microcontroller(s) and make sure they are properly wired.
- Write your code: Use JavaScript, HTML, and CSS to write the web application that will control your device. You can use the Modular Things client library to interact with the connected hardware.
- Set up the connection between your device and the web app: Configure the Modular Things server to recognize your device and establish a connection between it and your web application. This typically involves setting up the communication protocol (e.g., I2C, SPI, or UART) and defining the data exchange format.
- Test your project: Use the Modular Things web interface to test your device and ensure that it is functioning correctly. Make any necessary adjustments to your code or hardware as needed.
- Share your project: Once you've completed your project, share it with others by publishing it on the Modular Things platform. This will make it accessible to anyone with an internet connection and a web browser.
For more detailed instructions and examples, check out the Modular Things documentation (https://docs.modularthings.org/). The platform offers a wide range of tutorials and projects that can help you get started.
- Sources: 1. week14.md (page -) 2. week14.md (page -) -
How to make a silicone mold?
-
Creating a silicone mold involves several steps, including designing the mold, preparing the mold materials, creating the mold, casting the silicone, and demolding the part. Here's an overview of the process:
- Design your part: Use CAD software to design the 3D model of the part you want to create using silicone. Make sure that the design is watertight and has no draft angles or undercuts, as these can make it difficult to demold the part.
- Prepare the mold materials: Choose a suitable material for your mold, such as aluminum, steel, or resin. Ensure that the material is compatible with the silicone you plan to use and that it has good thermal conductivity to help dissipate heat during the casting process. Clean and prepare the mold material by sanding, priming, or coating it with a release agent to ensure easy demolding.
- Create the mold: Use CNC machining, 3D printing, or manual methods like vacuum forming or hand carving to create the mold. Make sure that all surfaces of the mold are smooth and free from imperfections, as these can transfer to the silicone part.
- Prepare the silicone: Mix the silicone and catalyst according to the manufacturer's instructions. Be sure to wear gloves and work in a well-ventilated area, as silicone can emit fumes during mixing.
- Cast the silicone: Pour or brush the silicone into the mold, ensuring that it completely covers all surfaces of the part. Use a vacuum chamber or high pour technique to remove air bubbles and ensure a bubble-free cast. Allow the silicone to cure for the recommended time according to the manufacturer's instructions.
- Demold the part: Once the silicone has cured, carefully demold the part from the mold. Use a release agent or lubricant to help separate the silicone from the mold material. If necessary, trim any excess silicone from the edges of the part using a knife or other cutting tool.
- Post-processing: Clean and prepare the silicone part for further use as needed. This may include sanding, painting, or adding additional features like threads or mounting points.
For more detailed instructions and tips on creating a silicone mold, check out resources such as the
- Sources: 1. week12.md (page -) 2. week12.md (page -) -
how to make a resin casting in the fab academy?
-
Creating a resin casting project at the Fab Academy involves several steps, including designing your part, preparing the resin, creating the mold, casting the resin, and post-processing the cast. Here's an overview of the process:
- Design your part: Use CAD software to design the 3D model of the part you want to create using resin. Make sure that the design is watertight and has no draft angles or undercuts, as these can make it difficult to demold the part.
- Prepare the mold materials: Choose a suitable material for your mold, such as aluminum, steel, or silicone. Ensure that the material is compatible with the resin you plan to use and that it has good thermal conductivity to help dissipate heat during the casting process. Clean and prepare the mold material by sanding, priming, or coating it with a release agent to ensure easy demolding.
- Create the mold: Use CNC machining, 3D printing, or manual methods like vacuum forming or hand carving to create the mold. Make sure that all surfaces of the mold are smooth and free from imperfections, as these can transfer to the resin part.
- Prepare the resin: Choose a suitable resin for your project based on factors such as desired material properties (strength, flexibility, transparency, etc.), cost, and curing time. Follow the manufacturer's instructions for mixing the resin and catalyst, ensuring that you use the correct ratios and mix thoroughly.
- Cast the resin: Pour or vacuum cast the resin into the mold, ensuring that it completely covers all surfaces of the part. Use a vacuum chamber to remove air bubbles and ensure a bubble-free cast. Allow the resin to cure for the recommended time according to the manufacturer's instructions.
- Demold the part: Once the resin has cured, carefully demold the part from the mold. Use a release agent or lubricant to help separate the resin from the mold material. If necessary, trim any excess resin from the edges of the part using a knife or other cutting tool.
- Post-processing: Clean and prepare the resin part for further use as needed. This may include sanding, painting, or adding additional features like threads or mounting points.
-
Finishing touches: Polish or paint the resin
- Sources:
- week12.md (page -)
- week12.md (page -)
- Sources:
-
how do i calibrate a cnc machine?
-
Calibrating a CNC machine involves adjusting various parameters to ensure accurate and precise machining. Here's an overview of the process for calibrating a CNC milling machine:
- Home the machine: Before calibration, it is essential to home the machine, which means bringing all axes to their zero position. This typically involves moving each axis to its limit switch or homing sensor and adjusting the limits in your CNC software.
- Check linearity: Linearity refers to how accurately the machine moves in a straight line when commanded to do so. To check linearity, perform a series of test cuts along the X, Y, and Z axes using a calibration block or dial indicator. Adjust the feedrates, step pulse widths, and other parameters as needed to ensure that the machine moves in a straight line.
- Check squareness: Squareness refers to how perpendicular the X and Y axes are to each other. To check squareness, use a dial indicator or test block to measure the angle between the X and Y axes at various points along their intersection. Adjust the machine as needed using shims, adjustable feet, or other methods to ensure that the axes are perpendicular.
- Check parallelism: Parallelism refers to how parallel the X and Z axes are to each other. To check parallelism, use a dial indicator or test block to measure the distance between the X and Z axes at various points along their intersection. Adjust the machine as needed using shims, adjustable feet, or other methods to ensure that the axes are parallel.
- Check tool length offset: Tool length offset is the difference between the actual length of a tool and its programmed length. To check tool length offset, measure the length of the tool with a micrometer or dial indicator and compare it to the value entered in your CNC software. Adjust the software as needed to ensure accurate tool length compensation.
- Check tool radius compensation: Tool radius compensation is used when machining parts with curved features. To check tool radius compensation, use a test part with various radii and compare the actual machined dimensions to the programmed values. Adjust the CNC software as needed to ensure accurate compensation.
-
Check spindle runout: Spindle runout refers to how accurately the spindle maintains its position while rotating. To check
- Sources:
- week04.md (page -)
- week07.md (page -)
- Sources: