17. Molding and Casting
-
Individual Assignment
- Design a mold around the stock and tooling
- Mill it (rough cut + (at least) three-axis finish cut),
- Use it to cast parts
- Design a mold around the stock and tooling
-
Group assignment:
- Review the safety data sheets for each of your molding and casting materials
- Make and Compare test casts with each of them
After doing some research, this week’s assignment can be divided into 3 components:
- Preparing the Model.
- Preparing the Mold.
- Milling the Mold.
- Casting the Parts.
About the Model
Decided to make a chocolate Pokemon! The original model was obtained from thingiverse.
https://www.thingiverse.com/thing:1576163
Preparing the Model
There seems to be three requirements for model to make fit for casting:
- No internal structures: not having multiple models within the same model.
- Low-Poly: the poly count on the model. The lower the better.
- Manifold: A model needs to be “manifold” to possibly turn it into a mold. The main cause of “non-manifoldness” are “holes” in a mesh.
Tips for Preparing a Model
Making the Model Solid (No internal structures)
Autodesk’s Meshmixer can be used for this process.
Import the Model
File > Import
Make Solid
Edit > Make Solid
Adjust the values of “Solid Accuracy” and “Mesh Density” When happy with the Model, “Accept” the changes.
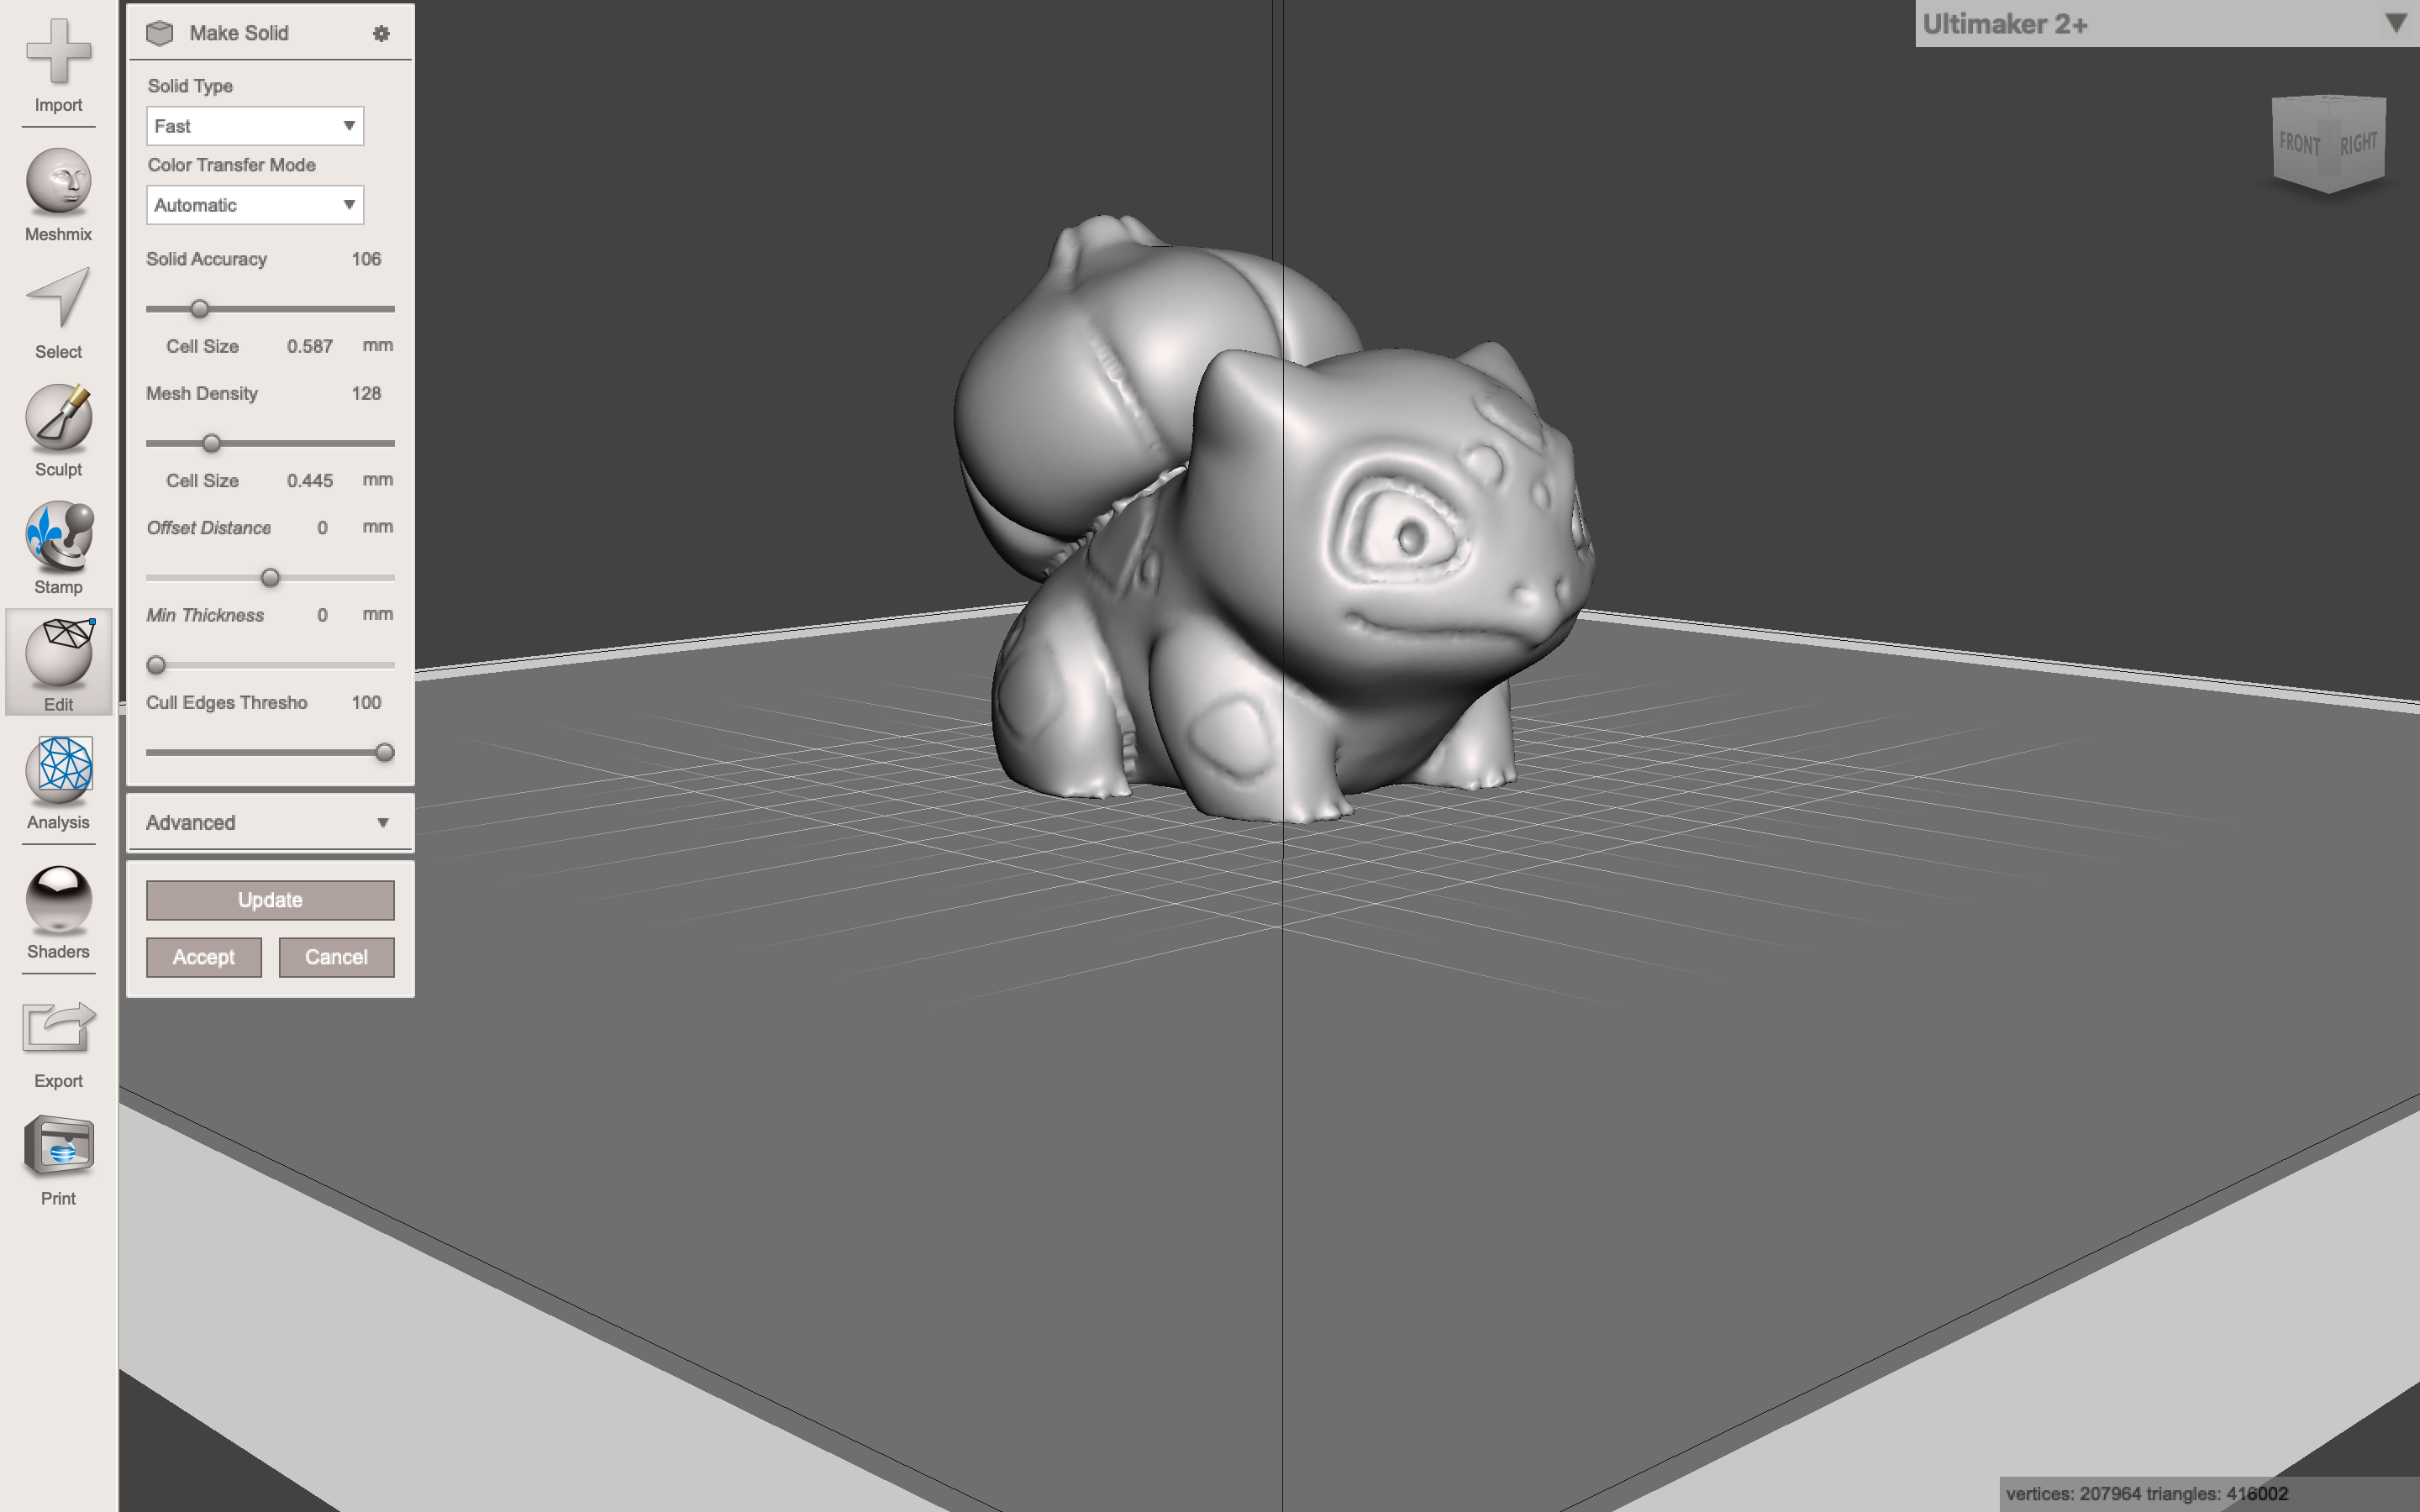
Export the Model
File > Export as an STL
Warning
This will produce a large file!
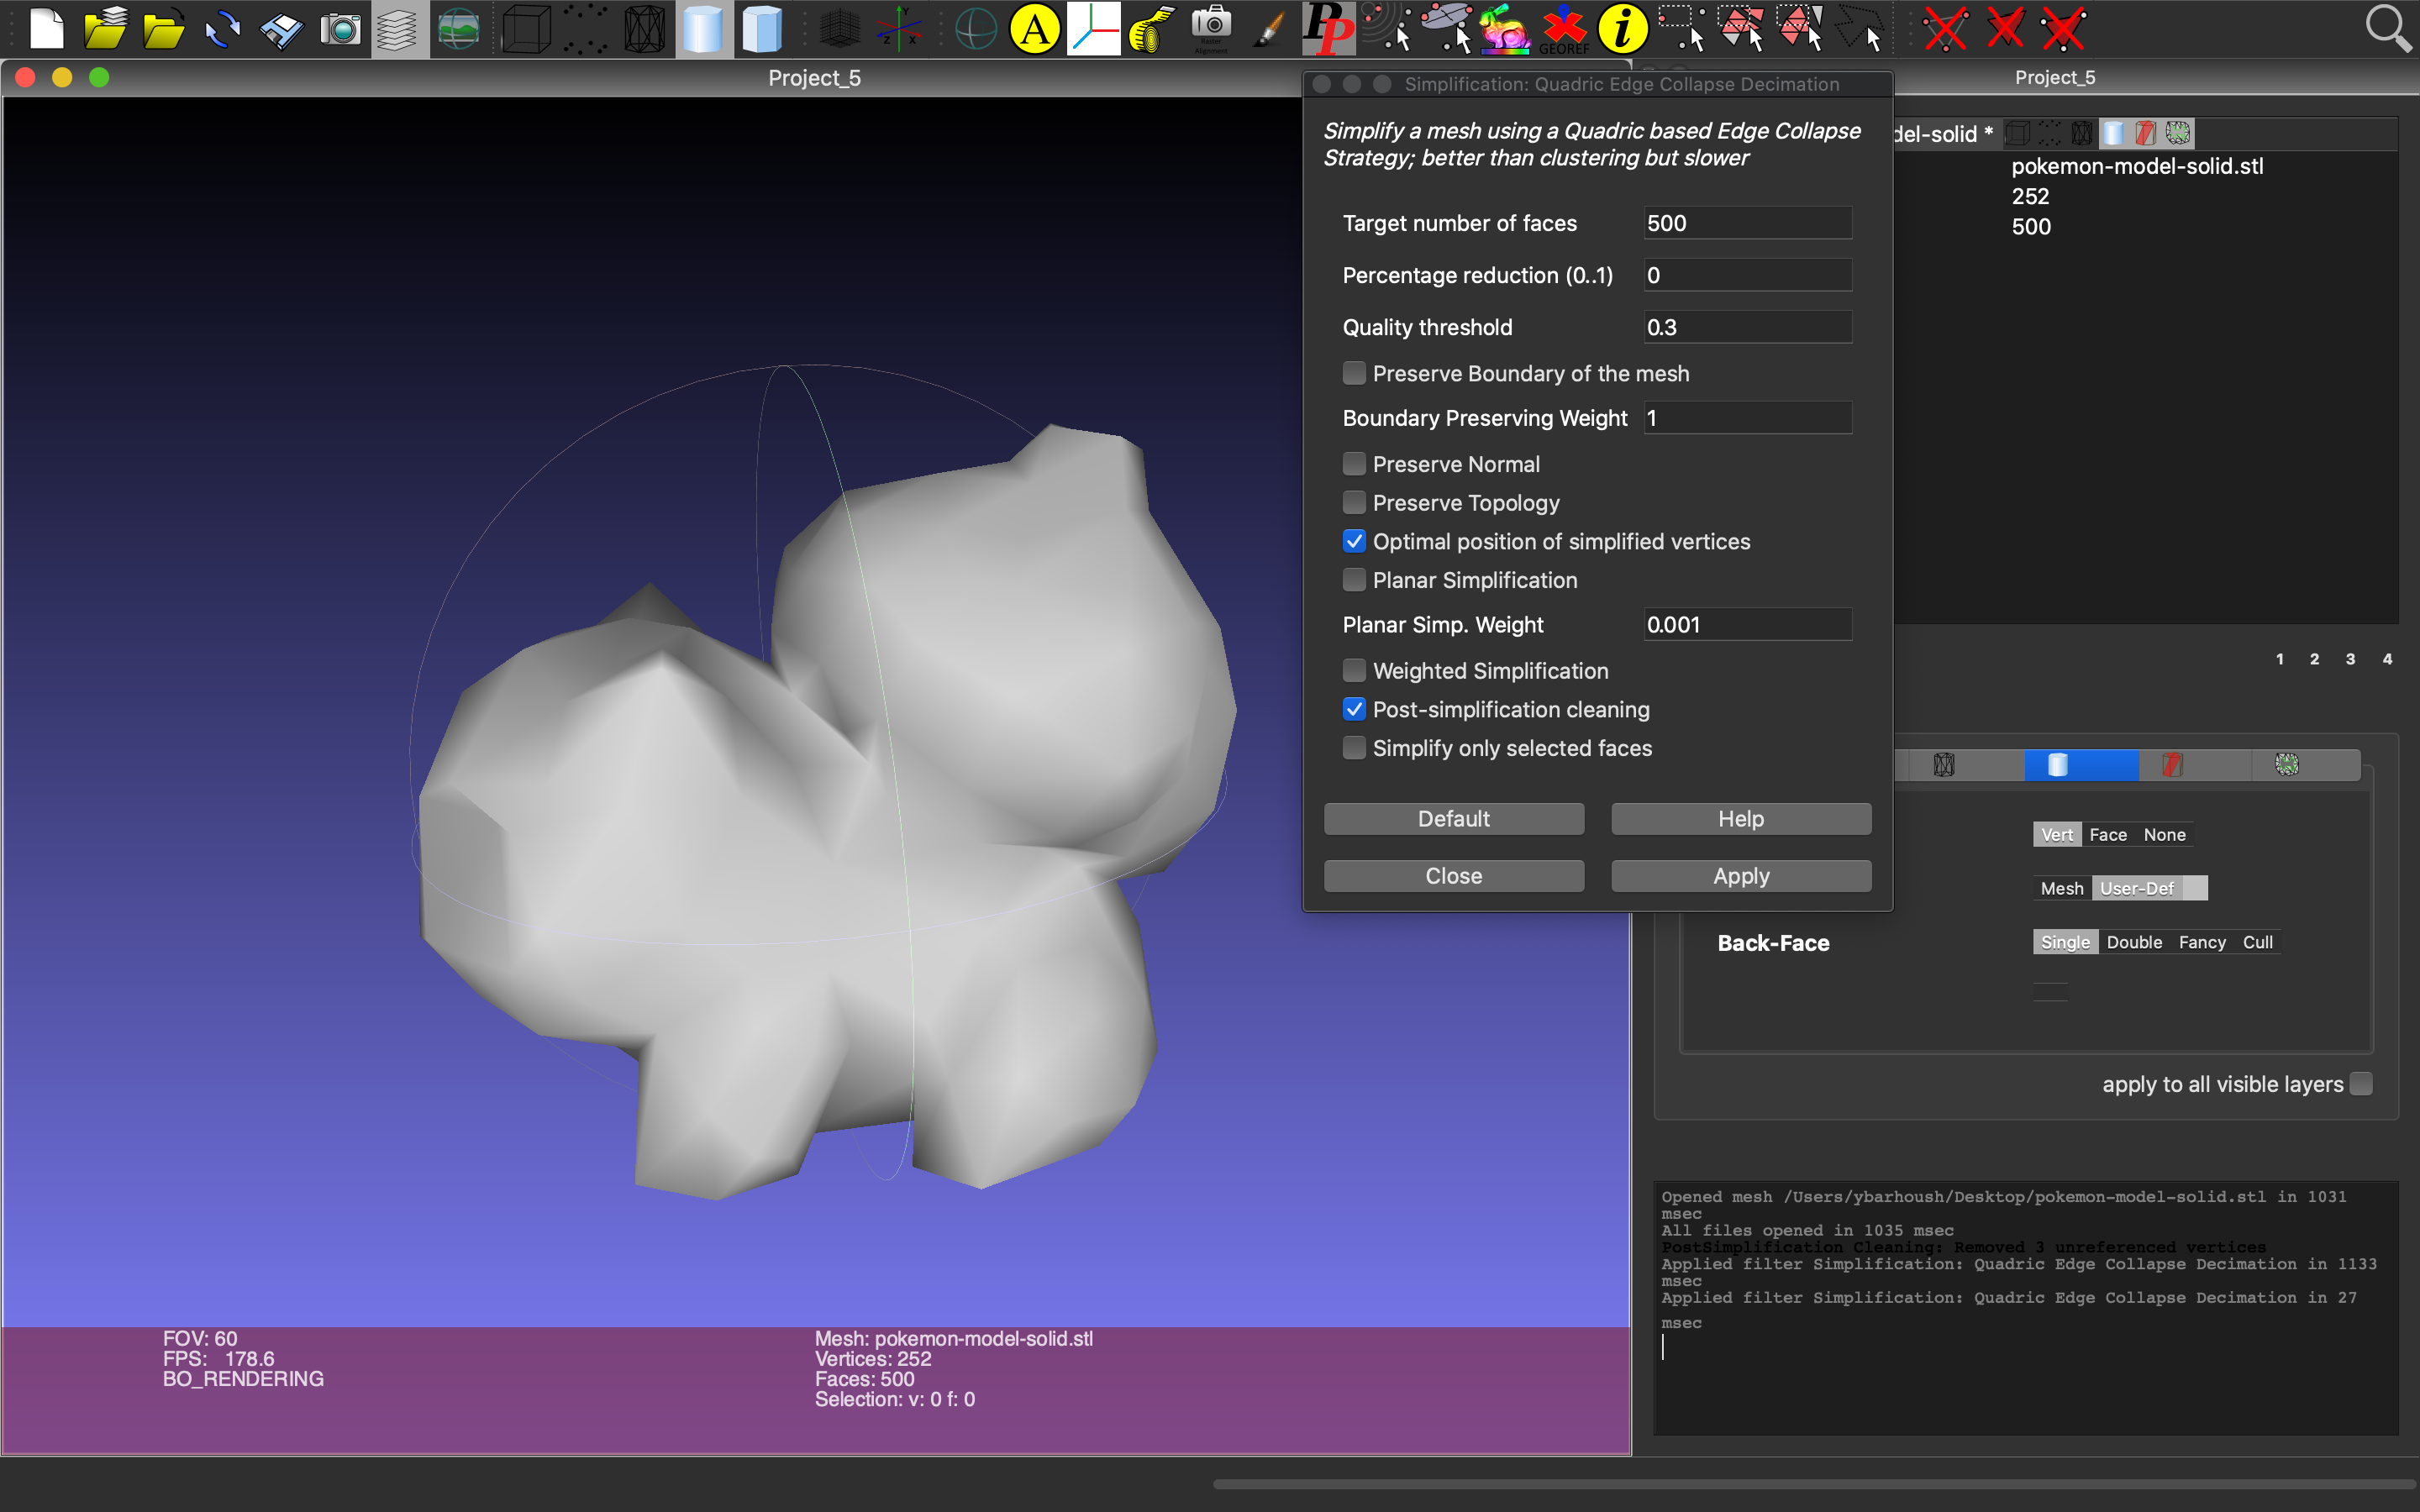
Making the Model Low-Poly
Warning
The model has around 125K faces! need to be reduced by half at least.
Meshlab can be used for this process.
Import the STL
File > Import Mesh…
Check the Face Count in the bottom,
To reduce the Face Count
Filters > Remeshing, Simplification, and Reconstruction > Simplification: Quadratic Edge Collapse Decimation
Making the Model Manifold
Meshlab can be used for this process.
“Quadratic Edge Decimation” from the previous section breaks manifoldness. To fix:
    Filter > Selection > Select Non-Manifold Edges
    Filter > Selection > Select Non-Manifold Vertices
Top-left corner should also have two boxes which should have a total of 4 zeros for “manifold”. To fix:
    Filter > Cleaning and Repairing > Remove Duplicate Faces
    Filter > Cleaning and Repairing > Remove Duplicate Vertex
    Filter > Cleaning and Repairing > Repair non Manifold Edges by removing faces
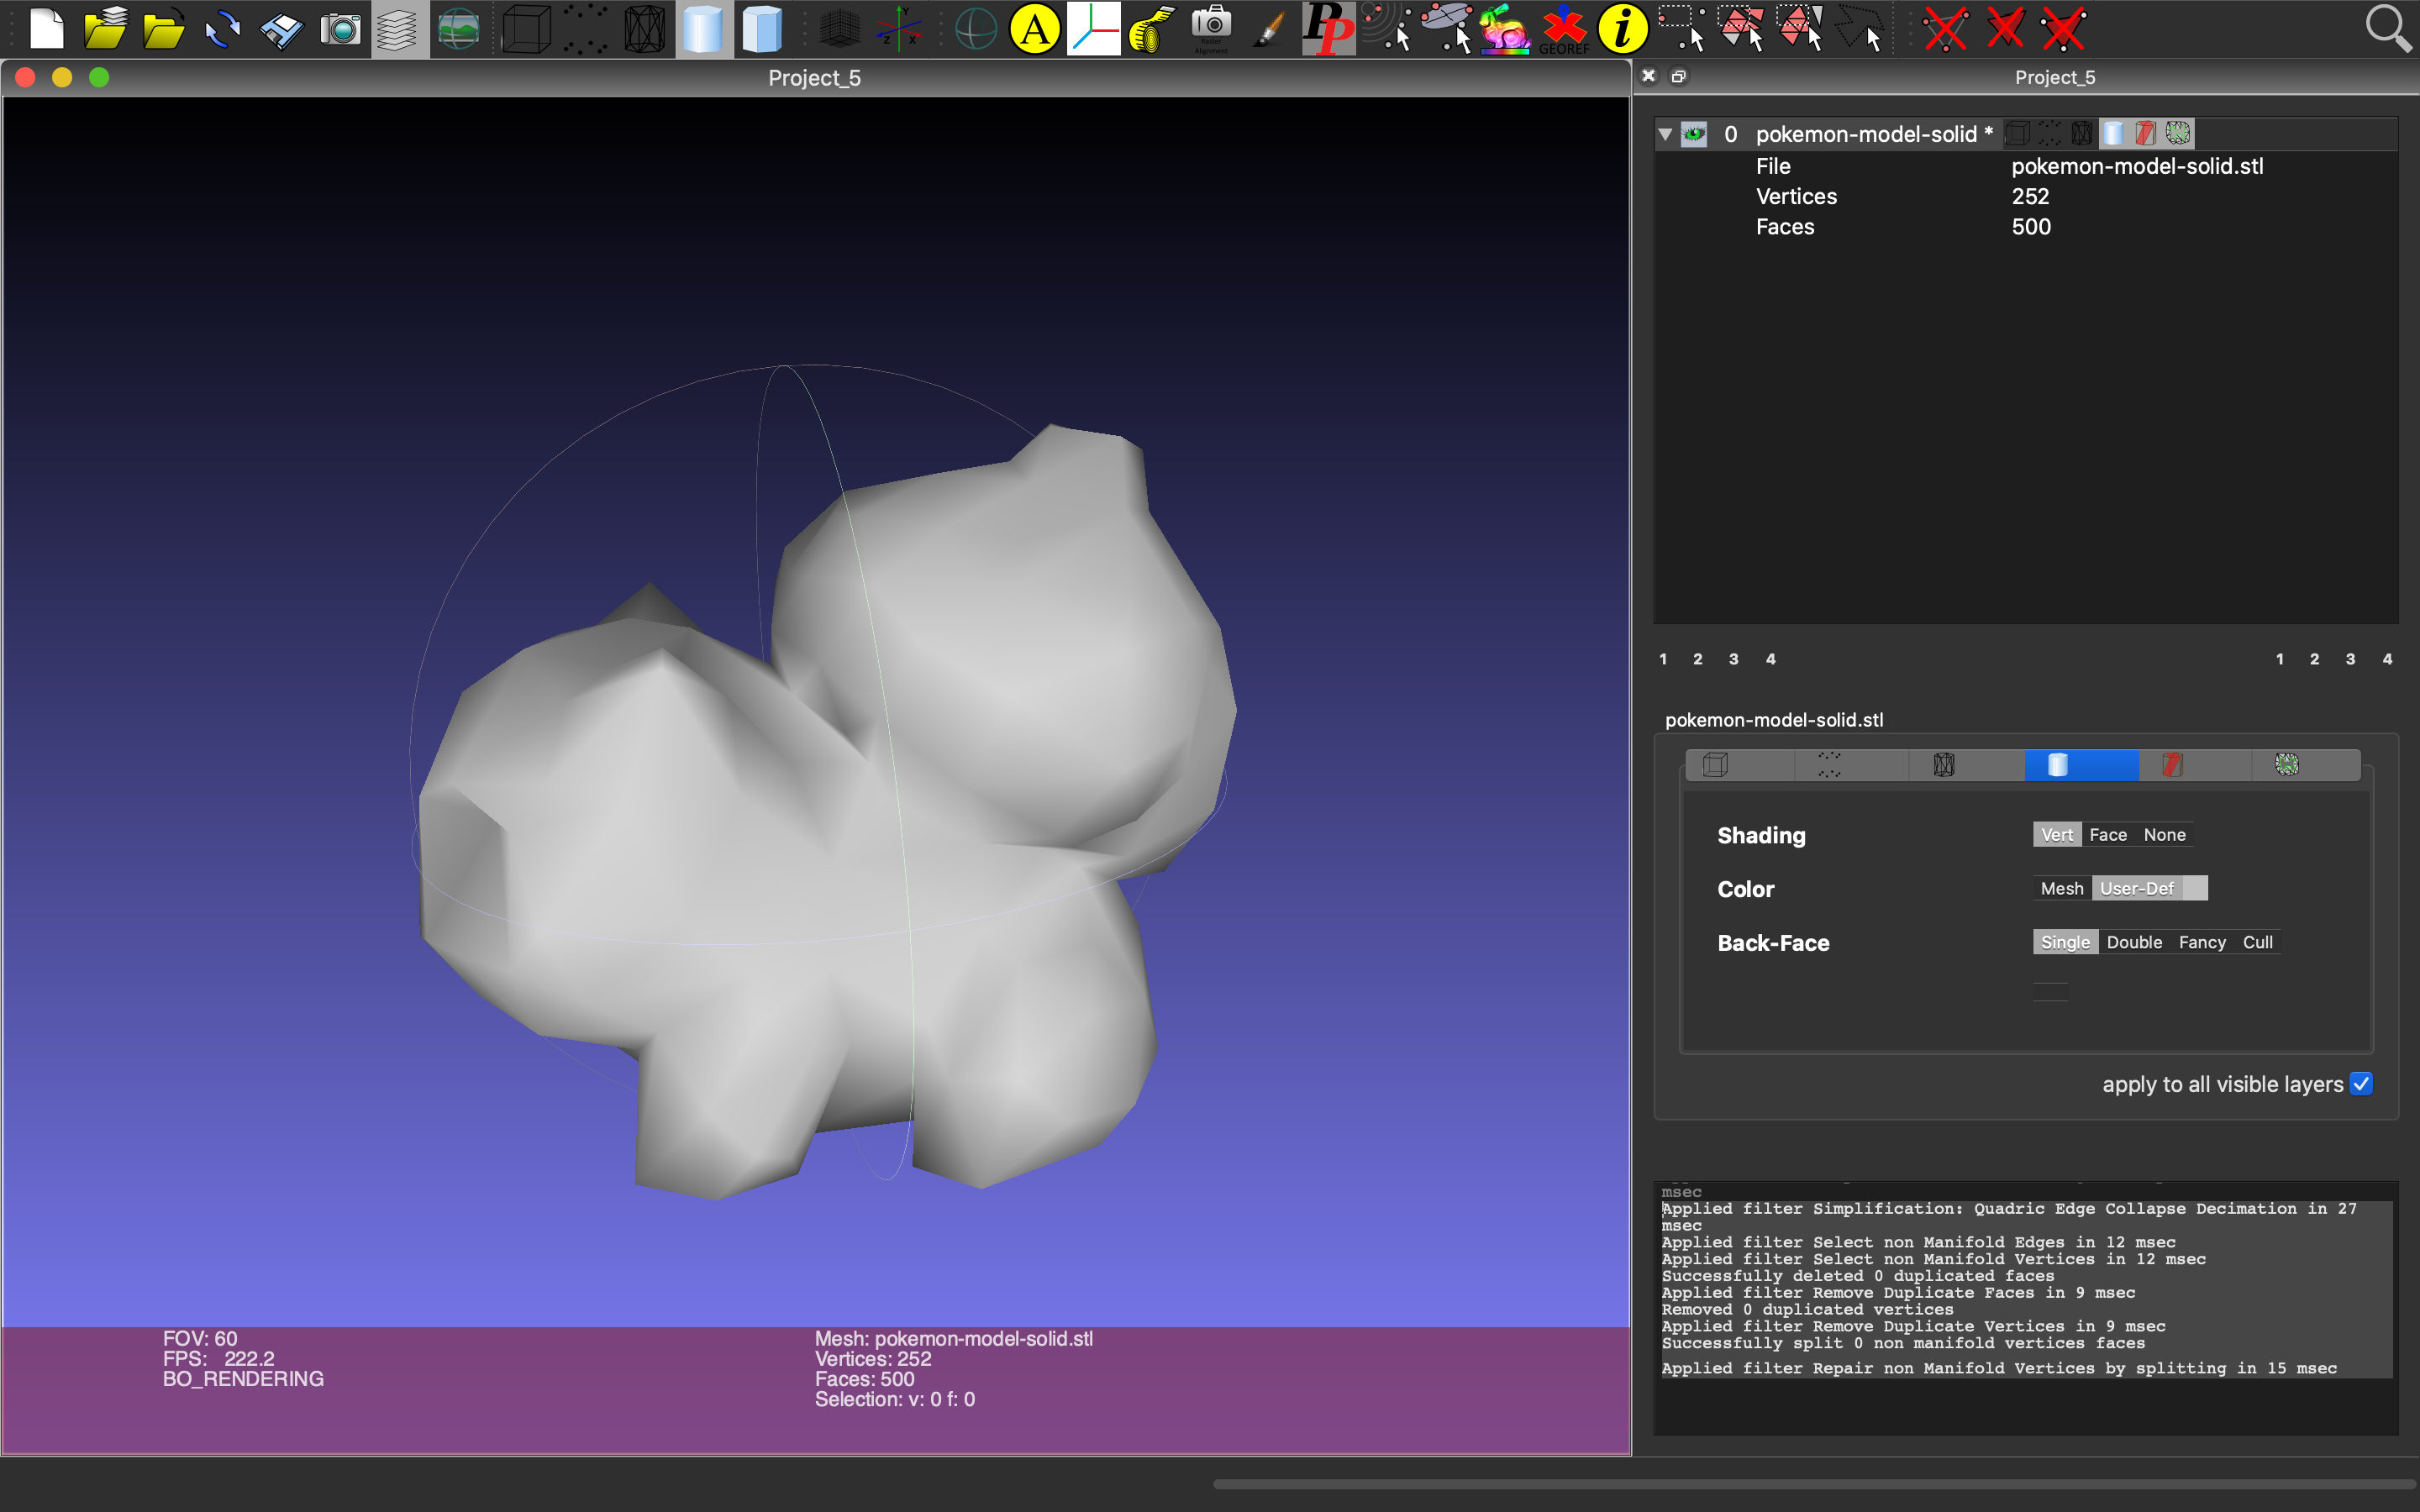
Tip
If the model is still not manifold, Netfabb Basic “Automatic Repair” can do the trick.
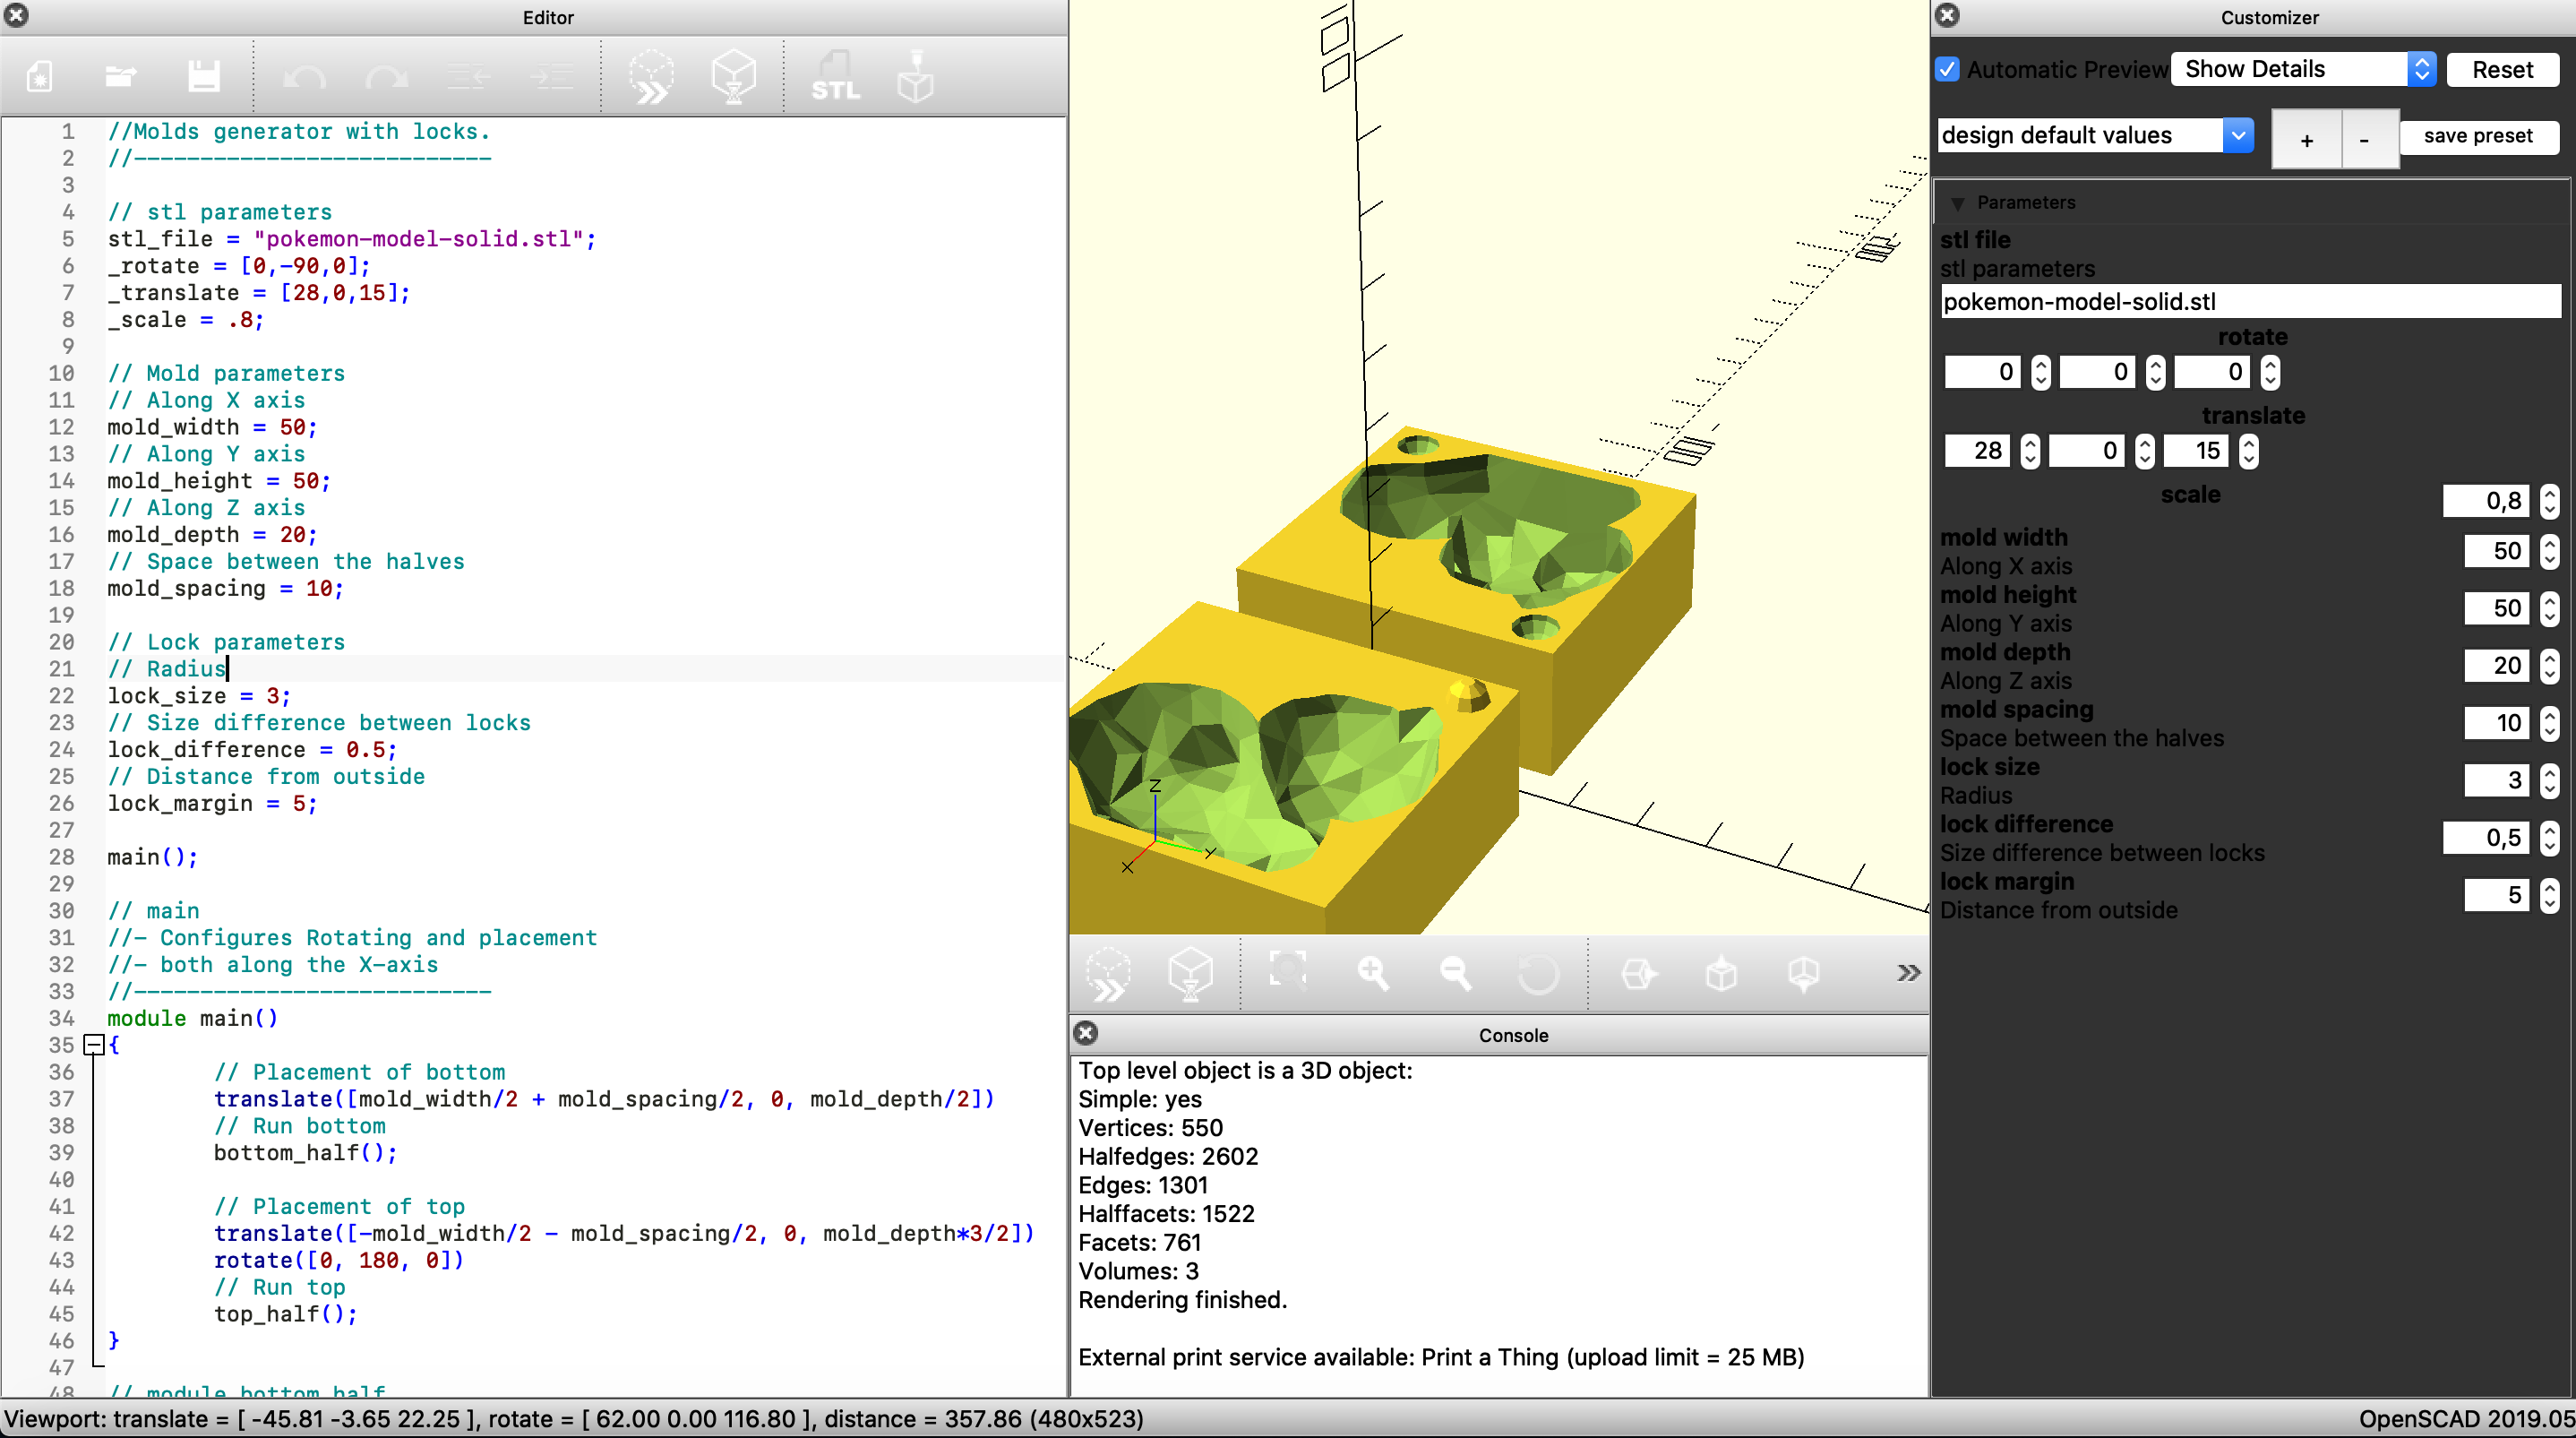
Preparing the Mold
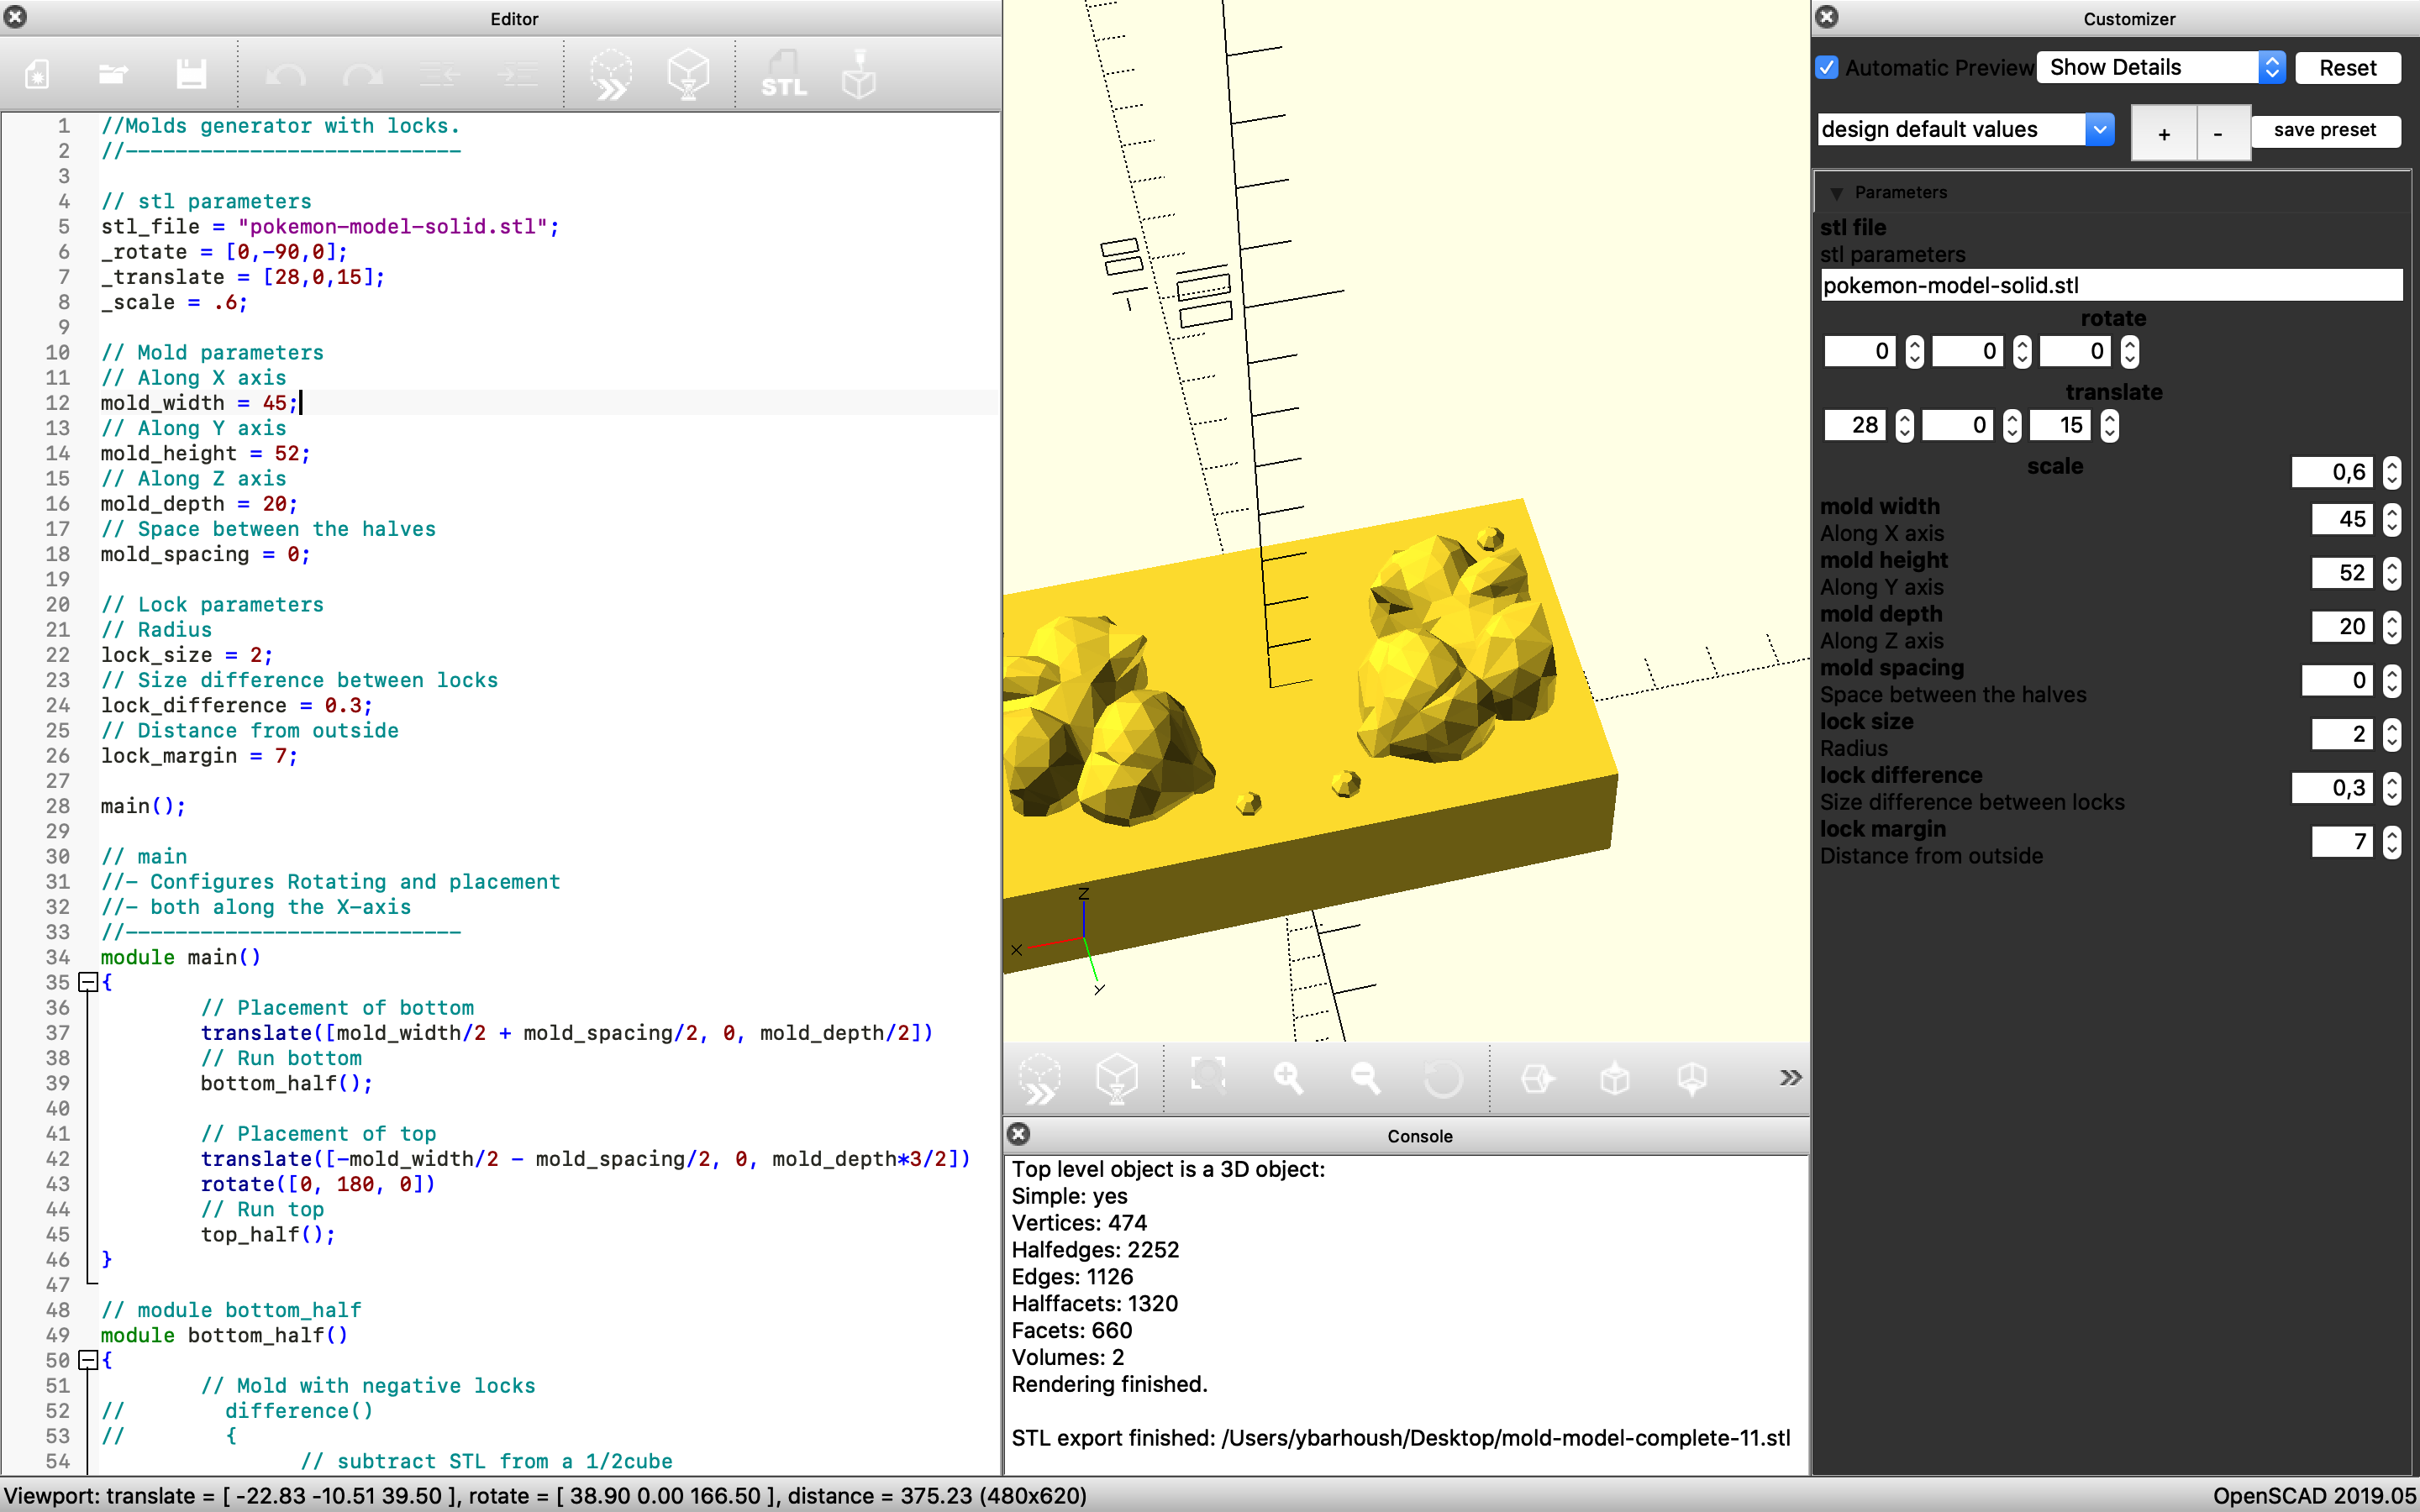
OpenSCAD can be used for this process.
A mold generation scad was written. Script:
//Molds generator with locks.
//---------------------------

// stl parameters
stl_file = "model.stl";
_rotate = [0,0,0];
_translate = [0,0,0];
_scale = 1;

// Mold parameters
// Along X axis
mold_width = 50;
// Along Y axis
mold_height = 60;
// Along Z axis
mold_depth = 14;
// Space between the halves
mold_spacing = 3;

// Lock parameters
// Radius
lock_size = 3;
// Size difference between locks
lock_difference = 0.5;
// Distance from outside
lock_margin = 5;

main();

// main
//- Configures Rotating and placement
//- both along the X-axis
//---------------------------
module main()
{
        // Placement of bottom
        translate([mold_width/2 + mold_spacing/2, 0, mold_depth/2])
        // Run bottom
        bottom_half();

        // Placement of top
        translate([-mold_width/2 - mold_spacing/2, 0, mold_depth*3/2])
        rotate([0, 180, 0])
        // Run top
        top_half();
}

// module bottom_half
module bottom_half()
{
        // Mold with negative locks
        difference()
        {
                // subtract STL from a 1/2cube
                difference()
                {
                        difference()
                        {
                                cube(size = [mold_width, mold_height, mold_depth],
                                center = true);
                                scale(_scale)
                                translate(_translate)
                                rotate(_rotate)
                                import(stl_file);
                        }
                }
        }

        // Positive lock 1
        translate(v = [-mold_width/2 + lock_margin, mold_height/2 - lock_margin, mold_depth/2])
        sphere(r = lock_size);

        // Positive lock 2
        translate(v = [mold_width/2 - lock_margin, -mold_height/2 + lock_margin, mold_depth/2])
        sphere(r = lock_size);
}

// module top_half
module top_half()
{
        // Create the mold form with negative locks
        difference()
        {
                // subtract STL from a 1/2cube
                difference()
                {
                        translate([0, 0, mold_depth])
                        cube(size = [mold_width, mold_height, mold_depth],
                        center = true);
                        scale(_scale)
                        translate(v = _translate)
                        rotate(_rotate)
                        import(stl_file);
                }

        // Negative lock 1
        translate(v = [mold_width/2 - lock_margin, -mold_height/2 + lock_margin, mold_depth/2])
        sphere(lock_size + lock_difference);

        // Negative lock 2
        translate(v = [-mold_width/2 + lock_margin, mold_height/2 - lock_margin, mold_depth/2])
        sphere(lock_size + lock_difference);
        }
}
Change model_filename to the name of the STL and configure the parameters.
A render a view of the Script.
Note
This script creates a negative of the stl and subtracts from two halves. Change parameters to get optimal results.
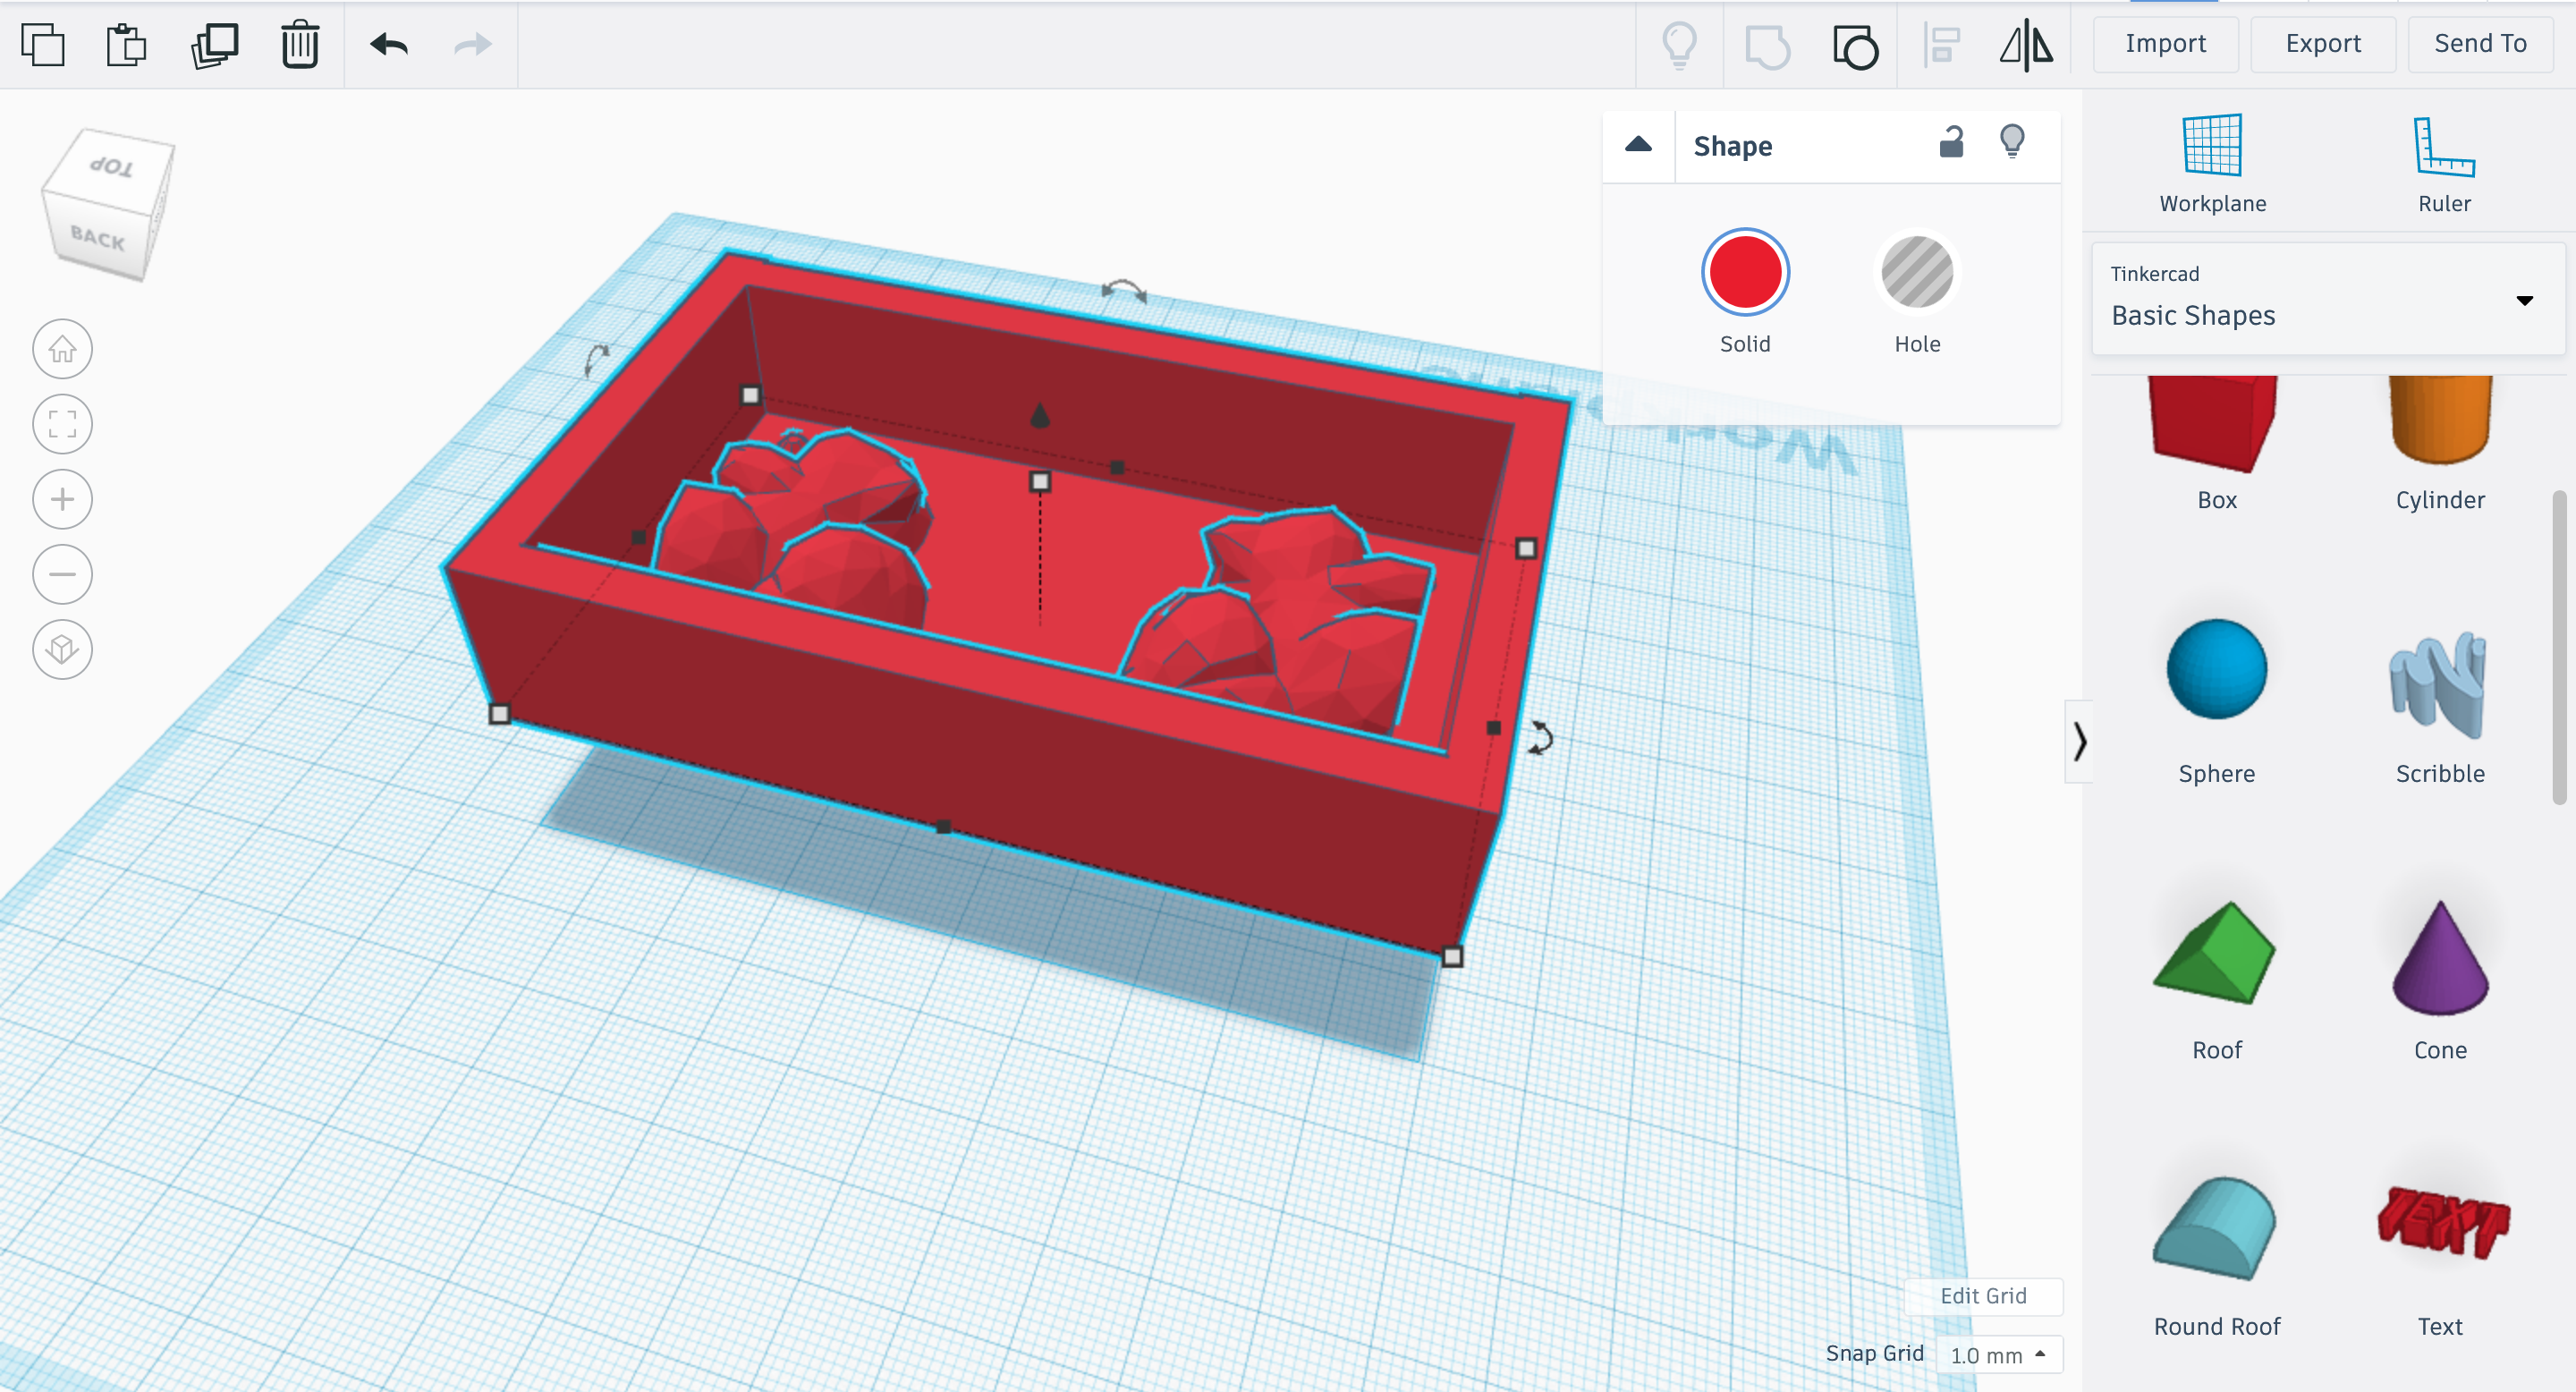
Warning
A negative of the stl and subtracting from two halves produces a positive mold! The following steps suggest a quick fix.
The script was modified, by commenting out the subtraction processes (difference() function in the code).
To make the mold negative, Tinkercad was used to make quick modifications.
Cubes were added to make “walls”, with 5mm width. The bottom was also removed using a hollow Cube. All were combined by using Group.
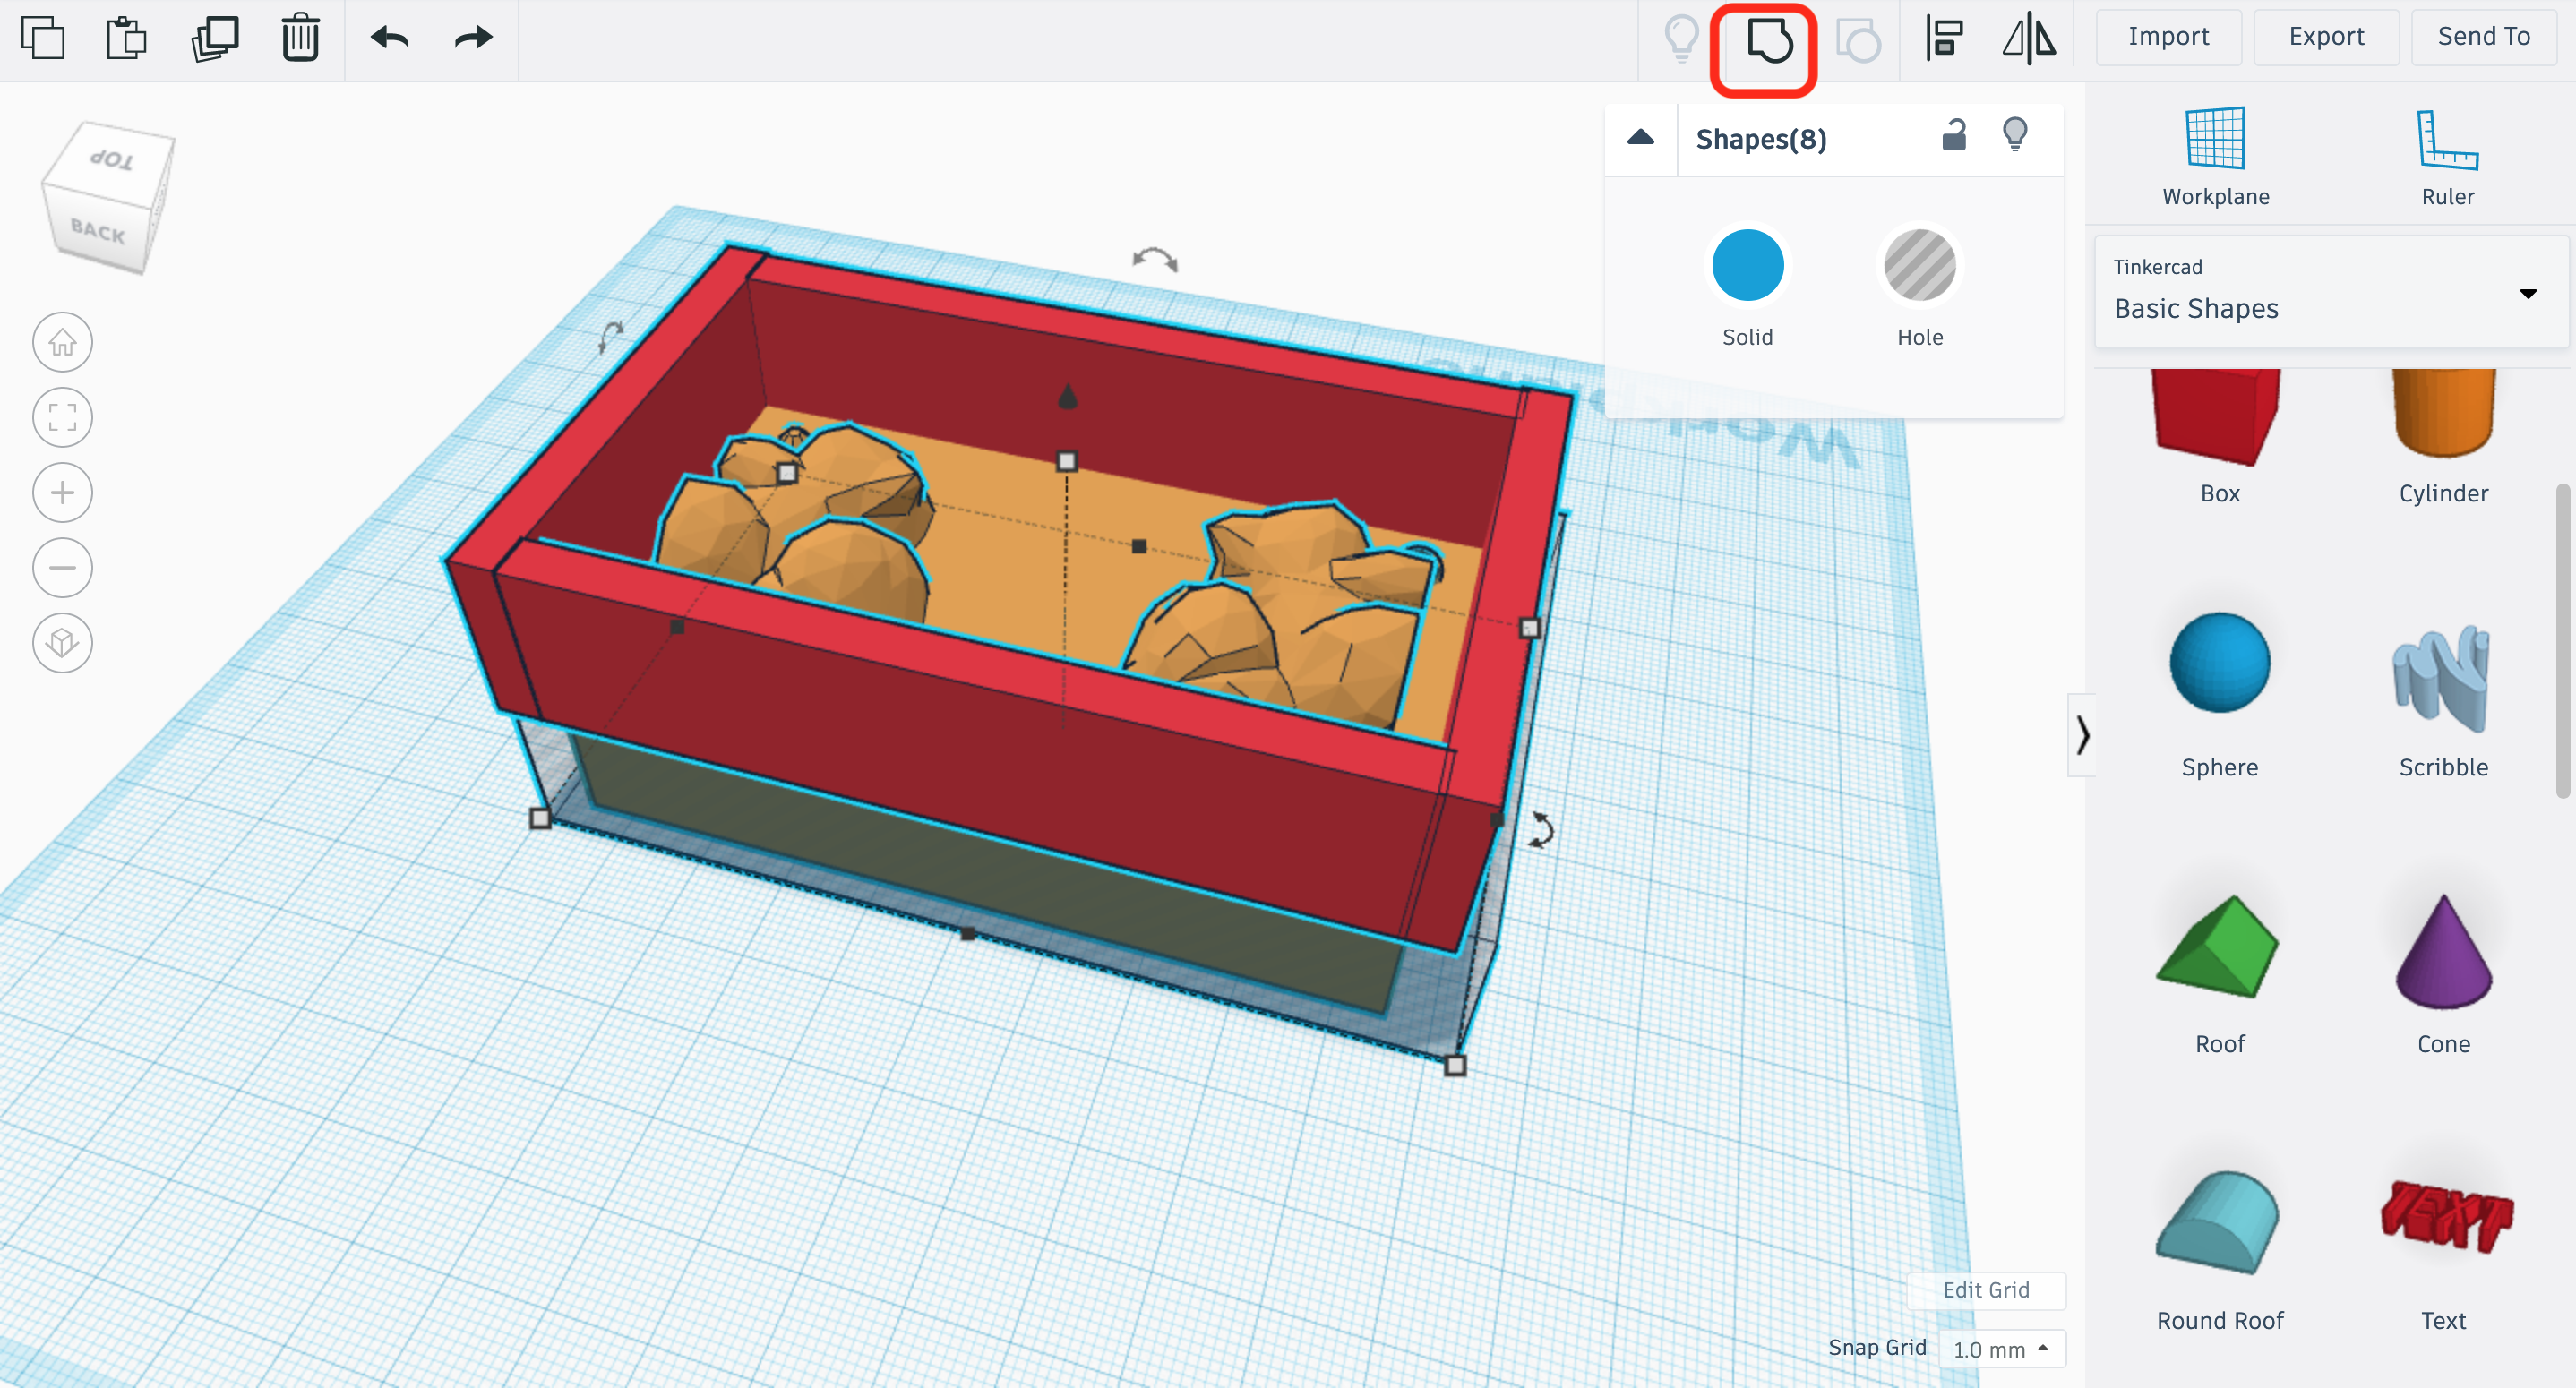
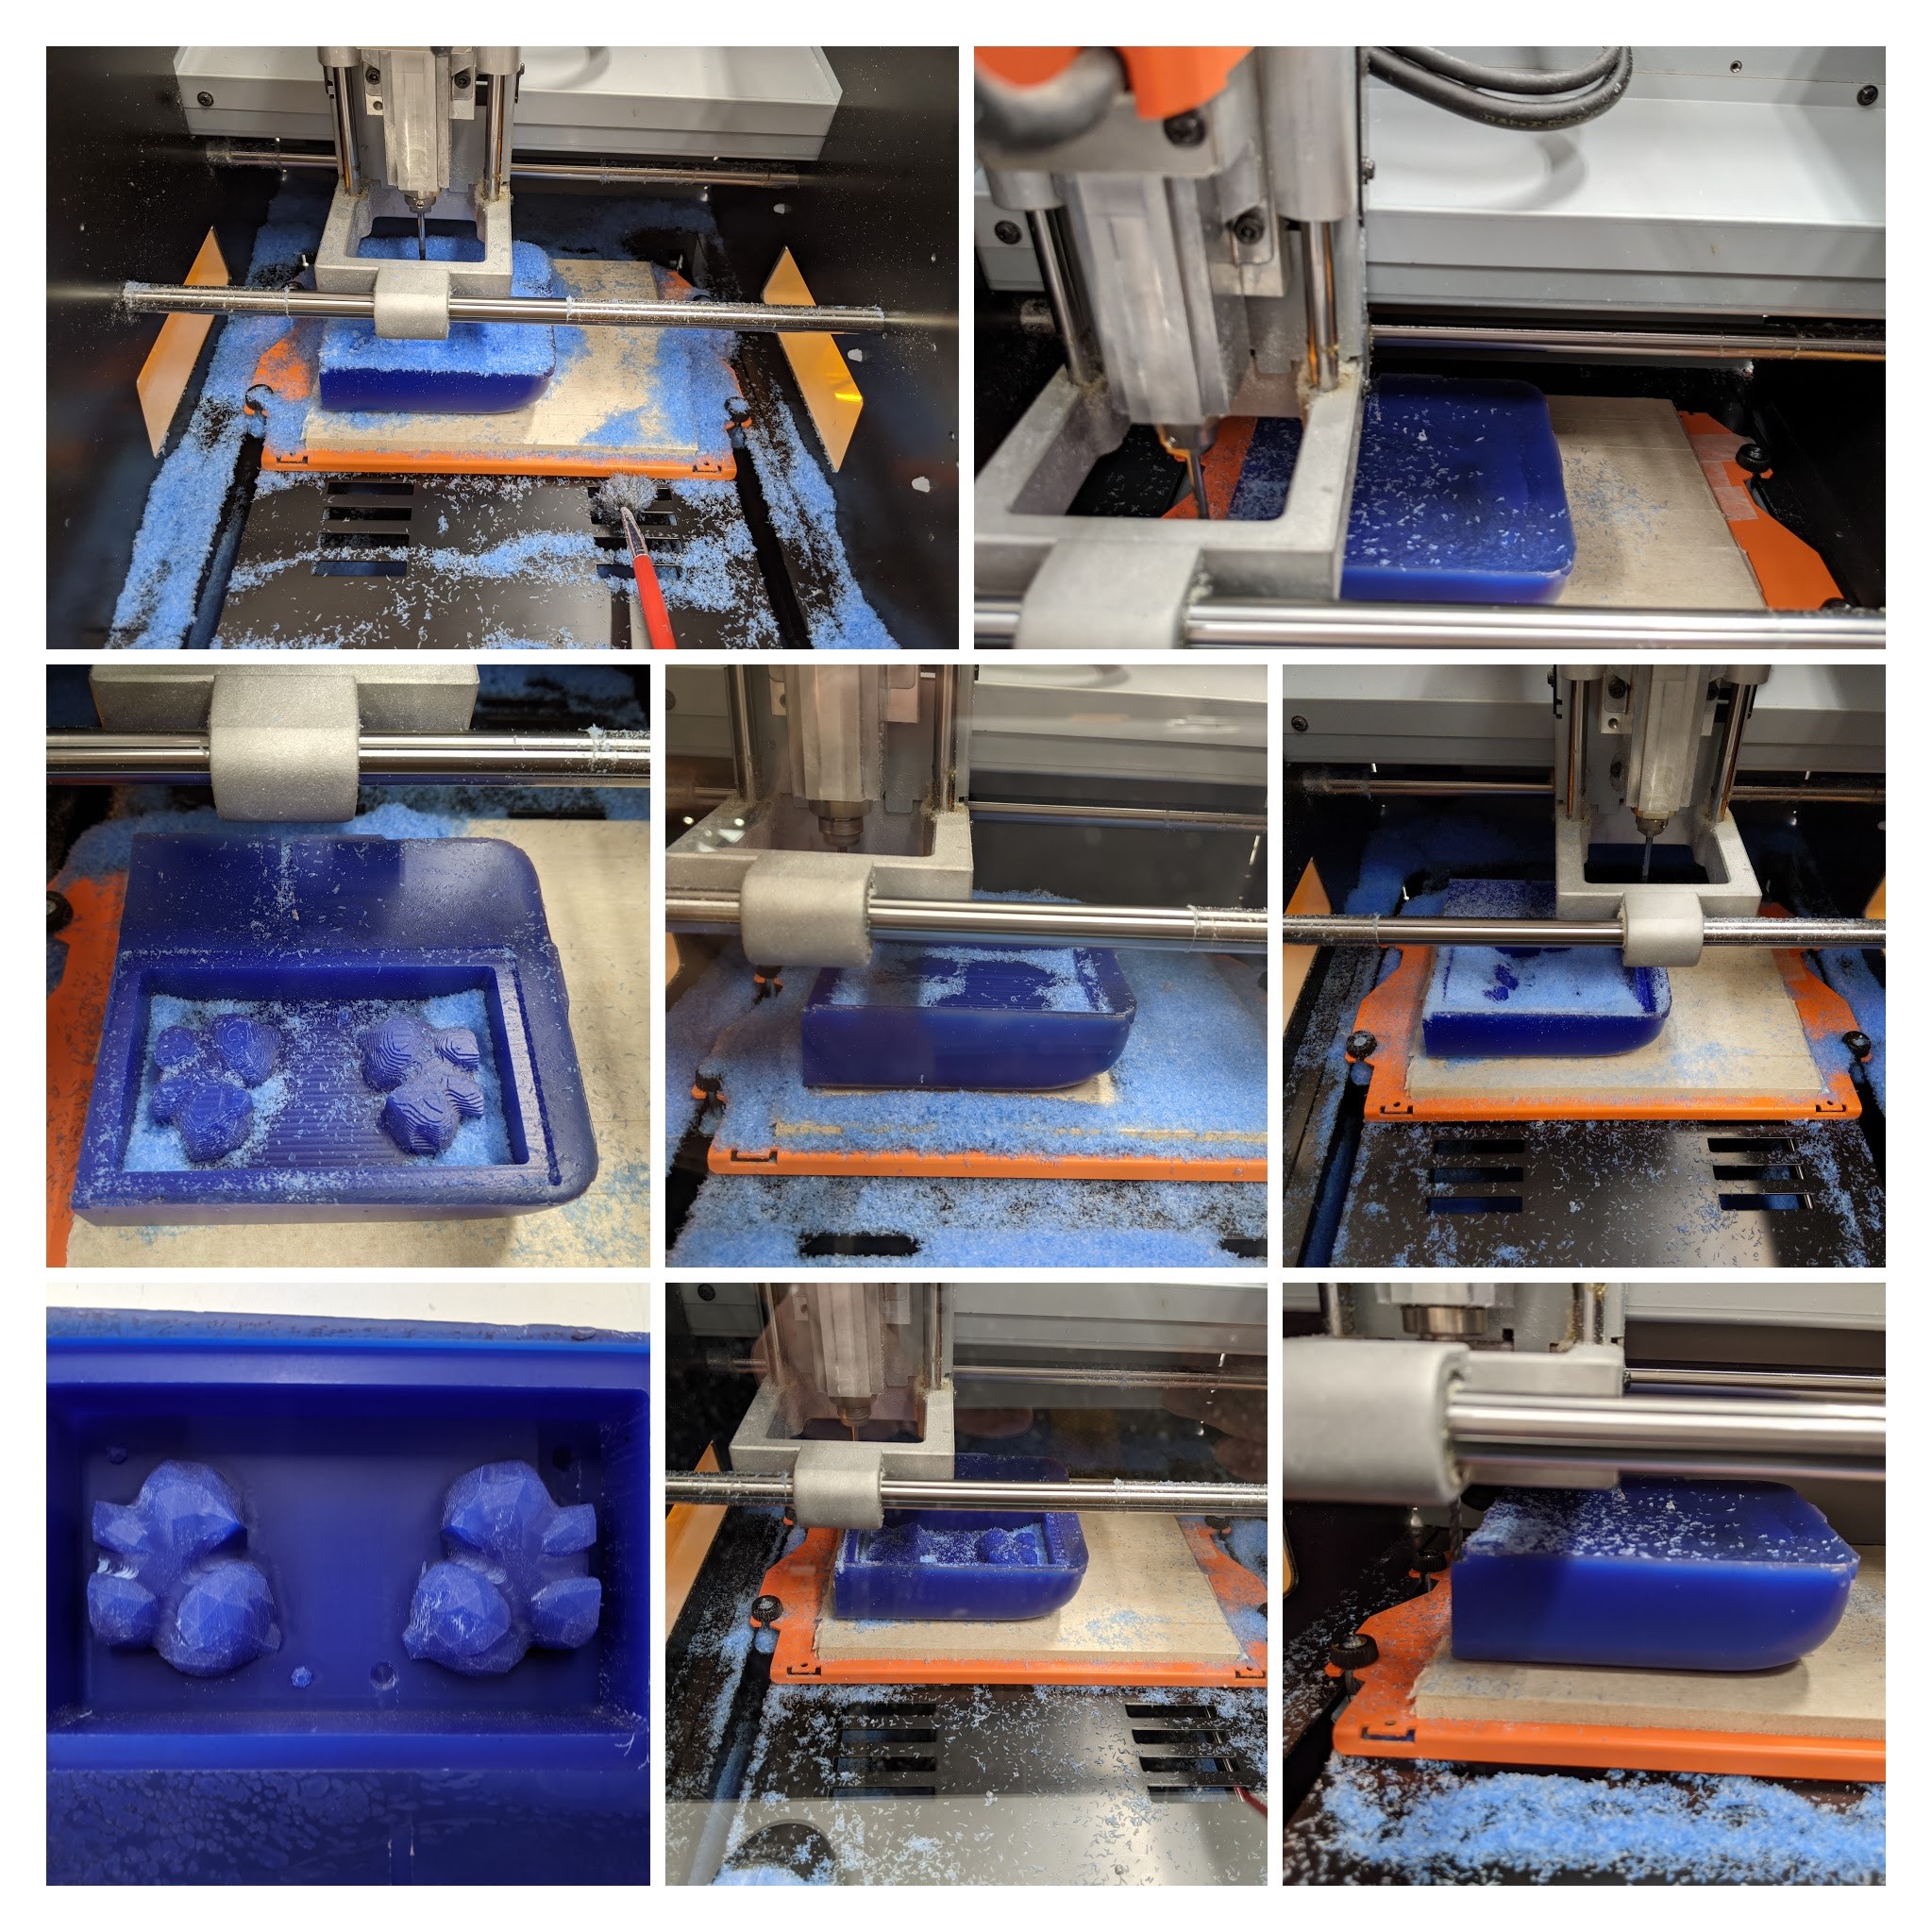
Final STL Outcome
Milling the Mold
Generate Milling Path
MODELA Player can be used.
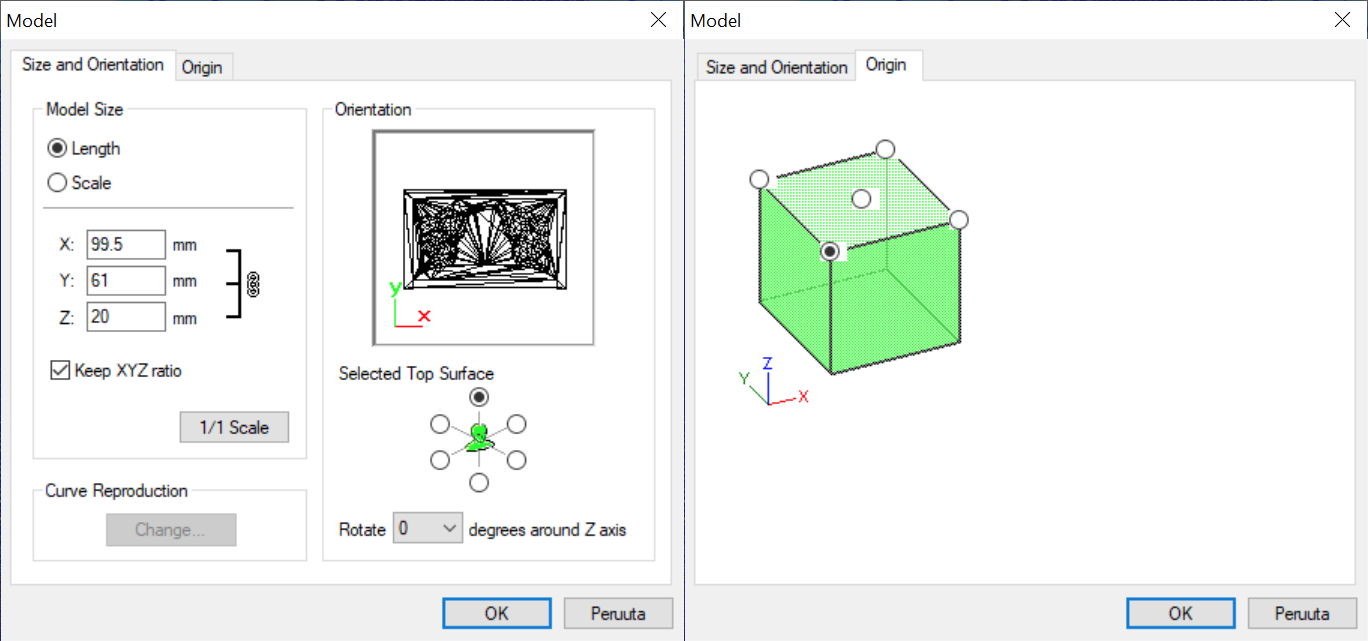
Import the STL file of the mold and adjust the orientation and origin.
Set > Model
Set the 1) Size and Orientation and 2) Origin
Select material as “milling wax”
Generate Roughing paths
Set > New Process > Roughing
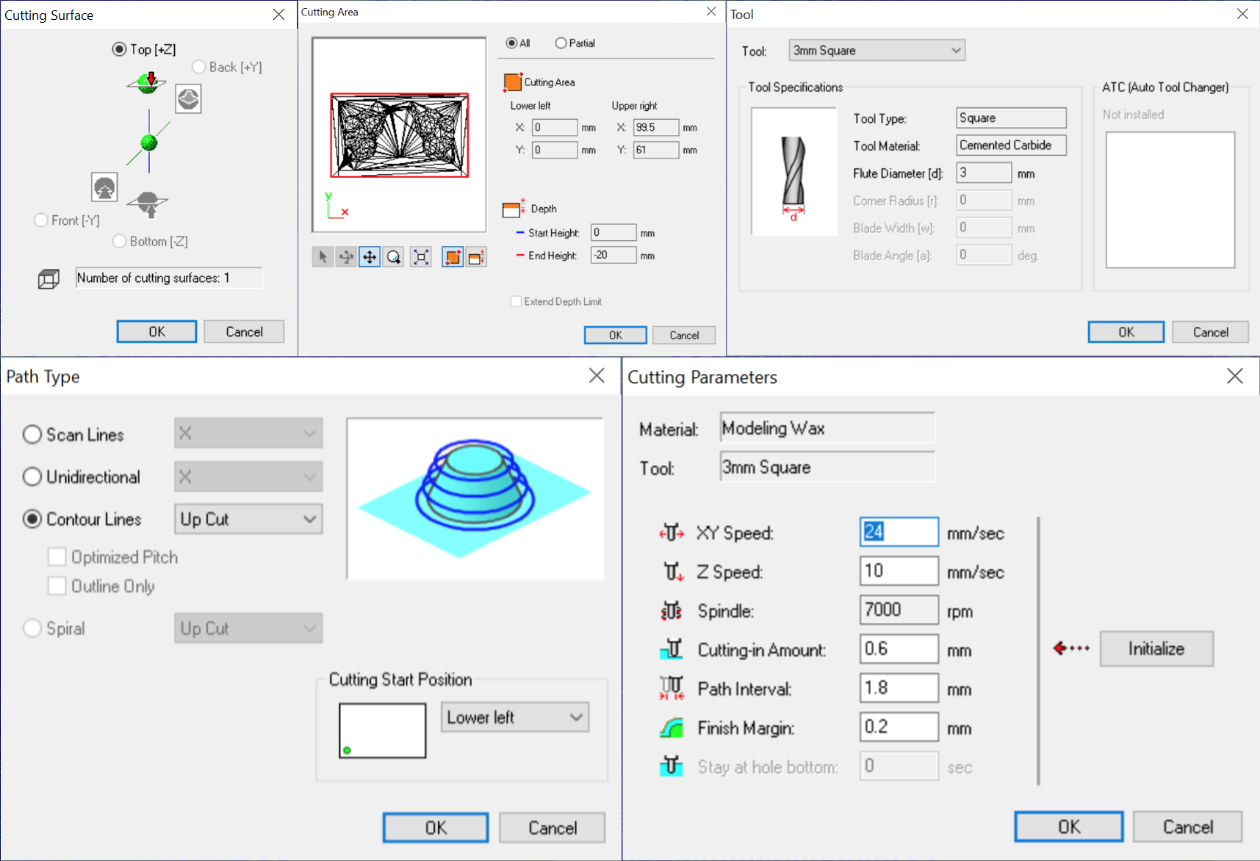
Result Paths:
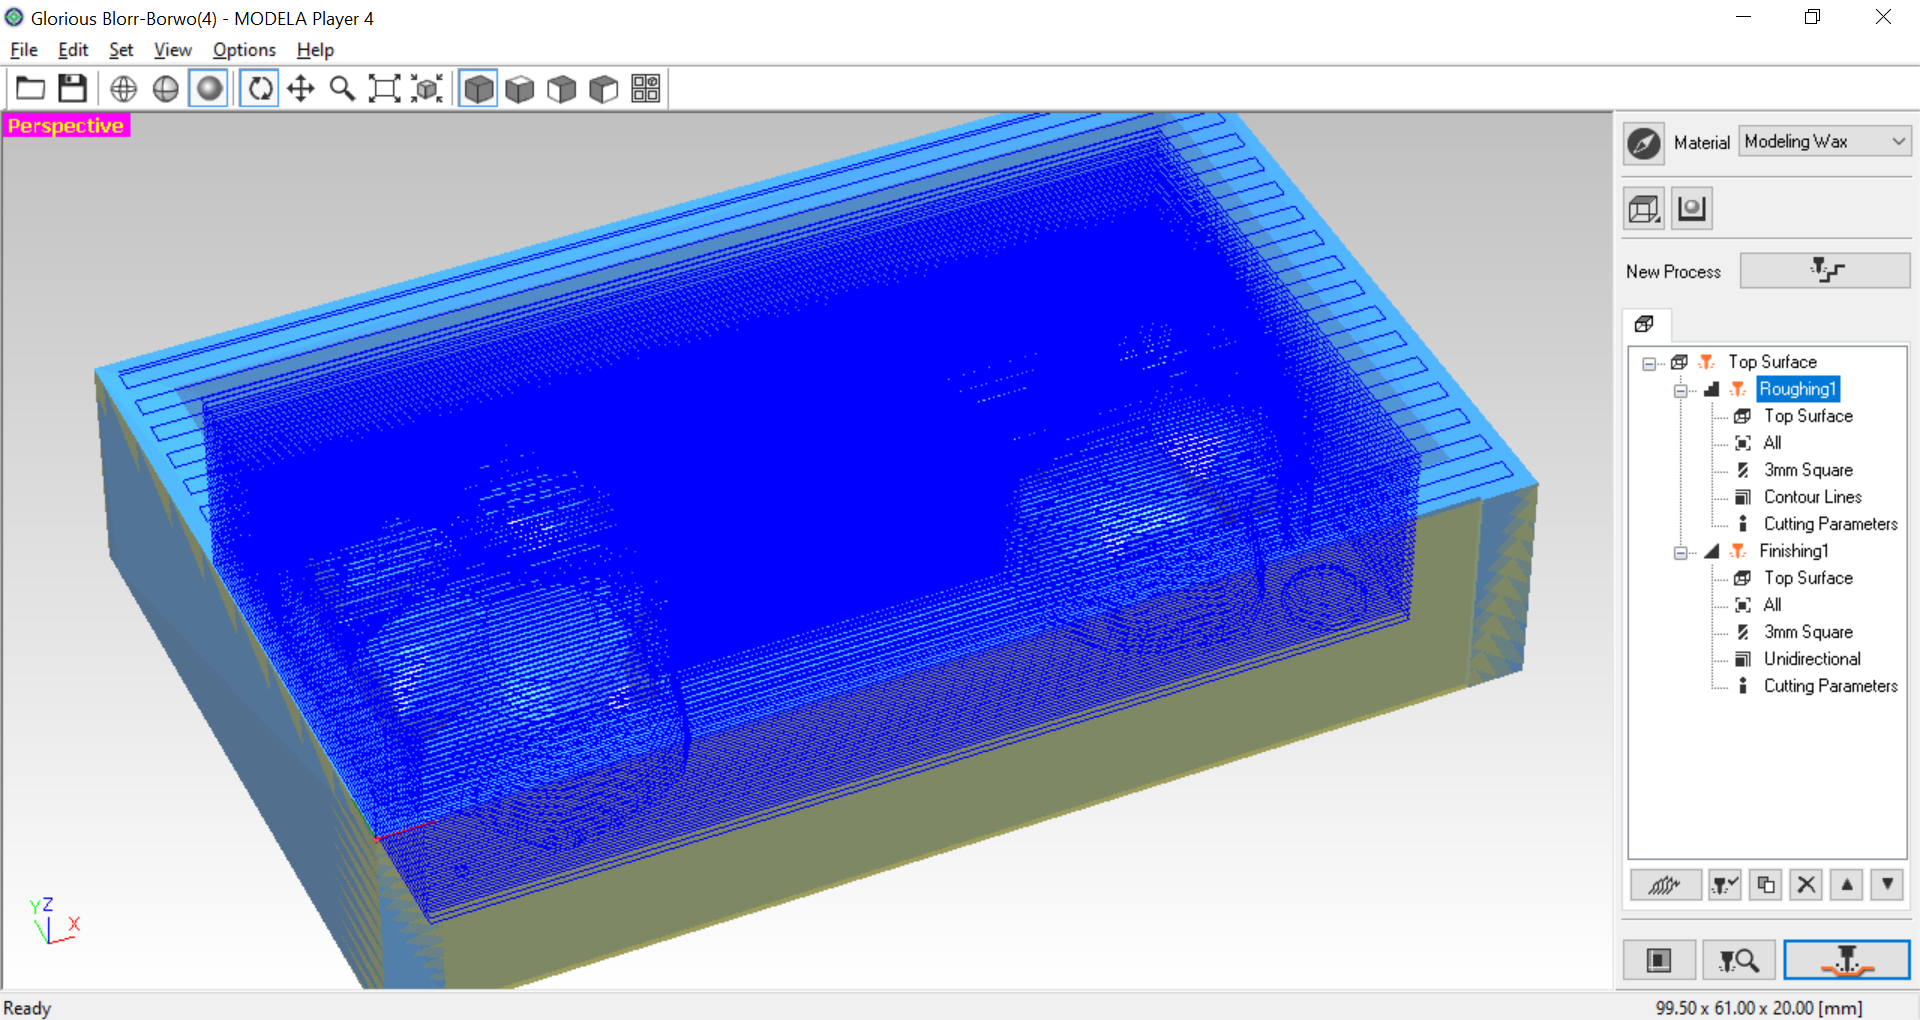
Generate Finishing paths
Set > New Process > Finishing
Result Paths:
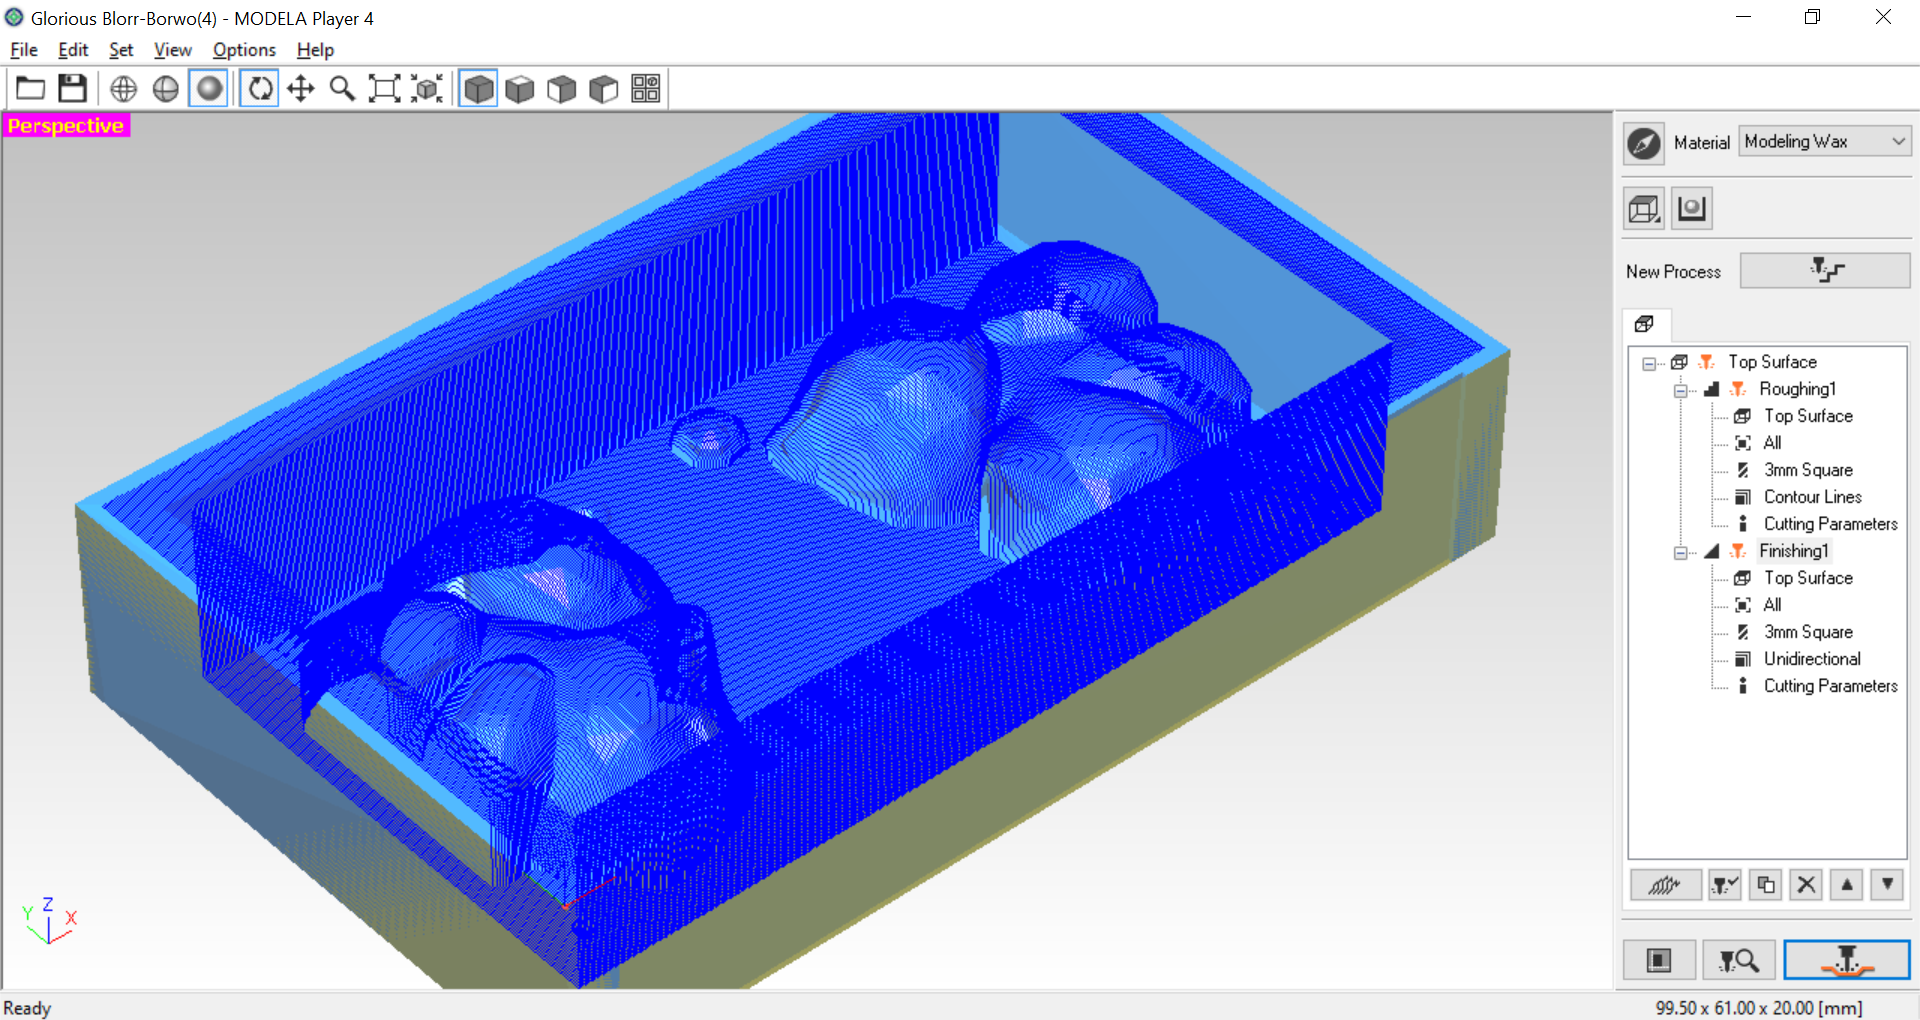
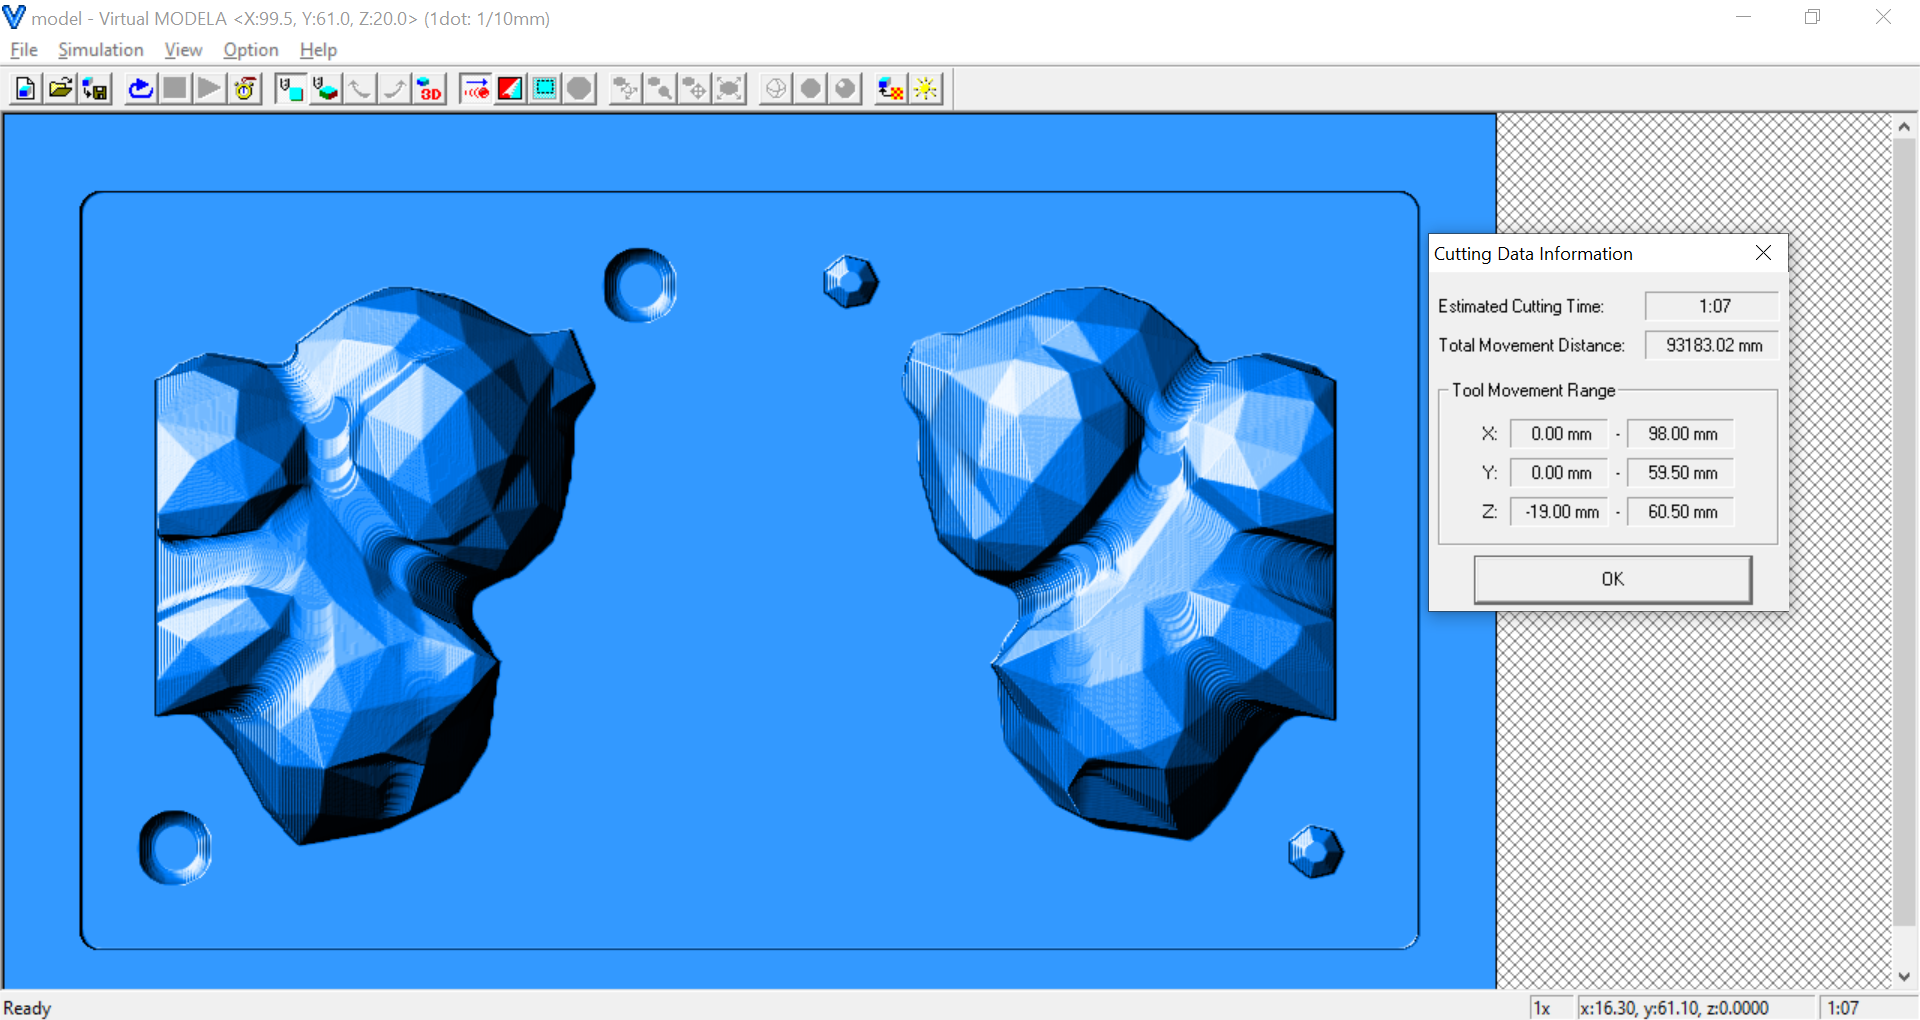
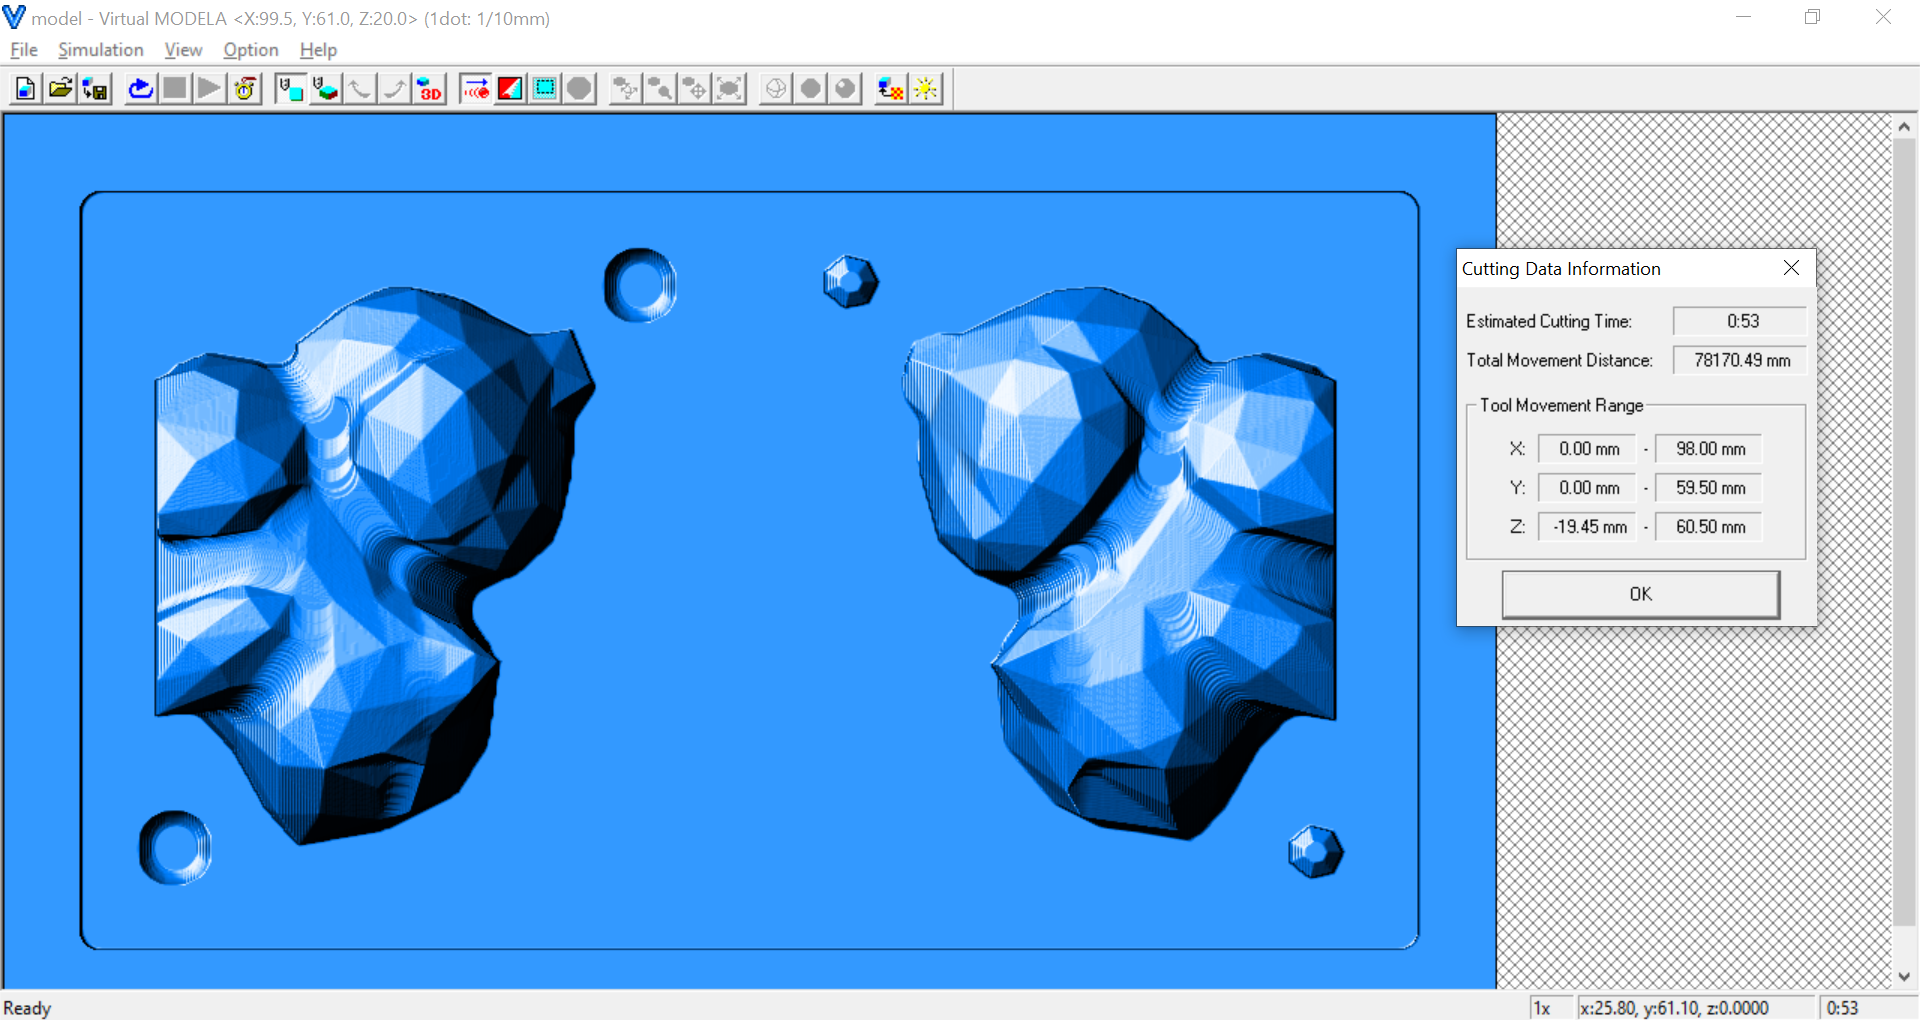
Select “Preview Cutting” to simulate the milling process.
File > Preview Cutting
Roughing Simulation
Finishing Simulation
Milling the Wax mold
Fix the block on the milling platform, with either hot glue gun or with double-sided tapes. More details about the SRM-20 machine can be found in previous weeks. See Electronic Design Board or Input Devices Week.
Casting the Parts
Material Choice
Smooth-Sil™ 940 Food safe silicone was chosen to cast the mold.
https://www.smooth-on.com/products/smooth-sil-940/
Mixing the Material
Warning
Use safety gear in molding!
-
Mix Smooth-Sil Part (A) and Part (B) … the ratio of 10 (A):1 (B). In grams, that would be 90.9g to 9.1g!
-
Stir the mixture for 2 minutes.
-
Remove the air/bubbles from the mixture by placing it into a vacuum chamber for 3-5 minutes.
-
Pour the mixture into the mold carefully.
-
Wait 24 hours, the mold is ready!
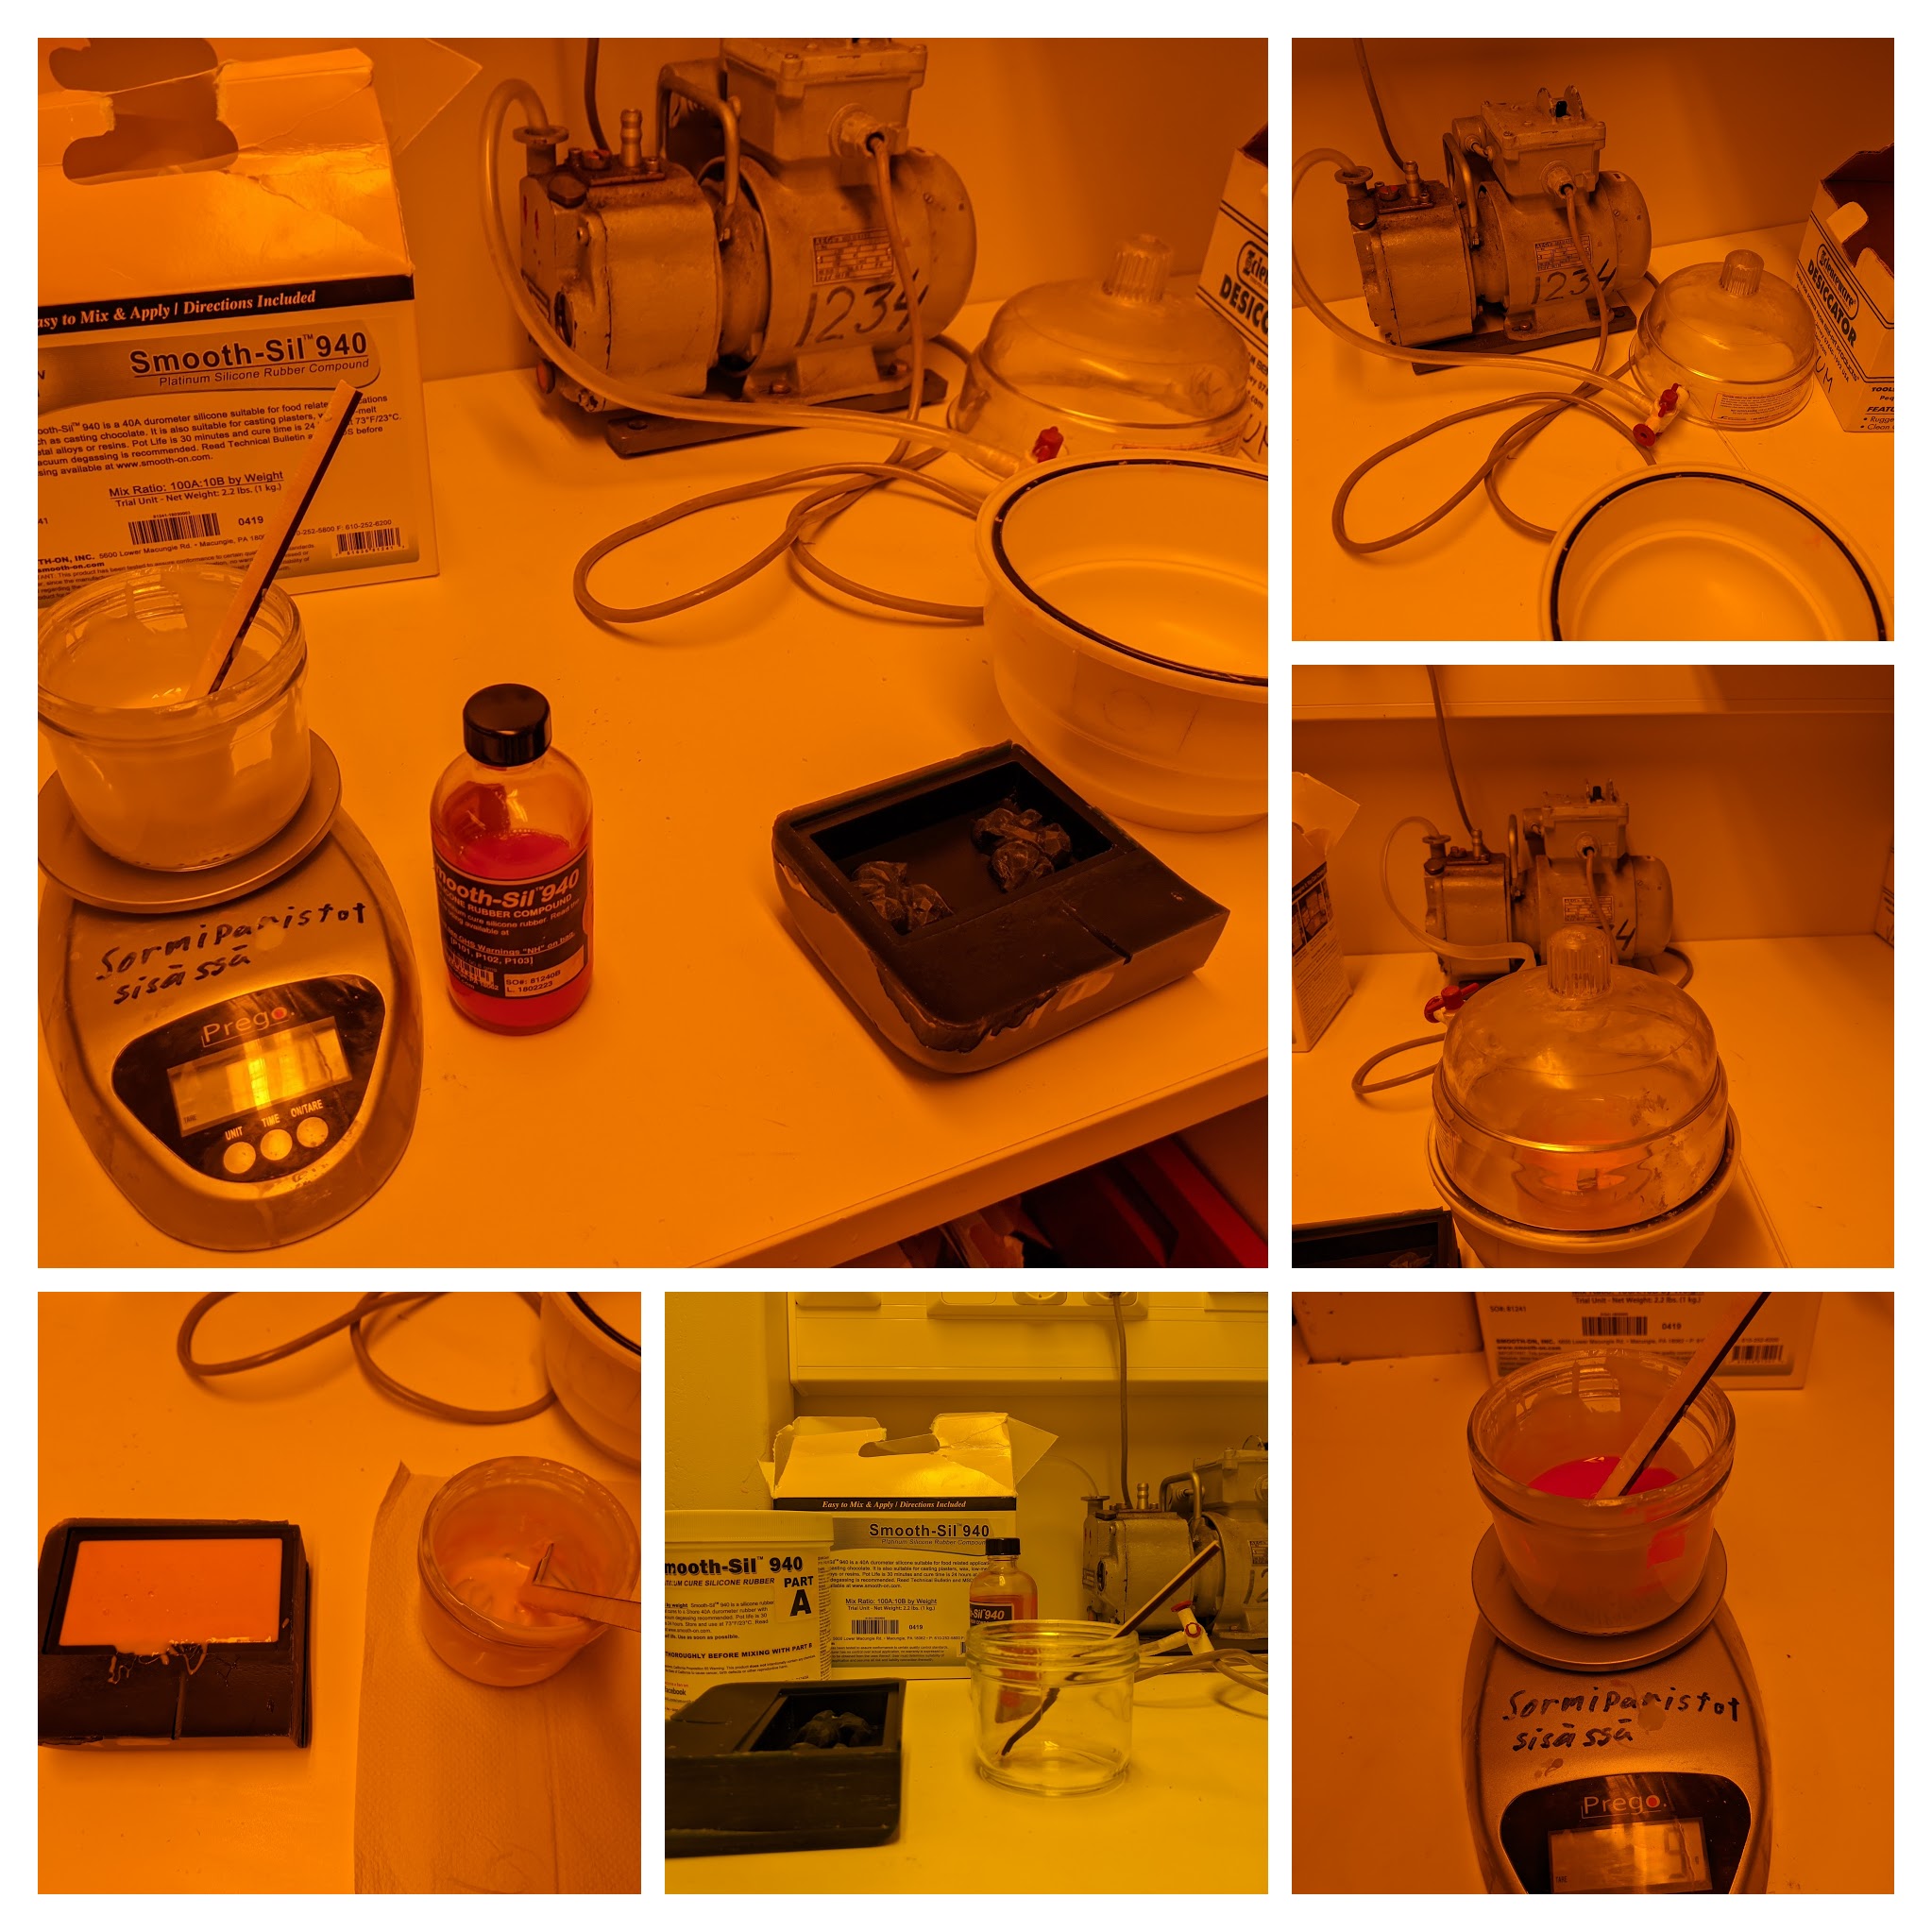
Final Silicone Mold
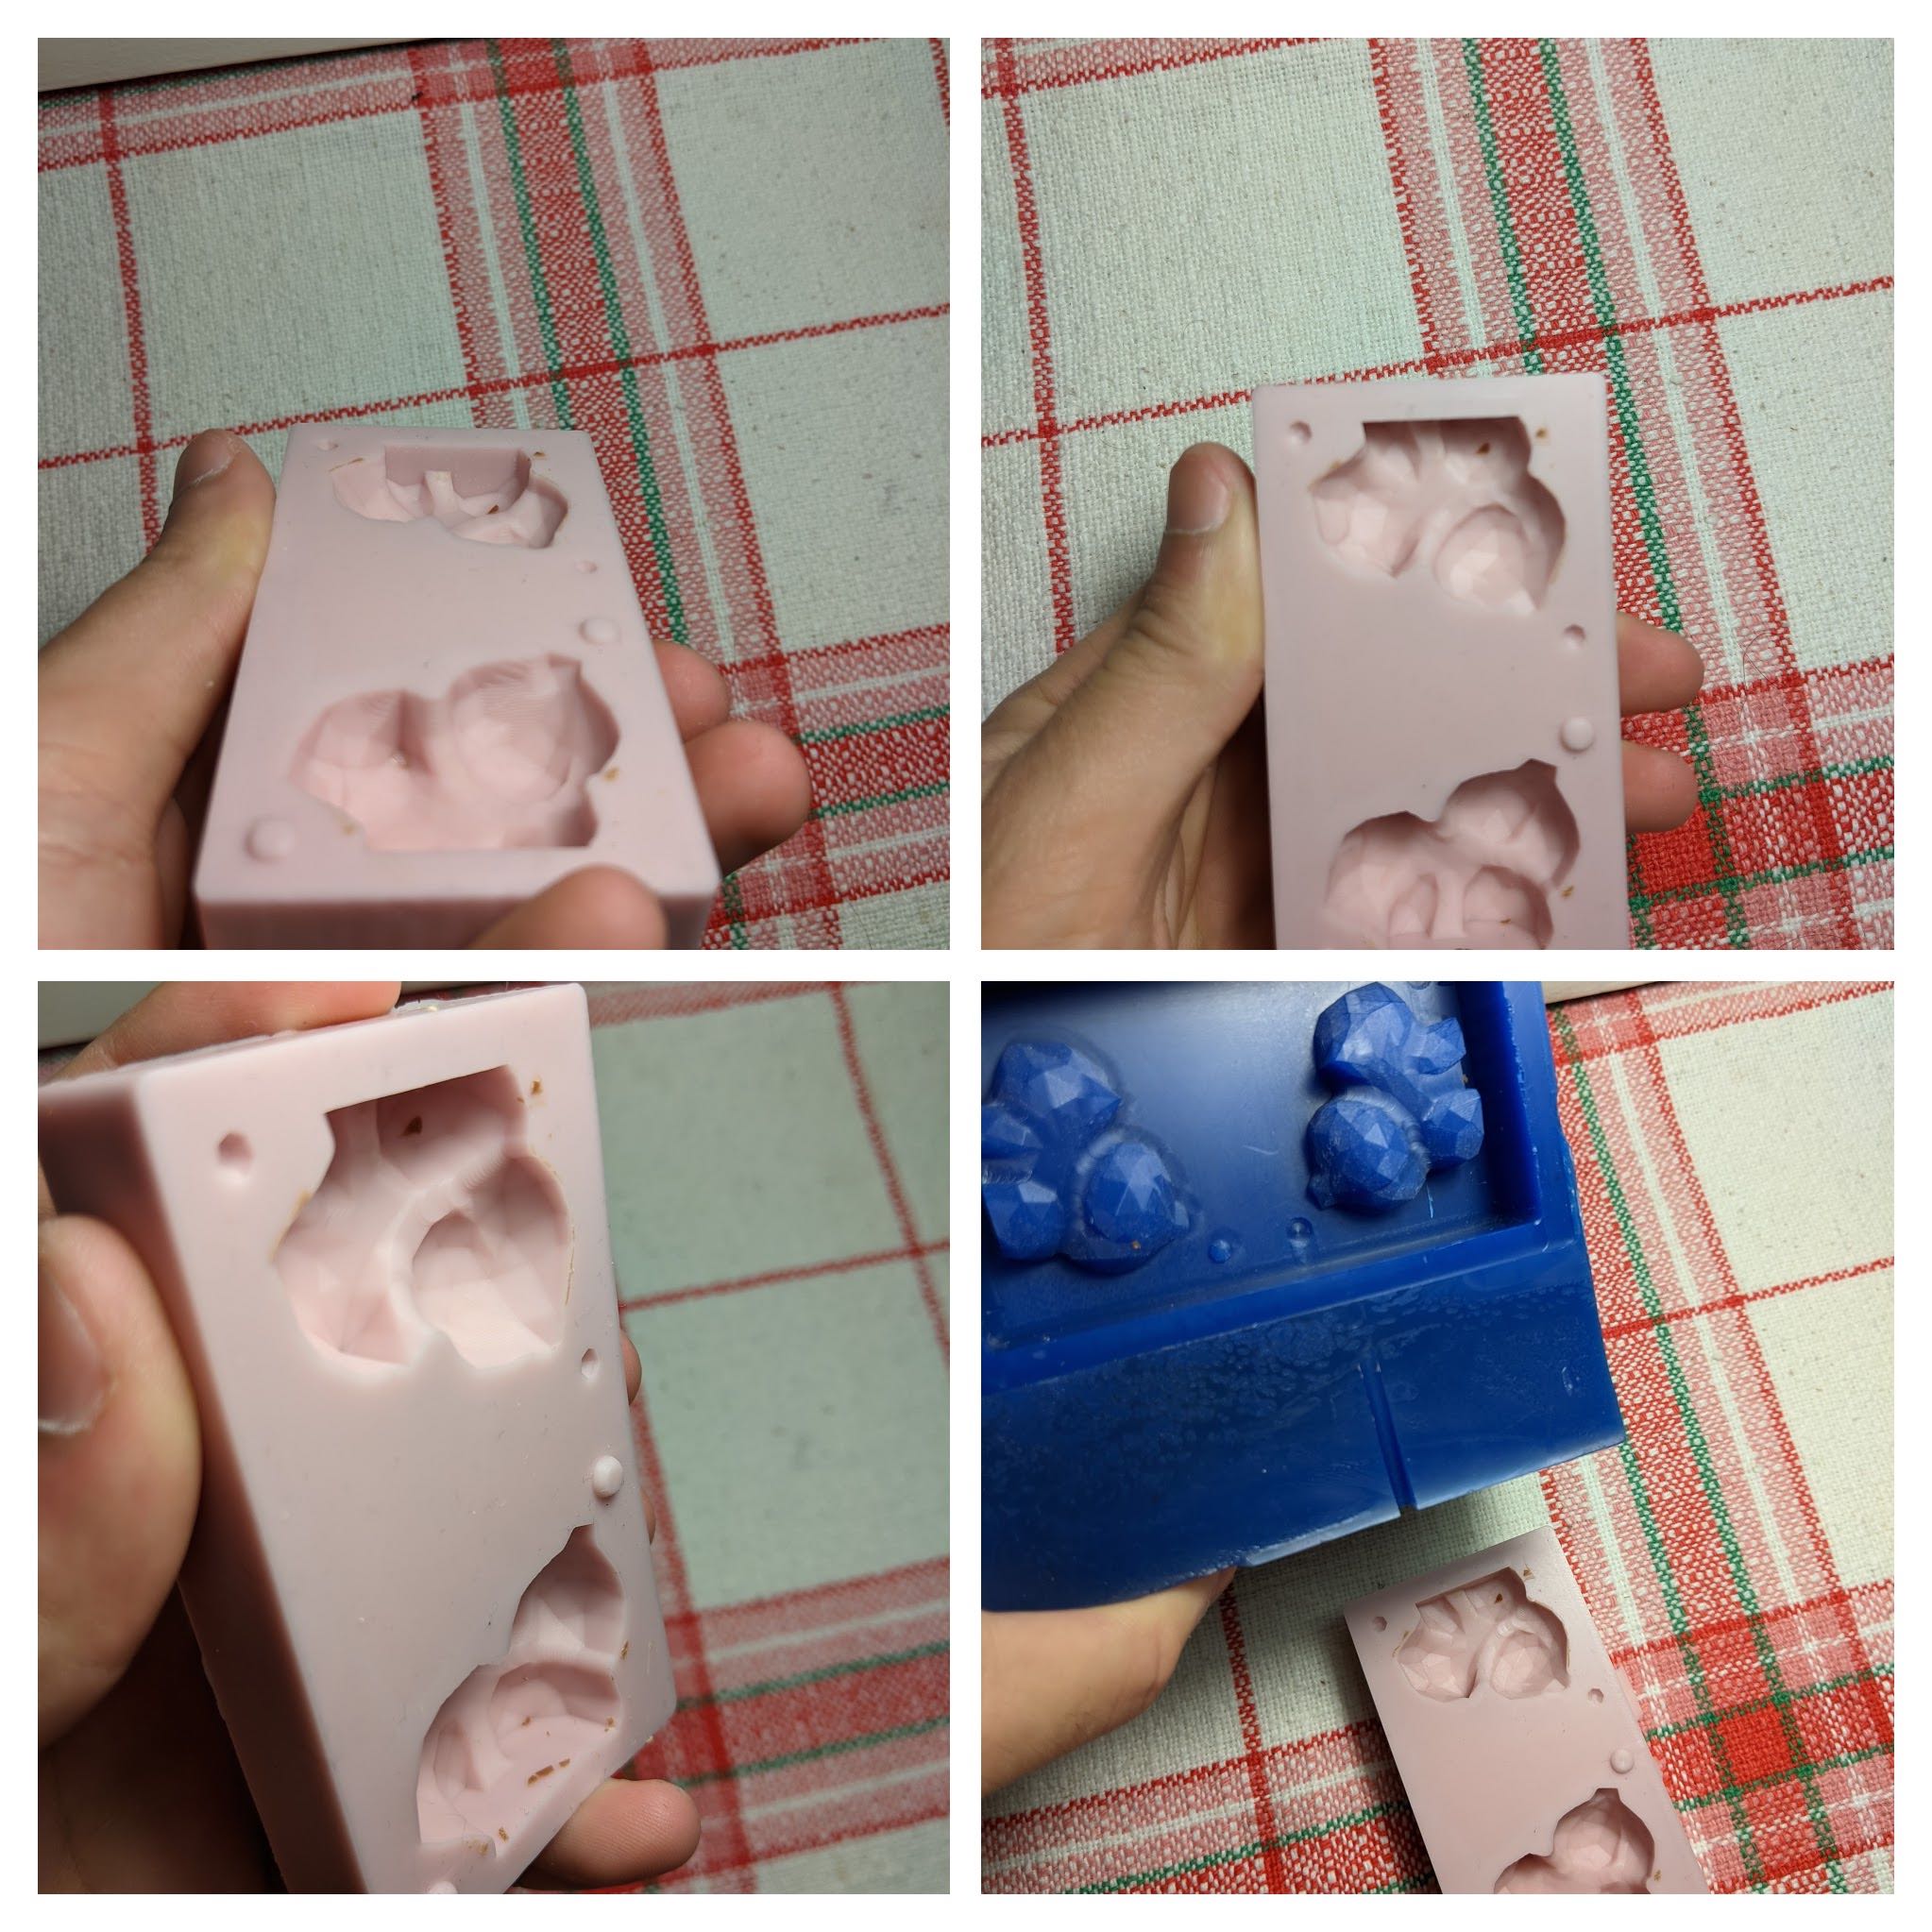
Tip
The Final Silicone Mold turned out to be great! The results were satisfying.
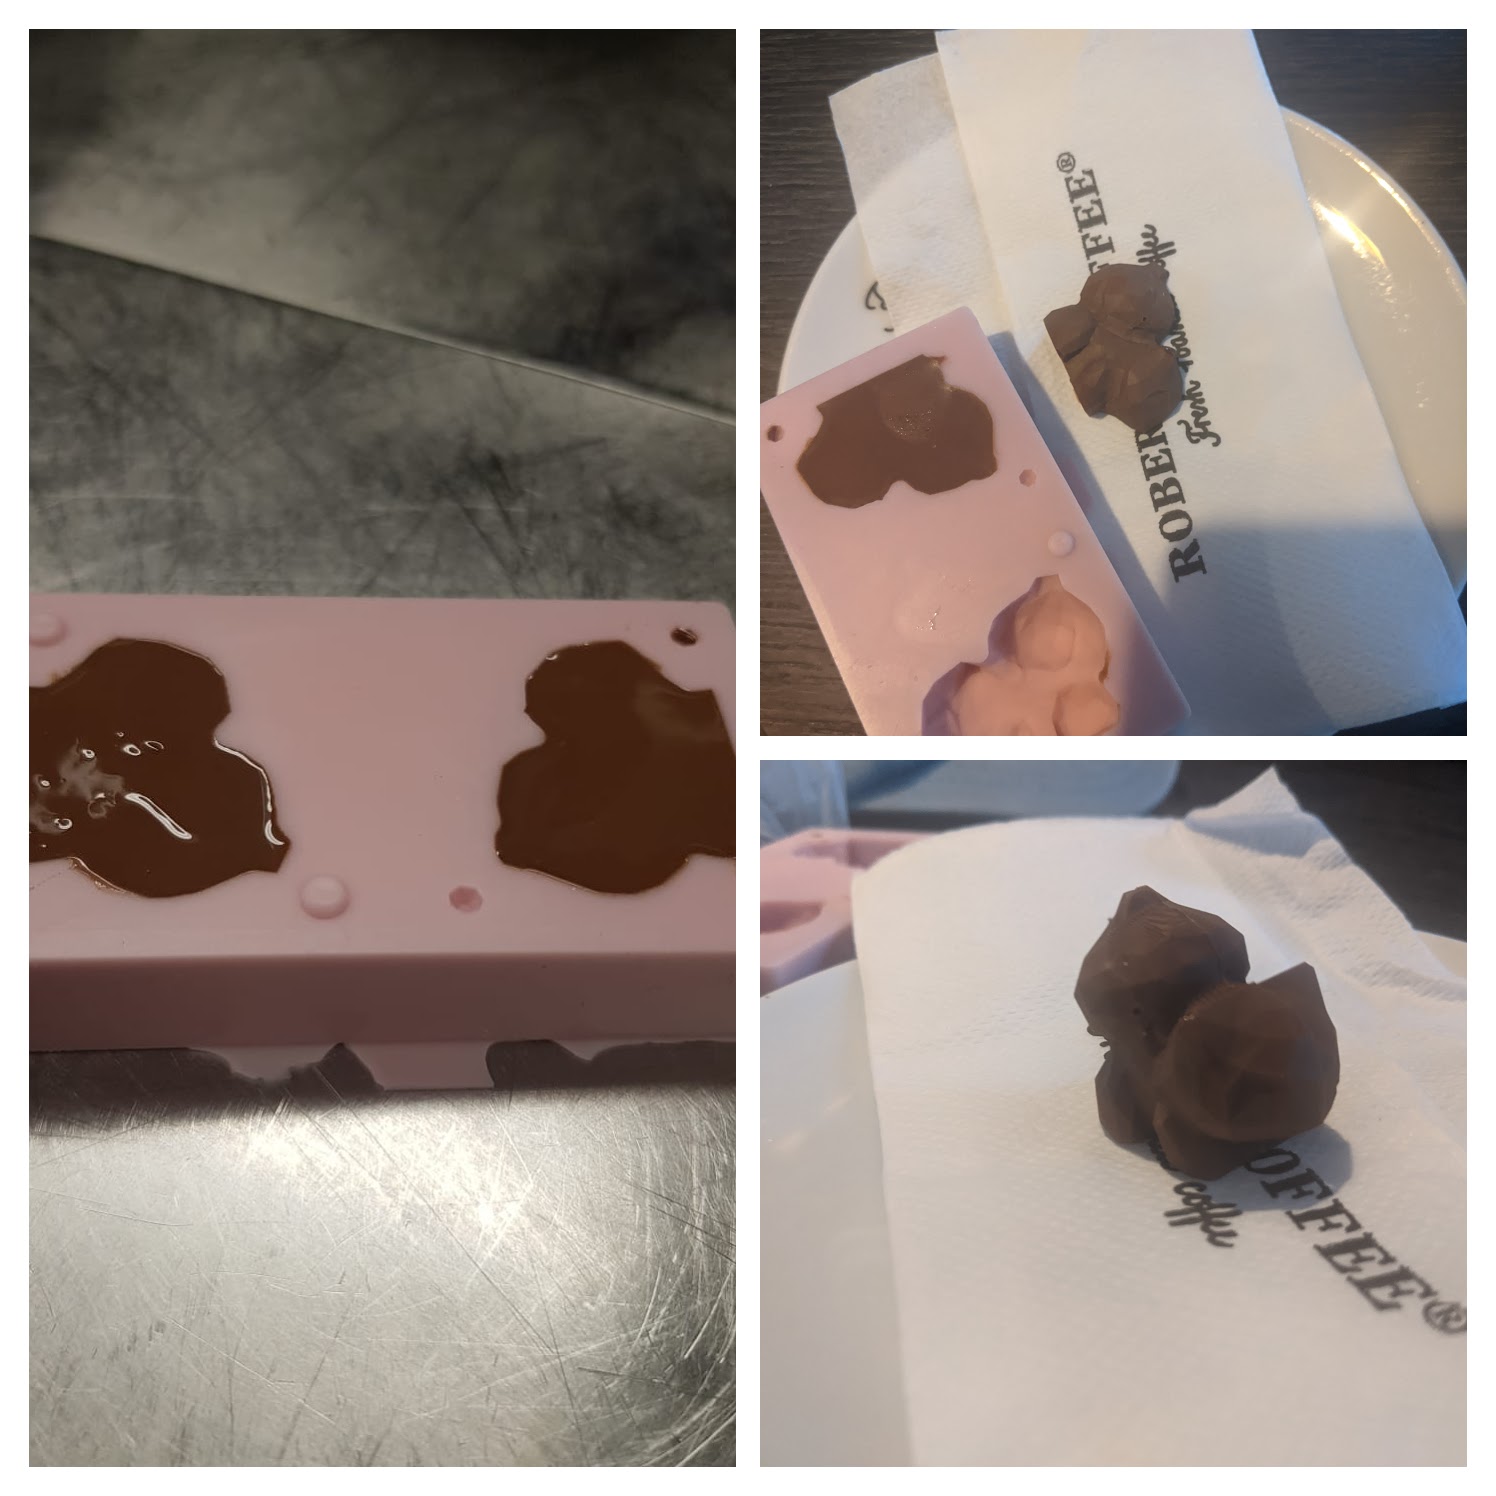
Casting
Nutella Spread was used as Casting material. After “spreading” the chocolate, it was put in the fridge for to harden. Results can be seen below.
Reflection
Molding and Casting has been a great experience. Even though it is time consuming, it is extremely satisfying. The final result was good and surprisingly cute.
Files
Group Work
https://fabacademy.org/2020/labs/oulu/students/zhengya-gong/assignments/week15/#group-assignment_1